
Becasmart BHT-8000RF-VA wireless rf Thermostat

IN THE BOX
- Display panel*1
- Receiver*1
- Bracket*1
- Screw*2
- QC passed*1
- Manual*1
- USB*1
- Non-marking hook*2
ABOUT YOUR THERMOSTAT
BHT-8000RF is suitable for electric heating, water heating, wall-hung boilers and boiler temperature control systems. It can be used in smart homes, shopping malls and industrial sites. Before use, please confirm the specific model of this product and the corresponding heating equipment. Please refer to the wiring diagram to identify the model or contact the merchant.
Note: The USB and Battery used in the display panel cannot be powered at the same time, you need to select one of them
FEATURES
- . No need to reserve a cassette or punch for installation;
- The display panel can be moved at will;
- Temperature control accuracy (±0.5℃), providing the warmth you want;
- Support power-off protection, and the information will not be lost when power-off suddenly;
- Programming mode, 6 periods a day Programmable setting, ECO, less cost, smarter and more environmentally friendly;
- Support: Tmall, Amazon echo, Google Home, Yandex Alice, Xiaodu Smart;
MODEL DEFINITION
- GA: Water heating, 3A;
- GB: Electric heating, 16A;
- GC: Dry contact gas/water boiler, 3A;
- GAB: Electric heating + Water heating;
- GBC: Electric heating + Dry contact gas/water boiler
- GAC: Floor water heating + Dry contact gas/water boiler, Water heating only applies to NC valves;
- W: APP wifi control
- VA VA Display Example: BHT-8000RF-VA-GAW
TECHNICAL DATA
|
Receiver Power Supply |
95 240 V AC
50 60 Hz |
Receiver Current Load |
3 A(water heating/ waterboiler/gas boiler) 16 A electric heating |
|
LED Panel power supply |
2*AA Battery/USB |
Temperature control accuracy |
0.5℃ |
|
Temp. Error |
±1℃ |
Sensor |
NTC3950,10K |
|
Timing Error |
<1% |
Set Temp. Range |
5 35℃ |
|
Working Ambient T emp/
Humidity |
0 45℃ 5 95% RH
Non-Condensing |
Power consumption |
<1.5W |
|
LED Panel Material |
PC+ABS Fireproof |
Receiver Installation |
Wall-mounted |
|
Protection Class |
IP20 |
Buttons |
Capacitive Touch Buttons |
|
Screen |
VA |
DIMENSION 
BEFORE WIRING AND INSTALLING
- . Please confirm that this product is suitable for your heating equipment before installation;
- . Be sure to keep the power off before installation or maintenance;
- Please strictly follow the wiring diagram for wiring installation;
- When installing to the wall, please confirm that it is fastened and suitable for this product;
- . Do not pull the cable hard, otherwise, it will cause damage to the product;
- . If a hard plastic wire is used in the installation process, it must be bent to an appropriate angle in advance;
- Please arrange professional installation;
- . Please contact the after-sales service for equipment failure, please do not try to repair it yourself;
- After installation, please refer to this manual to check again to ensure normal safety
WIRING
- Power supply: 95~220V, 50/60Hz;
- maximum load : 16A ,for electric heating film, cable, tile.
- maximum load : 3A, for water valve actuator ;
- maximum load : 3A, for wall-hung boiler;

INSTALLATION
- Wall-mounted installation steps:
- Remove the battery cover
- Install 2*AA batteries
- Install the battery cover
- Fix the traceless hook on the wall, then hang the product
HOME SCREEN QUICK REFERENCE
- The wifi version can display weather information. The Wifi version connects to the Internet for the first time, and the weather data is uploaded to the thermostat after the thermostat runs for 3-4 minutes. After connecting to wifi, the weather information will be updated every 30 minutes.
- When the wifi version is connected to the Internet, click the display the current humidity information in the upper left corner

DISPLAY PANEL OPERATION
- Power: Press the
 to control the power on/off of the display panel.
 - Note: When the display panel is powered by battery, after 20 seconds of no operation, the panel will stop and enter the energy-saving state, the APP will be locked, click on the APP to unlock the APP;
- When the display panel is powered by USB, the APP will not be locked.
- The display panel uses 2*AA for power supply. If the battery voltage is insufficient, the screen will display an icon. Please replace the battery in time.
- Manual & programming mode Press to switch manual mode programming mode. Manual mode: the user sets the temperature by himself; Programming mode: The thermostat will control the temperature according to the preset value. See “Programming Set” for details.

- Temp. Set: Press
 to set the temperature. Only in manual mode, the temperature can be set arbitrarily.
 - Time Set: press to enter time setting, press to adjust the value, respectively for minutes, hours, and days (the screen displays “1” for Monday, “2” means Tuesday, and so on) for setting. After the adjustment is complete,
- press to exit the time setting WiFi version, the local network time will be automatically synchronized when connecting to the network for the first time.
- Programming Set WiFi version can be set in APP. Non-wifi version, press 4 times to enter the programming mode setting. At this time, the screen displays (MON.TUE.WED.THU.FRI), the “minute” of the time flashes, and the period
- Press again to select and set the hour, temperature, and period. Press to adjust the corresponding value. Press once more to confirm and exit.
Default settings for program schedule
|
Time display |
MON.-FRI. (①②③④⑤ shows on screen) |
SAT. (⑥shows on screen) |
SUN. (⑦shows on screen) |
|||
|
TIME |
TEMP. |
TIME |
TEMP. |
TIME |
TEMP. |
|
| Period 1 | 6:00~8:00 | 20 | 6:00~8:00 | 20 | 6:00~8:00 | 20 |
| Period 2 | 8:00~11:30 | 15 | 8:00~11:30 | 20 | 8:00~11:30 | 20 |
| Period 3 | 11:30~13:00 | 15 | 11:30~13:00 | 20 | 11:30~13:00 | 20 |
| Period 4 | 13:30~17:00 | 15 | 13:30~17:00 | 20 | 13:30~17:00 | 20 |
| Period 5 | 17:00~22:00 | 22 | 17:00~22:00 | 20 | 17:00~22:00 | 20 |
| Period 6 | 22:00~6:00 | 15 | 22:00~6:00 | 15 | 22:00~6:00 | 15 |
RECEIVER OPERATION
- Power: Press the “left button” to control the receiver on/off. When the Power light is on, it means it is turned on, otherwise, it is turned off.
- When the receiver is turned on, press and hold the “right button” to enter the code matching between the display panel and the receiver.
- At this time, IP Setting flashes red, see the following “Setting the Functions and Options” for details
- When the receiver is off, long press the “right button”, the receiver enters the Wi-Fi network configuration state, the Wi-Fi light will flash quickly
- (AP mode) or the Wi-Fi light will display slowly (EP mode), see the wifi connection process below for details.
Setting the Functions and Options
When the display panel is off, press and at the same time for 5 seconds to enter the advanced selection setting. Press
![]() to select the function, and press or to adjust the corresponding value. All advanced options settings will take effect automatically after restarting the thermostat. Note: Item 1.2.3 of Setting the Functions and Options is the code-matching connection setting of the display panel and the receiver. Code matching connection steps: 1. The first item is set to 1; the second item is the serial number of the thermostat 0-99, as long as the serial numbers of the two thermostats are different; the third item does not need to be set. After the display panel completes the above operations when the receiver is turned on, press and hold the right button for 5 seconds, and the IP setting flashes red light to indicate the start of code matching, and the steady red light indicates that the code matching is completed. Then check the 3rd item of the advanced options on the display panel, and 1 is displayed, indicating that the code is matched successfully.
to select the function, and press or to adjust the corresponding value. All advanced options settings will take effect automatically after restarting the thermostat. Note: Item 1.2.3 of Setting the Functions and Options is the code-matching connection setting of the display panel and the receiver. Code matching connection steps: 1. The first item is set to 1; the second item is the serial number of the thermostat 0-99, as long as the serial numbers of the two thermostats are different; the third item does not need to be set. After the display panel completes the above operations when the receiver is turned on, press and hold the right button for 5 seconds, and the IP setting flashes red light to indicate the start of code matching, and the steady red light indicates that the code matching is completed. Then check the 3rd item of the advanced options on the display panel, and 1 is displayed, indicating that the code is matched successfully.
|
Code |
Function |
Setting and options |
Default |
|
1 |
Code confirmation |
00 Not code matching 01 start code matching |
00 |
|
2 |
Device ID |
0-99 |
00 |
|
3 |
Code Matching Succeeded |
00: code matching failed 01: successful code pairing |
Can only be viewed. |
|
4 |
Temperature compensation |
-9~9℃ |
-2 |
|
5 |
Deadzone Temp. |
1~5℃ |
1 |
|
6 |
Min.Set Temp. |
5~15℃ |
5℃ |
|
7 |
Max.Set Temp. |
15~35℃ |
35℃ |
|
8 |
Standby Brightness |
3-99 |
4 |
|
9 |
Energy saving Mode |
00:OFF
01:ON |
00 |
|
10 |
Energy saving Temp. |
5~30℃ |
20 |
|
11 |
All icons are displayed wh en booting |
00: Closed 01: Open |
00 |
|
12 |
Restore factory settings |
00: normal mode, 01: factory mode |
00 |
|
13 |
Version NO. |
U2 |
ABOUT WIFI
Note that the wifi link process needs to be operated after the display panel and the receiver are connected with the code.
WI-FI CWI-FI CONNECTION CONNECTION
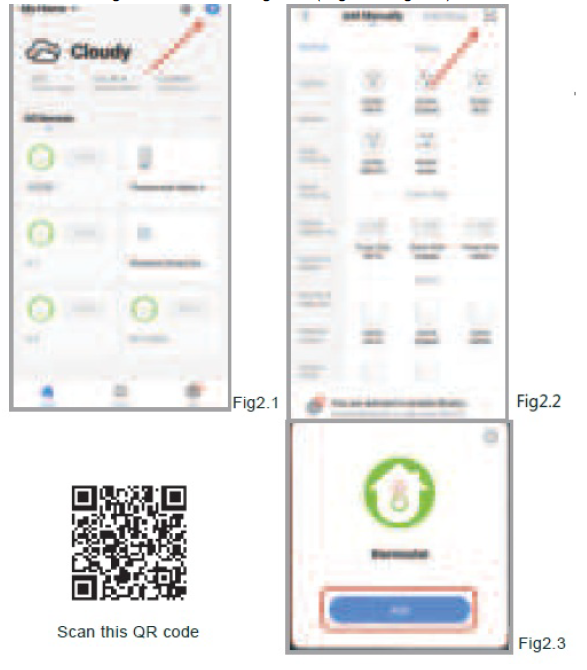
Before using your Wi-Fi thermostat for the first time, you must configure the Wi-Fi signal and settings through your smartphone or tablet, This will allow communication between your connected devices
Step 1 Download your APP Fig1-1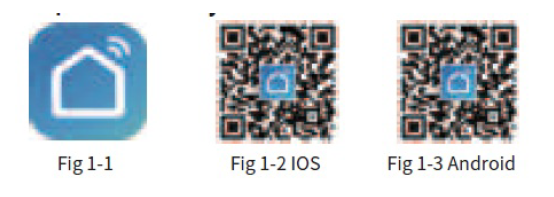
Step 2. Connect the thermostat
- Check the tutorial below to complete the connection and setup.
- Method 1: Scan the QR code to configure the network guide
 Method 2: Ordinary distribution network guidance
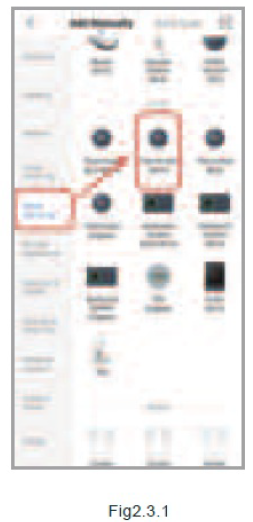
Network distribution mode
EZ Mode
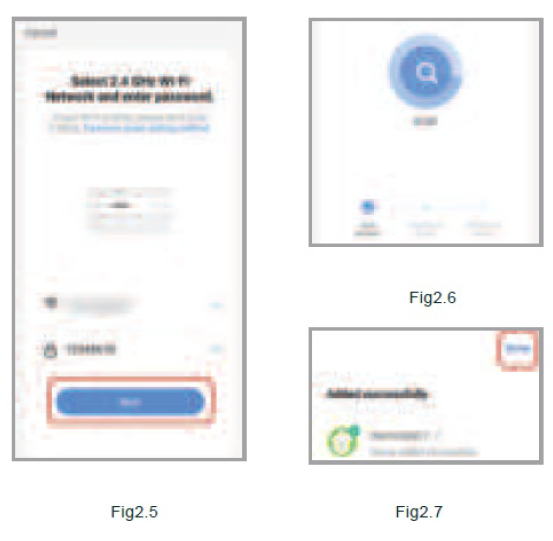
With the receiver turned off, press and hold the “right button” until the wifi light of the receiver flashes quickly, and then operate according to the following figure (Fig 2.4-Fig 2.7)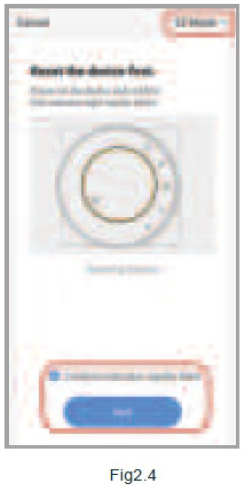
AP Mode
With the receiver turned off, press and hold the “right button” until the wifi light flashes slowly, and then follow operate as shown in the figure below (Fig 2.8-Fig 2.14).


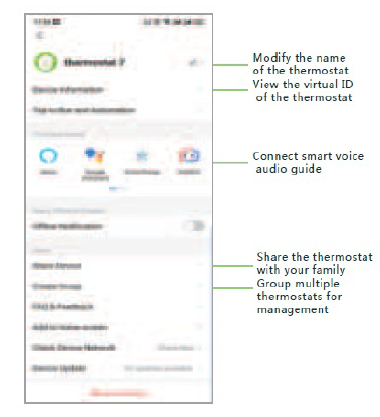
APP OPERATION INTERFACE DESCRIPTION (HEATING THERMOSTAT)

MORE SEMORE SETTTINGSTINGS
SIMPLE SIMPLE EXCEPTION HANDLING OPTION HANDLING
| No. | Phenomenons | Handling |
|
1 |
The display panel can be operated but the receiver does not respond | Check advanced option item 3, display panel and receiving |
| 2 | The phone cannot control the thermostat | Check if the APP is locked, click “lock” |
|
3 |
Room temperature is different from actual temperature |
Adjust temperature compensation in item 4 of advanced settings |
SERVICE
24-month warranty since date of purchase Service beyond the warranty period may need a charge. For more details, please contact us.
REFERENCE
DOWNLOAD MANUAL
Becasmart BHT-8000RF-VA wireless rf Thermostat User Manual
![]()
Leave a Reply