
Becasmart BAC-006 Series Room Smart Thermostat

For Fan Coil Unit
Welcome
Thank you for your purchase. Your new thermostat will provide uniform and comfortable temperature control throughout every room on your property. We bring together technology, and materials to provide you with a safe, reliable product combined with a sleek, contemporary design.
In the box, you will find
- Thermostat 1pc
- Screws 1pc
- User Guide 1pc
- Wallplate 2pc
- QC Passed 1pc
ABOUT YOUR THERMOSTATS
BAC-006 series Modern Round Touch Screen Room Thermostats temp. as reaching the aim of comfort and saving energy
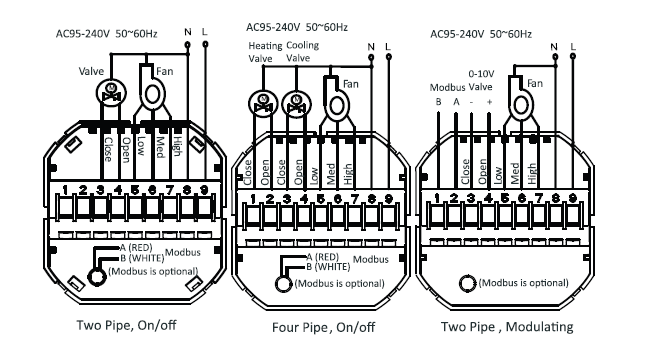
- A: Two pipes; Control Fan Coil Unit and Two Wired Motorized Valve
- M: Two pipes; Control Fan Coil Unit and 0-10V Motorized Valve
- E: Four pipes; Control Fan Coil Unit and Two Wired Heat Valves and Two Wired Cool Valve.
W: Wlfl connection
- K: Keycard
- W2 : Window
- E: External Sensor
- T: Clock
- P: Programmable
- For example BAC-006AW
FEATURES
On Appearance
- 86mm hidden box and a European 60mm round box are suitable.
- Full white appearance, perfectly integrated into your family.
- LED matrix light, simple display, energy saving, protects your eyes.
- Touch buttons to make simple operation.
- Amazing Silver Frame opens your modern life.
- The visible thickness above the wall is only 12mm.
- Interlock to connect gives you easy installation.
On Functionality
- 0.5℃ Accuracy keeps the temperature within the level you set.
- Data memory when power is off.
- 5+1+1 six periods programmable maximize comfort and economy.
- Temporary programmable.
- All setting languages synchronize your time zone, address, and language.
- No limit to adding thermostats in the App and supporting Smart Scene.
- Create a thermostat group to Centralize control.
- Integrate with Amazon Echo, Google Home, and Tmall Genie.
- Support device sharing.
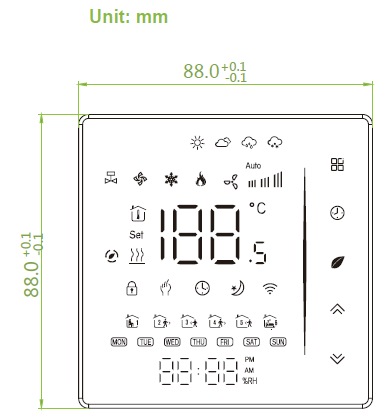
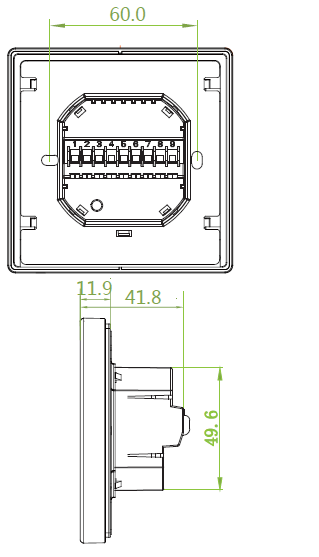
DIMENSION
TECHNICAL DATA
- Power Supply: 95 ~ 240 VAC, 50 ~ 60HZ
- Fan Relay Amps Resistance: 5A; Inductive: 3A
- Valve Relay Amps Resistance: 3A; Inductive: 1A
- Sensor: NTC3950, 10K
- Set Temp. Range: 5 -35 ℃
- Accuracy: ±0.5 ℃
- Display Temp. Range: 5 ~ 99℃
- Ambient Temp.:0~45 ℃
- Ambient Humidity: 5 ~ 95 % RH (Non-Condensing)
- Storage Temp.:-5~ 45 ℃ Timing Error: < 1%
- Power Consumption: <1.5W
- Shell Material: PC +ABS ( Fireproof)
- Installation Box: 86 * 86mm Square or European 60mm Round Box Wire Terminals: Wire 2 X 1.5 mm² or 1 x2.5 mm²
- Protection Class: IP20
- Buttons: Capacitive Touch Buttons
BEFORE WIRING AND INSTALLING…
- Read these instructions carefully. Failure to follow them could damage the product or cause a hazardous condition.
- Check the ratings given in the instructions and on the product to make sure the product is suitable for your application.
- Installer must be a trained, experienced service technician.
- After installation is complete, check out product operation as provided in these instructions.
CAUTION
Electrical Shock or Equipment Damage Hazard. Can shock individuals or short equipment circuitry.
WIRING
INSTALLATION
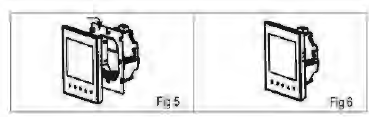
Your thermostat is suitable for installation within a standard 86mm pattress box or European 60mm pattress box,
Step 1. Keep the electricity off. See Fig 1.
Step 2. Remove the mounting Plate by rotating the LCD.part. See Fig 2.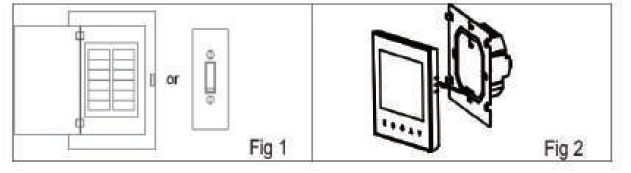
Step 3. Connect the power supply, and load it into the appropriate terminals. (see Wiring your thermostat for details and Fig 3). the box. See Fig 4.
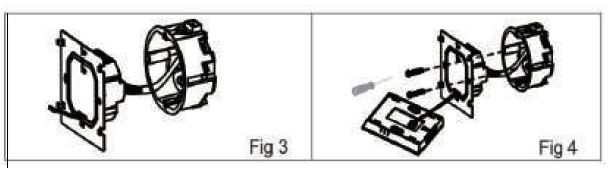
Step 6. Installation complete. See Fi& 6.
HOME SCREEN QUICK REFERENCE
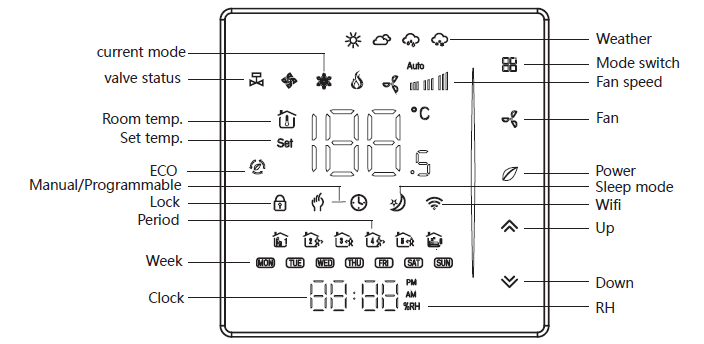
Note: The weather and humidity will be synchronized within 1 hour after the device is connected to the Internet for the first time and the weather will be synchronized every hour thereafter. Press the![]() in the power-on state to display the humidity and set 88.0+0.1 temperature
in the power-on state to display the humidity and set 88.0+0.1 temperature
OPERATION
OPERATION
- Power On/off: Press
 to turn the thermostat on/off.
 - Manual & Programmable Press and hold
 will
will  flash. Press
  to select manual and press to select weekly programmable.
 - Setting Temperature In the mode of the manual, press
 to set the temperature. will display below the middle of the screen.
 - Locking your Thermostat Press
 and hold them for 5 seconds to lock/unlock your thermostat. In item 3 of high senior options, you can select full lock or half lock.
 - Select System Mode Press to change the system mode HEATING, COOLING, and VENTILATION. In the mode of VENTILATION, the valve is off but the fan runs.
- Setting the Fan Speed
 Press to go to select the fan speed AUTO, HIGH, MED, LOW.
 - Set Clock Press and a hold will flash. Press
 to set minutes, hours, and weekdays. by using the arrows, after 3 seconds the value will be confirmed automatically. the relative values.
Your thermostat provides six scheduled heating and cooling periods each day three Comfort periods – 1, 3 & 5 (the temperature required when the room is occupied) and three Economy periods – 2, 4 & 6 (the temperature schedules can only be carried out when in program mode; Touch (mode) to change between manual mode the screen. Touch the icon period Press the icon and use the arrows to set the temp. for the 1st period. Repeat this process for periods 2 – 6. Press the icon the top of the screen). Repeat the above process to set the weekend schedule. Press once more to confirm and exit
|
Time display |
WEEKDAY (MONDAY – FRIDAY)
(1 2 3 4 5 shows on screen) |
WEEKEND (SATURDAY)
(6 shows on screen) |
WEEKEND (SUNDAY)
(7 shows on screen) |
|||
| TIME | TEMPERATURE | TIME | TEMPERATURE | TIME | TEMPERATURE | |
| Period 1 | 06:00 | 20。C | 06:00 | 20。C | 06:00 | 20。C |
| Period 2 | 08:00 | 15。C | 08:00 | 20。C | 08:00 | 20。C |
| Period 3 | 11:30 | 。
15 C |
11:30 | 。
20 C |
11:30 | 。
20 C |
| Period 4 | 13:30 | 。
15 C |
13:30 | 。
20 C |
13:30 | 。
20 C |
| Period 5 | 17:00 | 22。C | 17:00 | 20。C | 17:00 | 20。C |
| Period 6 | 22:00 | 15。C | 22:00 | 15。C | 22:00 | 15。C |
Then press to change the different items.
| Code | Function | Setting and options | Default | |
| 1 | Temperature
compensation |
-9 to 9 ℃ | -3 | |
|
2 |
Fan control |
00:When room temp. reaches the set point,the fan will turn off
01:When room temp. reaches the set point,the fan will keep low speed running. |
00 |
|
| 3 | Button Locking | 00:All buttons are locked except power button.
01:All buttons are locked. |
1 | |
| 4 | Mode Select Custom | 00:Cooling / Ventilation.
01:Cooling / Heating / Ventilation. |
01 | |
| 5 | Min.Set Temp. | 5-15℃ | 5 | |
| 6 | Max.Set Temp. | 15-45℃ | 35 | |
| 7 | 12/24 hours | 00:12h 01:24h | 01 | |
| 8 | Display Mode | 00: Display both set temp. and room temp.
01: Display set temp. only |
00 | |
| 9 | Energy-saving Mode | 00:Energy saving Mode 01:Non-energy saving
Mode |
00 | |
| A | Heating Energy-saving temperature | 10-30℃ | 20 | |
|
B |
Cooling Energy-saving temperature |
10-30℃ |
26 |
|
| C | Daytime display
brightness(6:00-22:00) |
0-8 | When set to 0, the device will run
for 10 seconds after inactivity. |
1 |
| D | Brightness at night (22:00-6:00) | 0-8 | The screen will go completely
off with no display. |
0 |
| E | Deadzone Temp. | 1-5 ℃ | 1 | |
| F | Version number | U3 | ||
ABOUT WIFI
WI-FI CONNECTION
Before using your Wi-Fi thermostat for the first time, you must configure the Wi-Fi signal and settings through your smartphone or tablet,This will allow communication between your connected devices
Step 1 Download your APP(Fig1-1)
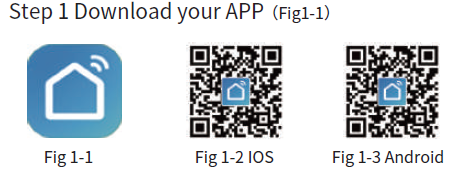
Search for “Smartlife” in Apple Store or Google Play or use a browser to scan the QR code above (Figure 1-2), and complete account registration and installation according to the guidance of the APP.
Step 2. Connect the thermostat
Check the tutorial below to complete the connection and setup.Method 1: Scan the QR code to configure the network guide (Fig 2.1-Fig 2.3)
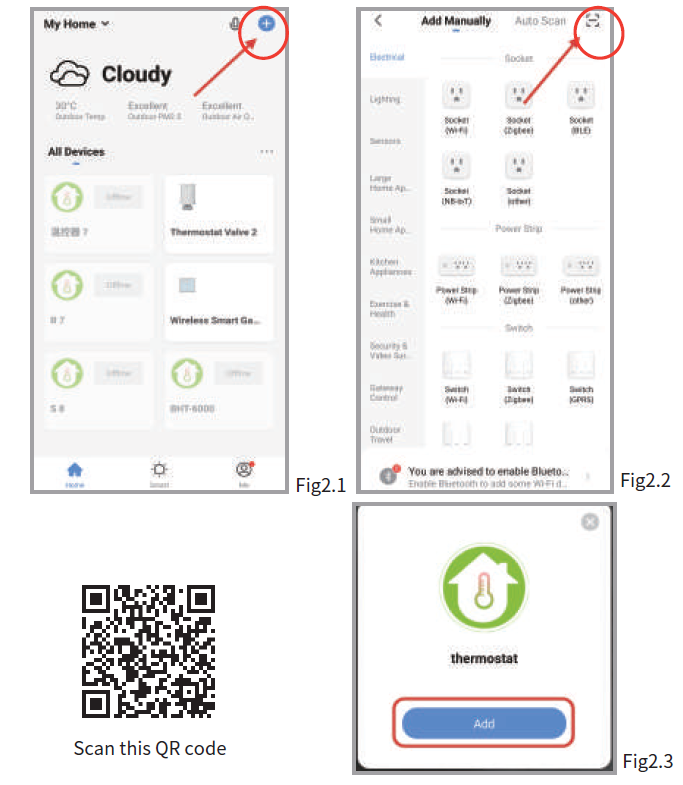
Method 2: Ordinary distribution network guidance
(Fig. 2. 1&Fig. 2.3.1)

Network distribution mode:
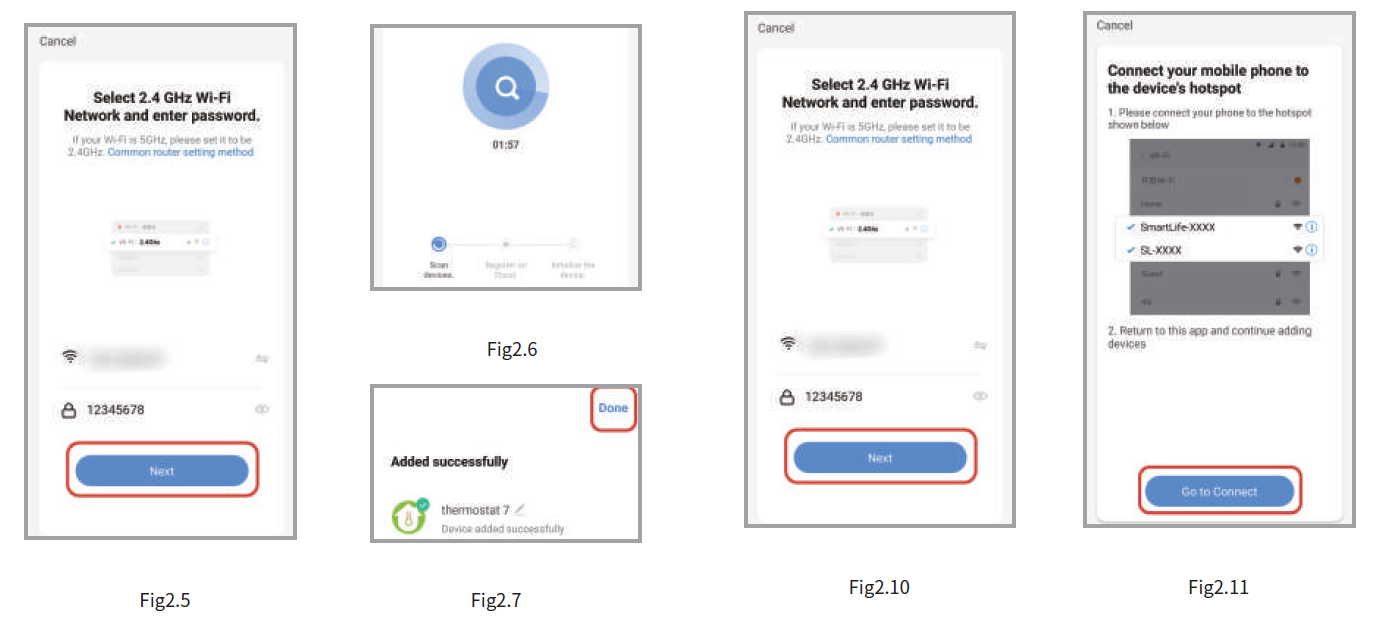
EZ Mode
When the thermostat is off, press and hold ![]() until the thermostat screen flashes quickly and displays the ”
until the thermostat screen flashes quickly and displays the ” ![]() ” icon, and then operate according to the following figure (Fig 2.4-Fig 2.7).
” icon, and then operate according to the following figure (Fig 2.4-Fig 2.7).

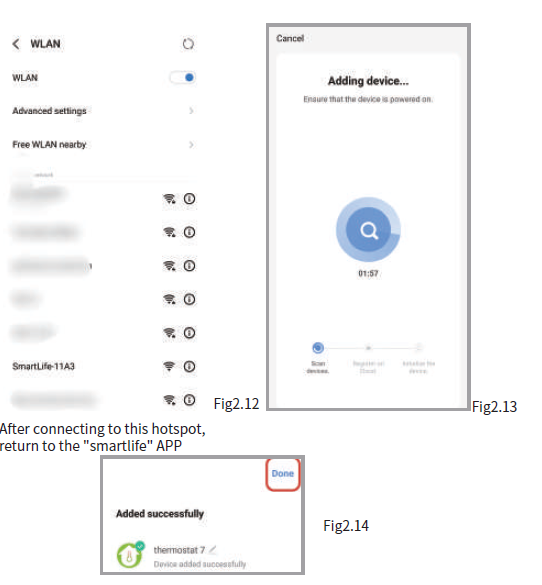
AP Mode
When the thermostat is off, press and hold the ”  ” until the thermostat screen flashes slowly and the ”
 ![]() ” icon is displayed (if the ”
” icon is displayed (if the ”  ” icon appears, continue to press the “ ” until the thermostat screen Flashes slowly and displays the “
  ” icon), and then operate according to the following figure (Fig 2.8-Fig 2.14).
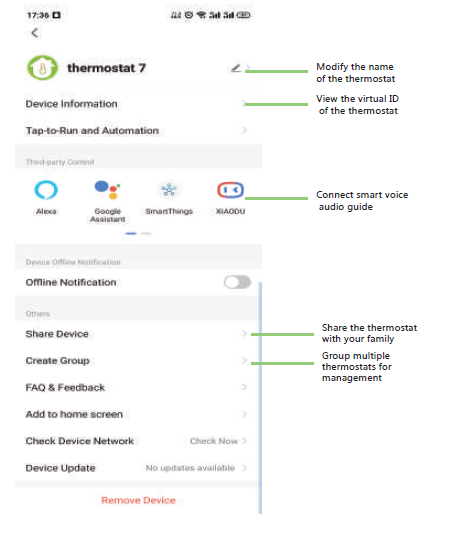
APP operation interface description
(FCU thermostat))
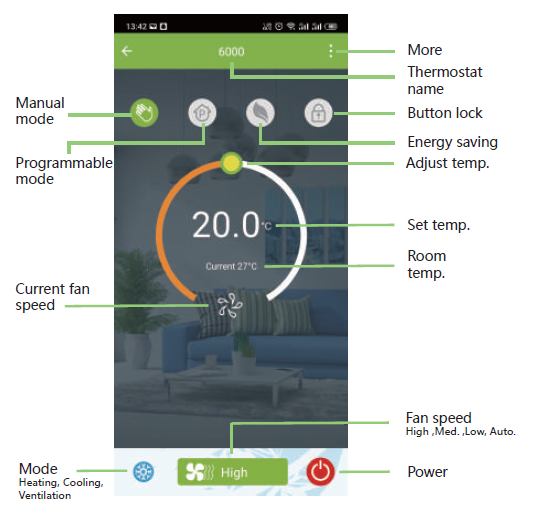
More settings
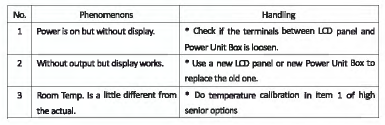
SIMPLE EXCEPTION HANDLING
SERVICE
Your thermostat carries a 24-month warranty from the date of purchase. Service outwith the warranty period may incur a charge. For more detail please contact us directly.
REFERENCE
DOWNLOAD MANUAL
Becasmart BAC-006 Series Room Smart Thermostat User Guide
![]()
Leave a Reply