
![]()
Becasmart BAC-005 Series Room Smart Thermostat

INTRODUCTION
Thank you for your purchase. Please confirm that this product is suitable for your heating equipment before installation; *Before installation or maintenance, please make sure to keep the power off; *Please strictly follow the wiring diagram for wiring installation; *Installation to the wall, please confirm that the fasteners are suitable for this product; *Do not pull the cable too hard, otherwise the product will be damaged; *If a hard plastic wire is used in the installation process, it must be bent to an appropriate angle in advance; *Please arrange for professionals to install; *Please contact the after-sales service for equipment failure, please do not try to repair it yourself; * After installation, please refer to this manual to check again to ensure normal and safe use, and keep this manual properly. In the box you will find
IN THE BOX
- Thermostat 1pc
- QC Passed 1pc
- Screws 2pc
- User Guide 1pc
ABOUT YOUR THERMOSTATS
BAC- 005 series Modern square Touch Screen Room Thermostats are designed to on / off control FCU the fans and valves in air conditioner applications via comparison of the room temperature and setting temp. As reaching the aim of comfort and saving energy.
MODEL DEFINITIONS
- A: Two pipe; Control Fan Coil Unit and Two Wired Motorized Valve
- M: Two pipe; Control Fan Coil Unit and 0-10V Motorized Valve
- E: Four pipe; Control Fan Coil Unit and Two Wired Heat Valve and Two
- Wired Cool Valve.
- N: Modbus RTU communication
- W : Wifi connection
- Example: BAC-005 AW
On Appearance
- Hidden LCD screen.
- Touch operation buttons, the interaction is smoother.
- Weather information display; 2.5D arc chamfer.
- Ultra-thin embedded panel, perfectly fit all kinds of walls.
- Suitable for European-style cassettes & American-style cassettes.
- White is elegant, black is calm and classic
On Functionality
- Modbus, WIFI version, etc.,
- Temperature control accuracy (±0.5℃), provide the temperature you want.
- Power-off protection to avoid loss of settings;
- Weekly 5+1+1 mode preset adjustment, 6-period programmable settings, energy saving, less expenditure, more environmental protection;
- The thermostat supports local grouping/sharing, realizing unlimited centralized control of the number of products;
- Support Tmall, Amazon Echo, and Google Home;
- APP (ios/android) automatically obtains the local temperature and humidity, PM2.5, and creates smart scenes. It supports all regions and languages in the world and provides more comprehensive services
TECHNICAL DATA
- Power Supply: 95 ~ 240 VAC, 50 ~ 60HZ
- Fan Relay Amps Resistance: 5A; Inductive: 3A
- Valve Relay Amps Resistance: 3A; Inductive: 1A
- Sensor: NTC3950, 10K Set Temp. Range: 5 -35 ℃
- Accuracy: ±0.5 ℃ Display Temp. Range: 5 ~ 99℃
- Ambient Temp.:0~45 ℃ Power Consumption: <1.5W
- Shell Material: PC +ABS ( Fireproof) Protection Class: IP20
- Buttons: Capacitive Touch Buttons
- Ambient Humidity: 5 ~ 95 % RH (Non-Condensing)
- Storage Temp.:-5~ 45 CTiming Error: < 1%
- Installation Box: 86 * 86mm Square or European 60mm Round Box
- Wire Terminals: Wire 2 X 1.5 mm² or 1 x2.5 mm²
DIMENSIONS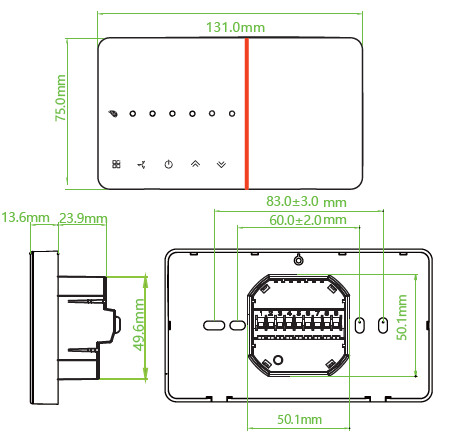
BEFORE WIRING AND INSTALLATION
- Read these instructions carefully. Failure to follow them could damage the product or cause a hazardous condition.
- Check the ratings given in the instructions and on the product to make sure the product is suitable for your application.
- Installer must be a trained, experienced service technician.
- After installation is complete, check out product operation as provided in these instructions.
WIRING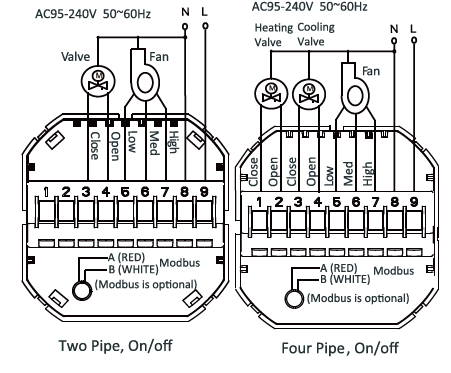
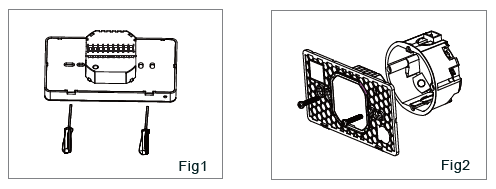
INSTALLATION
- Step 1: Use a screwdriver to pry open the mounting plate along the buckle position. After prying open, connect the cable to the screen and the power box without removing the cable.
- Step 2: Make sure that the wires are without electricity, connect the thermostat with the wires according to the wiring diagram, and then fix the mounting plate on the cassette with screws
 Step 3: Snap the thermostat screen and the mounting plate together to complete the installation. Power on for testing
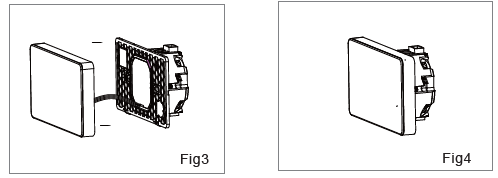
HOME QUICK REFERENCE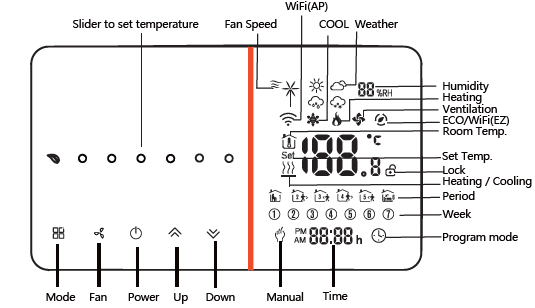
OPERATION
- Power On/off:
- Press “
 ” to turn the thermostat on/off.
- Press “
- Manual & Programmable
- Touch and hold “
 ”,“
”,“  ” icon will flash on the display, Touch “
 ”, select Manual mode . Touch “ ”, select Programmable mode .
- Touch and hold “
- Setting Temperature
- In the mode of manual, press “
 ”to set temperature. will display in below the middle of the screen.
- In the mode of manual, press “
- Adjusting/Setting the Clock
- Touch and hold “ “ ” icon will flash on the display, Press“ ” again to set minute, hour and weekday. By using the“ ”.
- Touch and hold “
- Locking your Thermostat
- Press and hold the for 5 seconds to lock/unlock your thermostat
- In item 3 of high senior options, you can select full lock or half lock
- Press and hold the
- Selecting System Mode
- Press“ ”to change the system mode HEATING, COOLING and VENTILATION.
- In the mode of VENTILATION, the valve is off but the fan runs.
- Press“
- Setting the Fan Speed
- On the Manual mode, Press “
 ” go to select the fan speed AUTO, HIGH, MED, LOW
- On the Manual mode, Press “
Adjusting/Setting the Programmable Schedules
WiFi version can be set in APP. Non-wifi version, Touch and hold “![]() ”,“
”,“ ![]() ” icon will flash on the display, Touch “ ” 4 times to enter the programming mode setting. At this time, the screen displays (①②③④⑤), the “minute” of the time flashes, and the period 1 “
” icon will flash on the display, Touch “ ” 4 times to enter the programming mode setting. At this time, the screen displays (①②③④⑤), the “minute” of the time flashes, and the period 1 “ “. Press “Time” again to select and set the hour, temperature, and period. Press to adjust the corresponding value.
Default settings for program schedule
|
Time display |
MON.-FRI.
(①②③④⑤ shows on screen) |
SAT.
(⑥shows on screen) |
SUN.
(⑦shows on screen) |
|||
| TIME | TEMP. | ON-TIME | TEMP. | ON-TIME | TEMP. | |
| Period 1 | 6:00~8:00 | 20 | 6:00~8:00 | 20 | 6:00~8:00 | 20 |
| Period 2 | 8:00~11:30 | 15 | 8:00~11:30 | 20 | 8:00~11:30 | 20 |
| Period 3 | 11:30~13:00 | 15 | 11:30~13:00 | 20 | 11:30~13:00 | 20 |
| Period 4 | 13:30~17:00 | 15 | 13:30~17:00 | 20 | 13:30~17:00 | 20 |
| Period 5 | 17:00~22:00 | 22 | 17:00~22:00 | 20 | 17:00~22:00 | 20 |
| Period 6 | 22:00~6:00 | 15 | 22:00~6:00 | 15 | 22:00~6:00 | 15 |
Setting the Functions and Options
When the power is off, press “![]() ” and ”
” and ” ![]() ” at the same time for 5 seconds to enter the advanced selection setting. Press “ ” to select the function, press to adjust the corresponding value. All advanced option settings will take effect automatically after restarting the thermostat.
” at the same time for 5 seconds to enter the advanced selection setting. Press “ ” to select the function, press to adjust the corresponding value. All advanced option settings will take effect automatically after restarting the thermostat.
ABOUT WIFI
WIFI CONNECTION
Before using your Wi-Fi thermostat for the first time,you must configure the Wi-Fi signal and settings through your smartphone or tablet, This will allow communication between your connected devices
- Step 1 Download your APP
- Step 2. Connect the thermostat
- Method 1: Scan the QR code to configure the network guide (Fig 2.1-Fig 2.3)
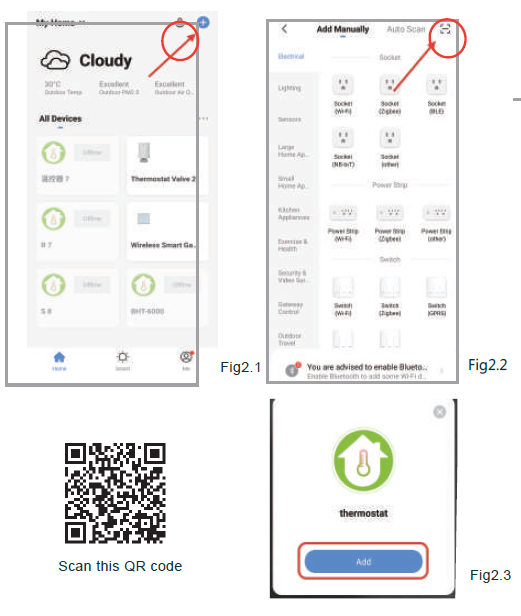
- Method 2: Ordinary distribution network guidance (Fig. 2. 1&Fig. 2.3.1)
Network Distribution mode
EZ Mode
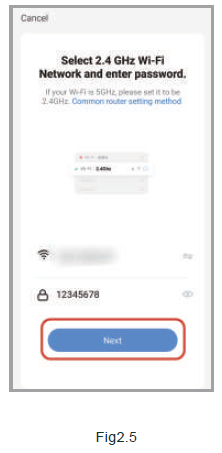
When the thermostat is off, press and hold the ” “until the thermostat screen flashes quickly and displays the ” ” icon, and then operate according to the following figure (Fig 2.4-Fig 2.7).
AP Mode
When the thermostat is off, press and hold the ” ” unt il the thermostat screen flashes slowly and the ” ” icon is displayed (if the ” ” icon appears, continue to press the ” ” until the thermostat screen Flashes slowly and displays the “ ” icon), and then operate according to the following figure (Fig 2.8-Fig 2.14). After connecting to this hotspot, return to the “smartlife”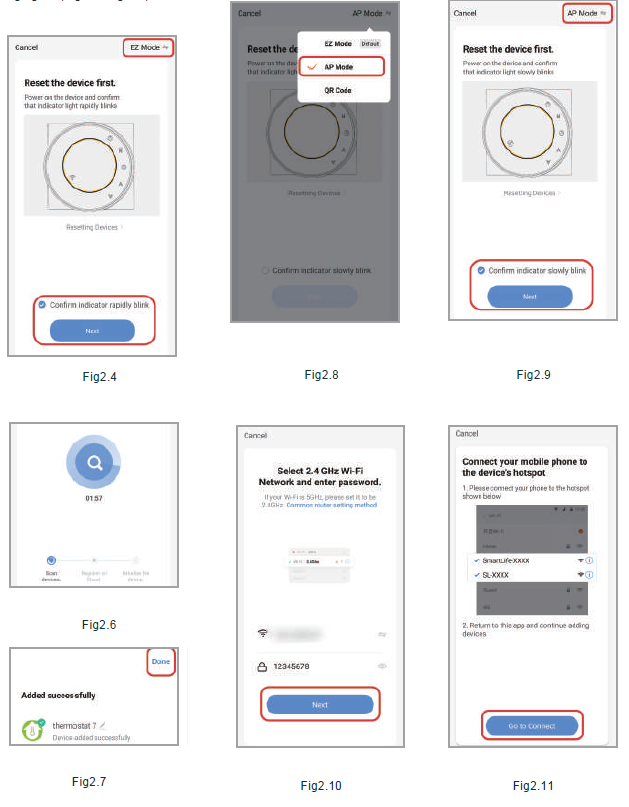
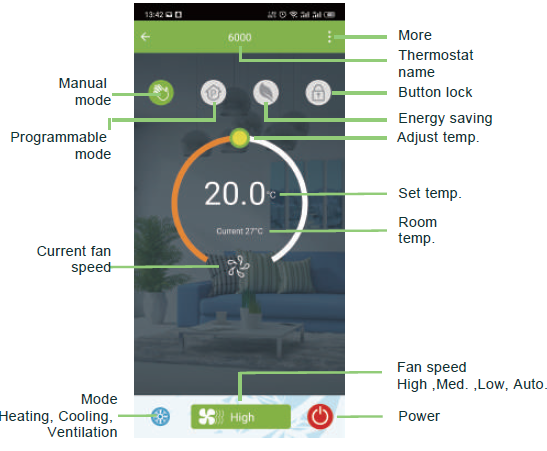
APP operation interface description FCU thermostat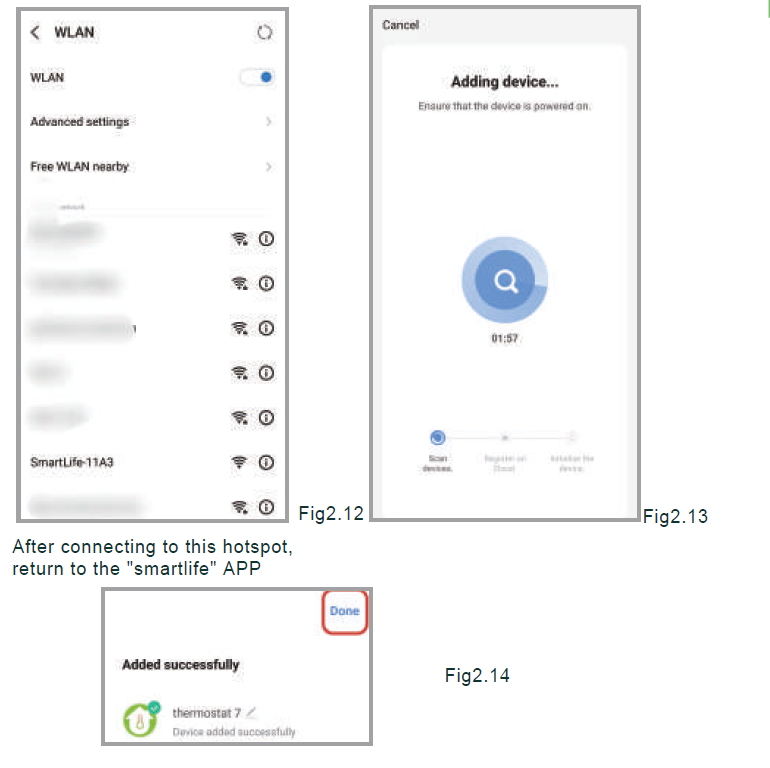
MORE SETTING

SIMPLE EXCEPTION HANDLING
| No. | Phenomenons | Handling |
| Power is on but without display. | * Check if the terminals between LCD panel and Power Unit Box is loosen. | |
| Without output but display works. | * Use a new LCD panel or new Power Unit Box to replace the old one. | |
| Room Temp. Is a little different from the actual. | *Do temperature calibration in item 1 of high senior options |
SERVICE
REFERENCE
DOWNLOAD MANUAL
Becasmart BAC-005 Series Room Smart Thermostat User Guide
Leave a Reply