
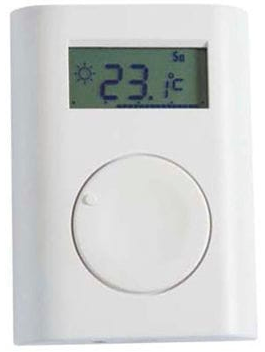
Herz F800-55 Wireless Programmable Thermostat
Introduction
The Herz 3 F800 55 is a wireless programmable thermostat with weekly heating schedule. Goal of the designer were to plan a device which is economic and offers the costumer a high level of comfort. The thermostat is able to realise a constant increase of the room temperature and will automatically adjust the settings. In this way it possible advance the comfort level. Begin and end of heating periods are also automatically calculated, only the temperature profile according to the course of the day has to be defined

Installation
The Herz 3 F800 50 should be mounted in a dry indoor location. Choose a mounting location about 1.5 meters above the floor in an area with good air circulation. Avoid places with draughts, dead air spots and radiant heat from the sun or appliances. It should not be installed close to any metal structure or other objects that may obstruct radio signal transmissions.
- Release the upper cover by pressing the plastic tab on the bottom side of the housing.
- Mount the back part on the desired location
- If the thermostat was purchased as a kit along with a receiving unit, connect the detector’s battery (pull out the red tape to activate the battery). Otherwise see section “Mounting the receiving unit”
- Close the thermostat
Mounting the receiving unit
Install and connect the receiving unit to the heating system. If the receiving unit was purchased separately then thermostat have to be connected – enter connection mode on the receiving unit (see its manual) and connect the battery to the thermostat.
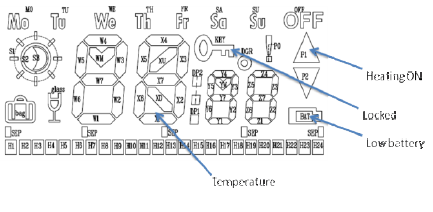
Symbols
Connecting the thermostats
Do the complete settings using the knob. The programming mode is entered by pressing the knob for two seconds.
General rules for programming:
- Flashing of any icon on the LCD allows changing the option(s) or choosing a next item.
- Perform choosing or changing by turning the knob
- Confirm the selection or change by briefly pressing the knob
- When the value of an item has been changed, then after this briefly press the knob and changes are saved. Then thermostat goes to the next item in the programming menu
- After the setting of the selected items, choose the parameter “OK” in the menu. By short pressing the system returns back to previous menu.
- If there is no manipulation of the knob for 30 seconds, it returns you back to the previous menu automatically.
The basic menu has 7 groups of settings:
- MA Manual mode
- LO Locking the thermostat
- OF. Switching off the thermostat
- SE. Temperature, date and time settings
- SE,2 Weekly schedule setting
- SE,. Service menu
- OK Saving the parameters and leaving the service menu
MA, – manual mode
In this mode the temperature is set manually regardless of the weekly schedule. The temperature can be controlled in the range between t Lo and t Hi.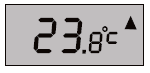
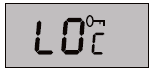
LO. – Thermostat lock
This function protects the device against unwanted manipulation. The key-symbol on the LCD screen is an indicator for the status of the lock mode.
Set1 Temperature, date and time settings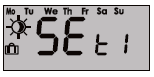 In Set1 menu the comfort (
![]() ), economy (
), economy (![]() ) as well as the temperature during the holiday mode (
) as well as the temperature during the holiday mode (![]() can be initialized. Additional it’s possible to fix specific times for the different mods.
can be initialized. Additional it’s possible to fix specific times for the different mods.
Set2 – Weekly schedule setting
In Set2 menu it’s possible to program different weekly schedule. The thermostat is able to implement different programs for weekdays (Mo, Tu, We, Th, Fr), for weekends (Sa, Su), or for every single weekday.
Programming always starts at 00 hours. By turning the knob clockwise, you can move through the time line. Press the knob at the point from which you want to start with heating to comfort temperature. By turning the knob now there will be points visible which represent the hours of heating to economy temperature. By turning the knob anti clockwise the points are erased. Pressing the knob switches between economy and comfort temperature. After programming of the whole day has been finished, the thermostat shows you OK. When the knob is pressed all settings are saved.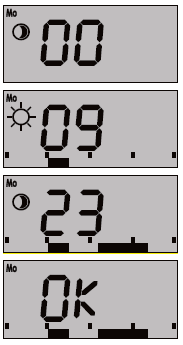
Set3 – Service menu
- In this menu service parameters can be changed. Under common circumstances it is not necessary to change any of those parameters.
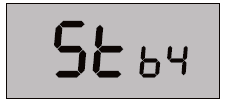
- Hysteresis is the accuracy to which the temperature is regulated. The setting is done via the HYst item in the adjustment menu. Turning the knob lets select you one of the following accuracy ranges: +0.1°C to +1°C (factory setting: +0.2°C) Example: If the accuracy is adjusted to +0.5°C and the temperature is set to 24°C, the thermostat switches the heating on when the temperature drops below 23.5°C and switches it off if the temperature goes above 24.5°C. In reality the temperature scatter can be slightly higher because of the temperature persistence of the room. Warning: Too high accuracy can cause the heating to turn on and off to frequently.
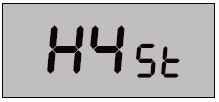
- The item Stby sets the temperature which will be kept in the case of switching off ther thermostat (item OFF). The Stby temperature is always at least 3°C higher than ALLo. The value of the Sty temperature does not have to be set higher than the t Lo tmperature.
- The t Lo item is the lower limit to which economical temperature can be set.
- The t Hi item is the upper limit to which the comfort temperature can be set.
- AL Lo is the lower critical temperature. When the temperature drops under the preset value, the thermostat sends an alarm report to the receiver and this state is indicated by a permanently lit (!) symbol. The ALLo – temperature is always at least 3°C lower than t Lo.

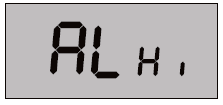
- AL Hi is the upper critical temperature. When the temperature increases above the preset value, the thermostat sends an alarm report to the receiver and this state is indicated by a permanently lit (!) symbol. The ALHi temperature is always at least 3°C higher than tHi
- This item allows to turn the adaptive pre- heating On or Off according to the heating system inertia. When auto modus is enabled, the thermostat starts measuring the time after which it has reached the requested comfort temperature and according to this time it starts the heating.
- The reset function allows you to reset the device to factory settings (listed in table). You can perform reset by selecting Res in the menu and pressing the knob and choosing the menu Res.
- By pressing the OK item you are leaving the service menu and return to the basic thermostat menu

| Settings item | Range | Factory settings | Description |
| HYst | 0.1°C to 1°C | 0.2°C | Hysteresis |
| t Lo | +6°C to +40°C | 6°C | lower limit of temperature |
| t Hi | +6°C to +40°C | 40°C | upper limit of temperature |
| AL Lo | -9°C to +20°C | 3°C | Panic Alarm |
| AL Hi | +30°C to +70°C | 60°C | Fire alarm |
| +6°C to +40°C | 18°C | Economical temperature | |
| +6°C to +40°C | 21°C | Comfort temperature |
Party Mode
In this mode it’s possible to raise or decrease the temperature for an defined amount of time. Party modus can only be entered from the weekly programm. When the defined time expires the thermostat will start again the weekly schedule. Party modus is entered when the display shows the (*)-symbol. The first value is time (hours) after which the thermostat returns to the weekly program. After time settings temperature settings have to be done. The party mode is indicated by the (:)-symbol on the display. If you want to leave teh party mode earlier than the defined time, then the thermostat have to be set back to weekly schedule.
Holiday Mode
The holiday mode is designed to save costs of the costumer. During vacation it is not necessary to keep the temperature of the weekly schedule. Like party modus, holiday mode is only possible to enter from the weekly program. If the holiday mode is entered the thermostat shows a flashing value of days for which the economical temperature has to be kept. The countdown starts from the moment of setting. Substraction is done every day at midnight. When holiday mode expires the thermostat returns to the weekly program.
Showing the pre-set temperature
The thermostat always shows the current room temperature in the normal mode. Pressing the knob will show the temperature which has been set for this time.
Replacing the batteries
When the thermostat starts to indicate the low-battery-symbol (at) or stops working completely, replace the batteries for new ones. A low batter report is sent to the receiver.
Note: We recommend only using alkaline batteries, type AA 1.5V
Specification
| Power supply: | 2x AA 1.5 V alkaline battery |
| Battery lifetime: | typically 1 year |
| Temperature measurement: | +6°C to +40°C |
| Temperature accuracy: | ±0.1°C to ±1°C |
| Freeze alarm (Panic alarm): | configurable from -9°C to +20°C |
| Fire alarm: | configurable from 30°C to 70°C |
| Operational frequency: | 868.1 MHz, JA-100 protocol |
| Operational radio range: | 100m (open area) |
| Operational temperature: | -10°C to +70°C (low humidity) |
| Dimensions: | 66 x 90 x 22 mm |
| According to: | ERC REC 70-03 |
Herz
- A-1230 Wien, Richard-Strauss-Straße 22
- Telefon: + 43/(0)1/616 2631-0
- Fax: + 43/(0)1/616 26 31-227
- e-mail: [email protected]
- www.herzeu
REFERENCE:
DOWNLOAD MANUALS:
Herz F800-55 Wireless Programmable Thermostat User Manual
![]()
Leave a Reply