Hotowell HTW-MT08 Programmable Multi-Stage Smart Thermostat
Identify System Type
This thermostat is compatible with the following systems:
- Gas, oil, Propane or electric furnace
- Central air conditioner
- Geo Thermal / Hot water system with or without pump
- Heat only/Cool only/Auto/Emer/Off modes configurable
- Central heating and cooling system
- Heat pump with auxiliary/backup heat
- Forced Air / In-Floor Radiant / Radiator system
Features
![]() SAVE ABOUT 25% ON HVAC ENERGY
SAVE ABOUT 25% ON HVAC ENERGY
Save money without compromising your comfort with features like flexible weekly programmable scheduling and remote WiFi control.
![]() FLEXIBLE MOUNTED TYPE
FLEXIBLE MOUNTED TYPE
Wall Mounted or 2.36”/62±5mm(Europe,China,Japan) or 3.37”/86±3mm(USA, Italy), easy to install.
![]() SAVE ABOUT 25% ON HVAC ENERGY
SAVE ABOUT 25% ON HVAC ENERGY
Permanent Hold/Temporary Hold/Using Programming Schedule/Hold Until Menu.
 HUMIDITY/UV/WEATHER DISPLAY
Synchronizes Humidity/UV/Weather data locally on the screen display
 SMART HOME COMPATIBLE
Compatible with smart home platforms Amazon Alexa, Google Assistant, and Tuya Smart Life.
![]() MULTIPLY THERMOSTAT CONTROL
MULTIPLY THERMOSTAT CONTROL
Easy management for schools and light commercial applications. Smart Scene/Group Control available.
 OTHER FEATURES
- Device Sharing, Languages/Time synchronizes according to time zone.
- F or ºC configurable.
- Negative Black Screen, black lightness configurable.
- Fan switch ON and AUTO Configurable.
- Air Filter change Indicator, Temperature calibration.
- Touch Screen Keypad, Easy operation friendly.
- Built-in compressor protection.
Specification
| Power Supply | AC/DC24V±10% |
| Terminal Load | 1.0A(Inductive) per terminal, 3.0A (Resistance) per terminal |
| Set Point Temp. Range | 42ºF to 122ºF (5ºC to 50ºC). |
| Accuracy | +/- 1ºF or +/- 0.5ºC. |
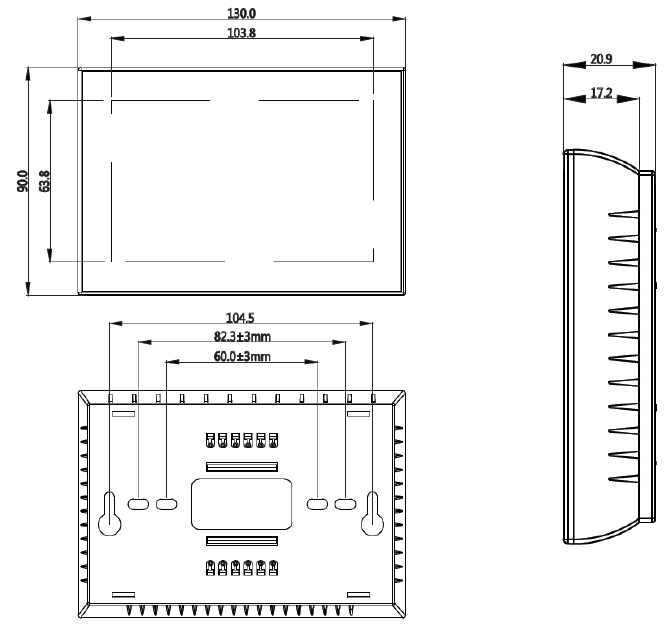
| Dimensions | 5.12” L*3.54‘’ W* 0.82‘’ D /130x90x20.9mm |
| Color | White/Black/S.S Brush panel optional |
| Installation Hole Distance | Wall Mounted or 2.36”/62±5mm(Europe,China,Japan) or
3.37”/86±3mm(USA, Italy) |
| Wire Diameter for Terminals | 2*1.5mm² or 1*2.5mm² |
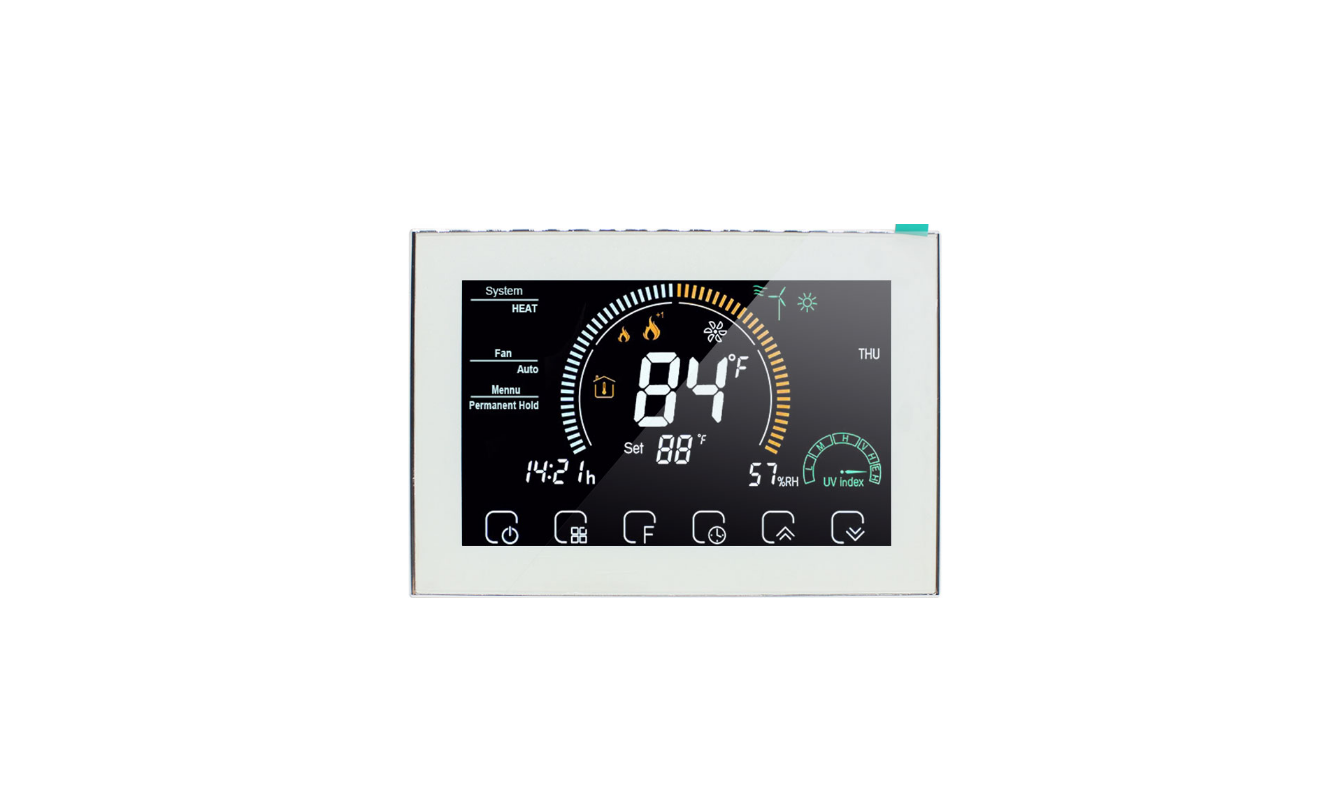
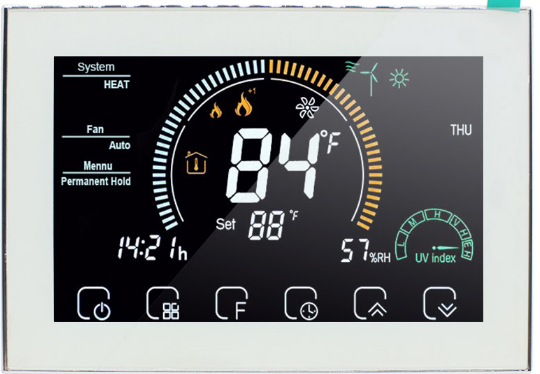
Display
- Wifi ( AP mode )
- Wifi ( EZ mode )
- AUX Heat
- 1st Stage Heat
- 1st Stage Cool
- Fan
- Wind speed
- Weather
- periods
- Monday to Sunday
- External sensor
- Ultraviolet intensity
- The humidity outdoor
- Down Button
- up Button
- Clock
- Hold /Ternporary
- Hold/Using Schedule/Hdiday
- Auto/cool/Heat/Off
- power
- Time
- Set temp
- Menu
- Room Temp
- Fan auto/open
- System mode
Dimensions
Installation
- Turn Off the Power
- To ensure the power to your heating and cooling system has been turned off, try to turn on heating or cooling by changing the temperature on your old thermostat

- Remove the old thermostat cover
- Remove the old thermostat’s front cover from the wall base. Some covers pull off easily, while others may need to be removed by prying the cover off with a screwdriver.
Label wires
- Using your screwdriver, carefully unscrew one wire at a time from the terminal block and attach the corresponding wire label sticker.
- Please note that not all terminals may be used, and that there’s no standard color code for thermostat wires, so your wire colors may vary.
- For your reference, we’ve included a terminal label reference chart as below to help you connect the wires in your old thermostat to your new thermostat in case you get stuck.
Terminal labeling reference chart
| If your current terminal has the following letter | Label the wires with the following letters |
Terminal function |
| RC | RC | 24V Power (Cooling) |
| RH, R, R5, 5 | RH | 24V Power (Heating) |
| C | C | 24V (Common) from Equipment Transformer |
| W, W1, 4 | W | Heating Relay |
| Y, Y1 | Y | Cooling Relay |
| G | G | Fan Relay |
| O | O | Reversing Valve
(for heat pump applications energized in Cool mode) |
| B | B | Reversing Valve
(for heat pump applications energized in Heat mode) |
Identify jumper wire
|
On your old thermostat, if… |
Then, on your new thermostat… |
| Terminal RC and RH are connected with a jumper wire |
Leave the jumper wire in its place |
| There’s only one R wire (RC, RH, R or R5) coming out of the wall |
Leave the jumper wire in its place |
| Terminal RC and RH (or 5 or R5) are NOT connected by a jumper wire |
Remove the jumper wire between RC and RH |
For terminal Y and W:
If you have a heat pump with reversing valve, connect Y and W with a jumper wire on your new thermostat
Remove old thermostat base
With all of your wires disconnected and properly labeled, you may now safely remove the thermostat base from your wall
Mounting and Wiring Your New Thermostat
- Remove the mounting plate by screw driver and Open the insulating cover.
- Install new thermostat base
- Mount your new thermostat base using screws. Drill holes and insert wall anchors to secure the thermostat base to the wall, if necessary.
- Connect wires to corresponding terminal blocks
- Match each labeled wire to it’s corresponding terminal on the mounted thermostat base. Insert each labeled wire into the hole of it’s matching terminal, and using the screwdriver, tighten the screw on the terminal block securely
- Fasten body of thermostat and the whole mounting plate back.
- Turn on power
- Turn on your power at the source.
Check Thermostat Operation
- ON/OFF operation
- Press the Power button
 to turn the thermostat on/off.
- Press the Power button
- Working Mode Operation
- Press
 to set the thermostat working mode in Permanent Hold, Using Schedule or Temporary Hold. These functions will appear on the screen.
 - Permanent Hold =Manual Mode. In this mode, press
 to set the temperature manually.
 - Temporary Hold. when you change the temperature setting to a different temperature and it stays at that setting until the next schedule change
- Press
- Using Schedule. 7-day separate four periods daily programmable
- Holiday Mode. Changes temperature setting for a designated number of days.
Real-Time Setting
Press and hold for 5 sec. till the min of time flashes; press ![]() to set your minute. Then press the switch to the “hour” and “weekday” settings respectively, press to set the values.
to set your minute. Then press the switch to the “hour” and “weekday” settings respectively, press to set the values.
Programmable Schedule Setting
After the above time setting, touch the icon each weekday”1 2 3 4 5 6 7” will show along the top of the screen. press to set the time for the 1st period(Awake). Press the icon then use the ![]() arrows to set the temp. for the 1st period. Repeat this process for periods 2-4. Default values set as below
arrows to set the temp. for the 1st period. Repeat this process for periods 2-4. Default values set as below
|
Schedule Period |
Time |
Set-Points | |
| ℉Hea°t C | ℉Coo°l C | ||
| Wake | 6:00 Am | 72 (22 )℉ °C | 72 (22 )℉ °C |
| Leave | 8:00 Am | 72 (22)℉ °C | 72 (22)℉ °C |
| Return | 11:30 Am | 72 (22 )℉ °C | 72 (22)℉ °C |
| Sleep | 01:30 Am | 72 (22 ) | 72 (22 ) |
System Mode Operation
- Press to select the mode AUTO, COOL, HEAT, OFF, EMER.
- HEAT — The thermostat controls the heating system.
- OFF — Both heating and cooling systems are off.
- COOL — The thermostat controls the cooling system.
- AUTO — The thermostat automatically changes between heating and cooling operation, depending on indoor temperature.
- EMER — Emergency heat cycles to maintain temperature
Installer Set-Up Process
Turn off the thermostat and press and![]() hold
hold![]() and simutaniously for 3 second to enter into Installer Set-Up Process(ISU), press to configure values and press
and simutaniously for 3 second to enter into Installer Set-Up Process(ISU), press to configure values and press button again to switch to next parameter. Save and Exit ISU by pressing Power button or wait for 3 seconds.
Parameter items and default value set as below:
| Item | Function | Setting Value and Options | Default
Value |
| 1 | Fan ON / AUTO switch | 0=Fan AUTO, 1=Fan ON | 0 |
| 2 | Compensation temperature | -8 °F to 8 °F (-4 °C to 4 °C) | -6 °F(-3 °C) |
| 3 | Delay setting for compressor output | 1–5 minute | 01 |
| 4 | O/B Reverse Valve | 0=O/B terminal energizes in cooling
1= O/B terminal energizes in heating |
1 |
| 5 | Min. Set Temp. | 42 °F to 62 °F (5 to 15 °C) | 42 °F (5 °C) |
| 6 | Max. Set Temp. | 62 °F to 122 °F (15 to 45 °C) | 122 °F(45°C) |
| 7 | 12/24 hours format | 0=12h 1=24h | 1 |
| 8 | Auto mode switching differential | 0 to 5°C(0 to 10 °F) | 03 |
| 9 | Filter change reminder | 0–5 (month) | 03 |
| A | Standby Backlight Brightness | 1 — 99 (Brightness) | 4 |
| B | ℉ or °C | 0=°C 1= °F | 1 |
| C | Dead band Temp. | 1 to 5 °C(2 to 10 °F) | 1 |
| D | Max. Set Temp. | 15 to 45 °C(59 to 113 °F) | 45 |
| E | Heat Pump/Conventional System | 0=Heat Pump System
1=Conventional System |
0 |
Important Safety Information
Always turn off power at the main power source by removing the fuse, or switching the circuit breaker to the off position before installing, removing, cleaning, or servicing this thermostat.
- Use this thermostat only as described in this manual. Read all of the information in this manual before installing this thermostat.
- Use a professional personnel / installer to install this thermostat.
- This is a 24VAC/24VDC low-voltage thermostat, do not install on voltages higher than 30 Vac.
- ALL wiring must conform to local and national building and electrical codes and ordinances.
- Do not short (jumper) across terminals on the gas valve or at the system control to test installation. This will damage the thermostat and void the warranty.
- Do not switch the system to cool if the temperature is below 50ºF (10ºC). This may damage the air conditioning system.
- Change the Air Filter when the Filter Change Icon begins blinking.
Wifi Connection
Step 1- Download and Install APP
Use your smart phone or tablet PC to scan the QR code below or Search “SMART LIFE” in the app store /Google play to download and install APP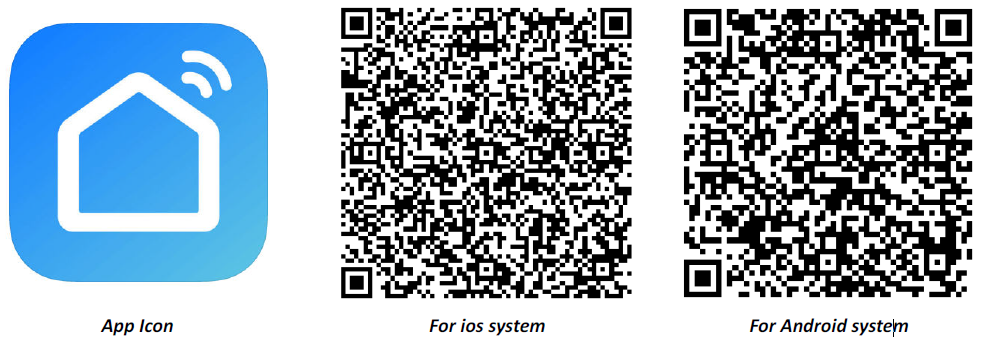
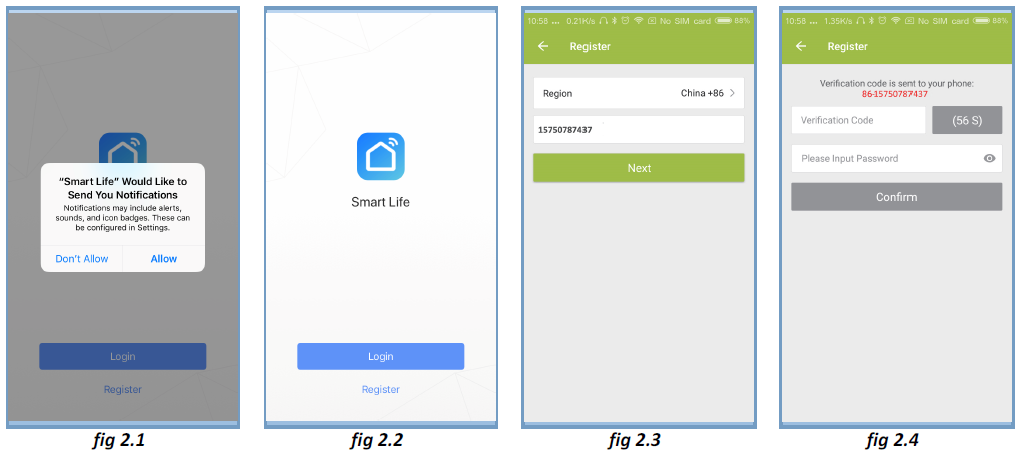
Step 2- Register your account
- Open “SMART LIFE” application, click “Allow” on the pop up notification dialog(fig 2.1)
- Press “register” button on the register page(fig2.2)
- Select your region and type in your phone No. or email (fig 2.3) then you may get a verification code.
- Type in your password and confirm (fig 2.4) to complete your registration.
- If you already have an account, please just log in.
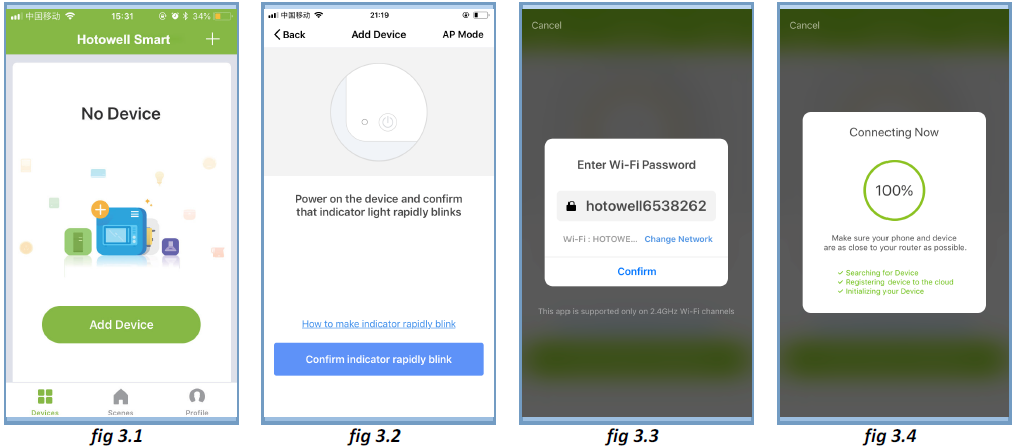
Step 3- Connect App with Thermostat
On the thermostat
During power off status, press and hold the arrow icon for 8 sec until the connecting icon appears on the thermostat screen and flashes once a sec
On the App
- Press the “+” on the upper right corner of the page (see Fig 3.1) or “Add Device” to add “Thermostat”.
- Click “Confirm indicator rapidly blink” (Fig 3.2) then select your network and back to your App to enter the password of your wireless router and confirm.
- The App will connect with the thermostat successfully. The connecting process takes 5~90 sec, the thermostat name can be editable once connected
Alternative AP mode Connection
- If the thermostat has already been connected under above steps, please ignore this process.***
- This SMART LIFE App is only supported on 2.4GHz Wi-Fi channels.
- If the router does not be supported, or the wi-fi signal is weak or thermostat can not be connected as above steps, please try this AP mode connection process.
On the thermostat
- During power off status, press and hold the arrow icon
 for 8 sec until the
 connecting icon appears on the thermostat screen and flashes once a sec.
 - press and hold the arrow icon for 8 sec again, the icon
 will flash once per 3 sec
 - indicates connecting from normal router mode.
- Indicates connecting from AP mode.
On the App
- Click “Confirm indicator slowly blink” then select your network and back to your app to enter the password of your wireless router and confirm. The app will go into the page
- Press “Connect now” to select the wifi signal Smart life-XXXX from the thermostat
- This AP mode connection process may typically take approx. 5~90 seconds to complete.
- The thermostat name can be edited after connection

Operation Icons on APP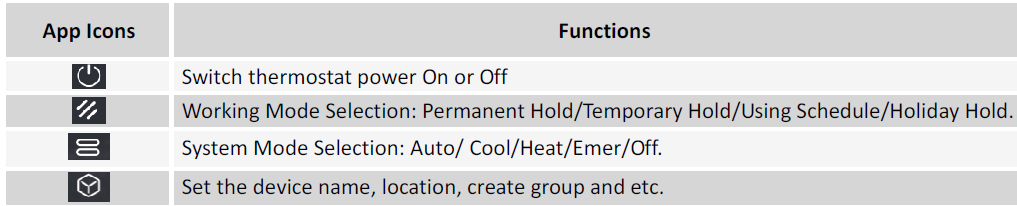
Programmable Schedule Setting
When thermostat runs in programmable mode, click the setting symbol (at the bottom of the page) to switch to the schedule page, where you can simply configure the weekly programmable schedule up to 4 periods each day. Once your schedule has been set, click on SAVE and the app will send the programming to your thermostat and confirm the schedule has been saved.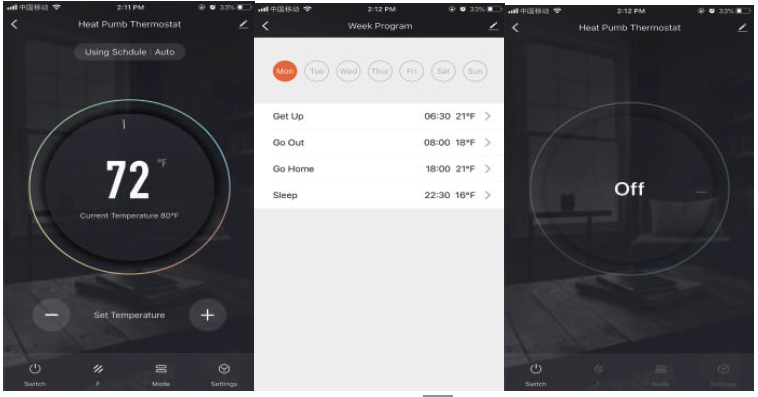
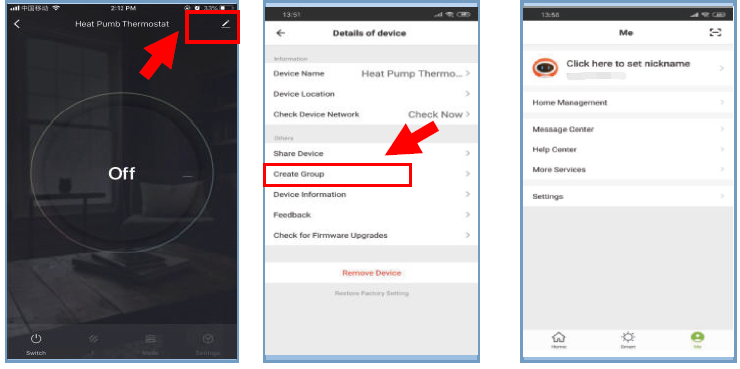
Group Control and Info. Modify
- Press the menu button
 as , then click “Create Group”. Select all the rooms you want and confirm, edit the group name or ungroup
 - Group Control allows to control all thermostats(+∞ units) configurations in the group at the same time
Share Thermostat with Others
- Method 1: Click “Share with Familay”
- Method 2: Click “Profile”>”Sent”>”Add”>Switch on the device>”Share with New Member”>Type in the telephone number you would like to share with.
- Method 3:Home page of the device>Menu>”Device Sharing”>”Add”>>Type in the telephone number you would like to share with.
Work with 3rd party Echo Control
Click “Profile”>”Integration”>Select amazon echo/Google Home/IFTTT>”Use Now” 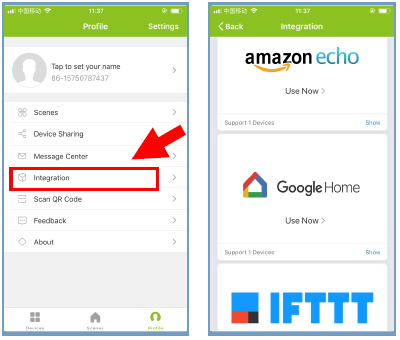
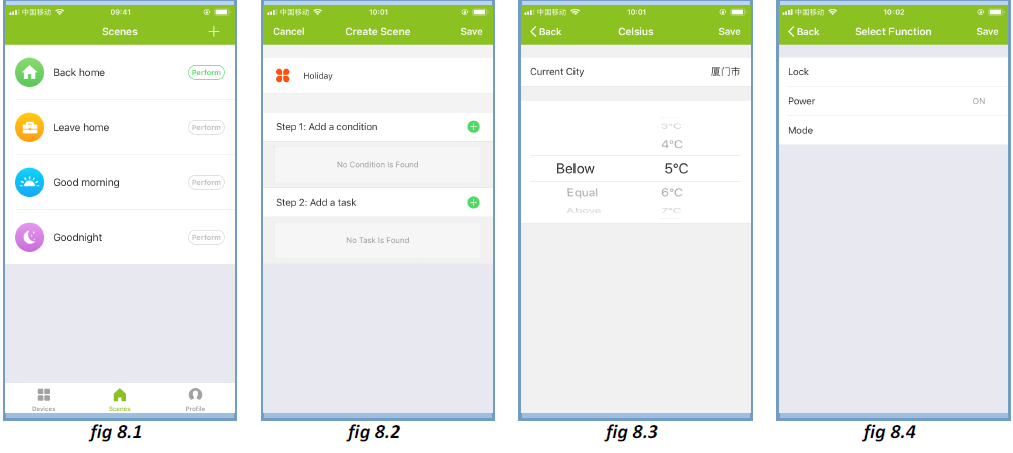
Customize Scene
- This process is to customize your own personal scenes to suit your needs, for example, set your home temperature automatically when you come back home.
- There are 4 scenes in default setting, and can be added/deleted at will.
- Here set an example of a specific scene: “leave home for holiday” and turn on the thermostat when temperature lower than 5°C
- Scenes>+>Enter a name for the scene>Add a condition(Below 5°C )>Add a Task>Save
Trouble Shooting
| Trouble Shooting | ||||
| No. | If… | Then… | ||
| 1 | The power is on but without display. | n Check if the terminals between the LCD panel and
The relay/Power Module is loosened. |
||
| 2 | Without output but display works. | n Use a new LCD panel or new Relay/Power
Module for Replacement |
||
| 3 | Room Temp. on display is not correct | n Do temperature calibration in parameters in ISU | ||
|
4 |
The heating system does not respond |
n Set the mode to heating by pressing the M button. n Make sure the temperature is set above the room temperature. n Make sure the “heat on” icon shows on the display. n Wait 5 minutes for the system to respond. |
||
| 5 | The M or Increase/Decrease button doesn’t work | n Make sure the keypad is unlocked. n Check that thermostat is on. |
||
Warranty
Products are warranted for 2 full years (checking and repairing services) from the date of purchase which products are not being damaged by any man-made factors. Service out of the warranty period may incur an extra charge. For more details please contact Hotowell directly.
REFERENCE”
DOWNLOAD MANUALS:
Hotowell HTW-MT08 Programmable Multi-Stage Smart Thermostat Installational Manual
![]()
Hotowell HTW-MT08 Programmable Multi-Stage Smart Thermostat Installational Manual
Leave a Reply