EARU WIFI-X7GA-B Electric WiFi Thermostat
INTRODUCTION
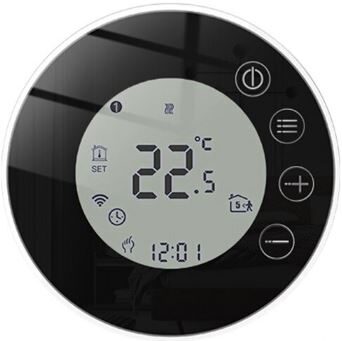
With the EARU WIFI-X7GA-B electric WiFi thermostat, you may regulate the temperature of your house from a distance using a mobile app. It works with electric heating appliances like convection heaters, radiant ceiling heating, and baseboard heaters. The WiFi connectivity of this thermostat, which lets you regulate the temperature from anywhere as long as you have an internet connection, is one of its key features. From your smartphone or tablet, you can create schedules and change the temperature settings. The EARU WIFI-X7GA-B is easy to use because of its touch-sensitive interface and large, easy-to-read digital display. Additionally, it has a variety of cutting-edge features, including adaptive temperature control, which learns your heating preferences and modifies the temperature accordingly, and a vacation mode, which enables you to conserve energy while you’re away from home. Overall, the EARU WIFI-X7GA- b is a handy and adaptable electric WiFi thermostat that may help you conserve energy and maintain a comfortable environment in your house.
Specification
- Type: WiFi Temperature Controller Thermostat
- Material: Anti-flammable PC is made of AC 220V, 50/60Hz voltage.
- Current Load Maximum: 16A/3A/3A 1°C of temperature accuracy
- Temperature Range: 5 to 95 °C
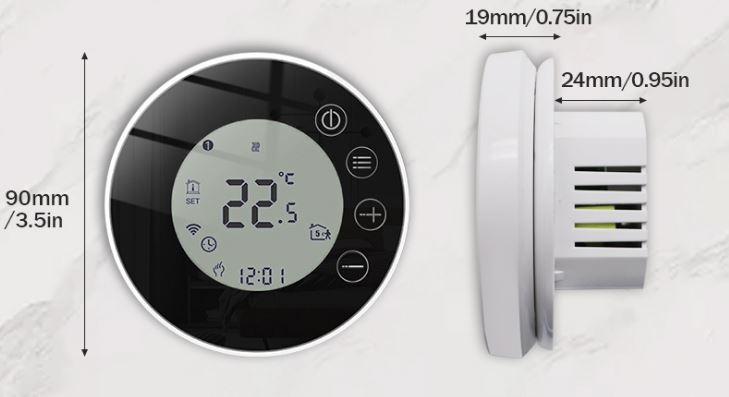
- Size of Item: 90 x 90 mm/3.5 x 3.5 in
User Operation
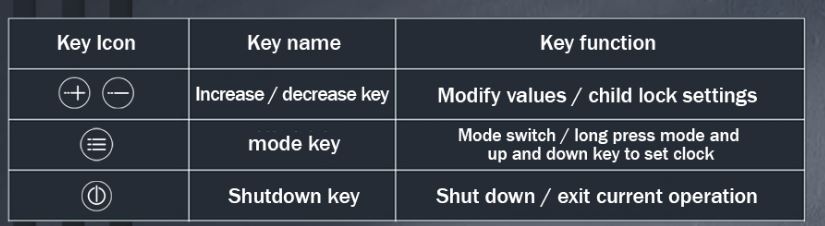
- Press the
 button, and power it on/off.
 - Select auto or manual mode by pressing the
 button.
 - When in automatic mode, pressing the “+” or “-” buttons will switch to automatic mode.
- The “and”+” button can be long-pressed to start the timer. Toggle setting options by pressing the “button; change values by pressing “+” or “-.”
- To add or remove a child lock, hold down the “+” and “-” buttons at the same time.
- To connect to the internet via WiFi, hold down the “+” button after the device has been turned on for five seconds.
Function
- Memory Performance
After a sudden power outage, remember all of your settings. You won’t need to reset it when the power is restored. - programming function
5+2 /6+1 / 7 days of support Weekly Temperature control that is customizable for six intervals. - Wifi and APP support mobile phone-based remote control.
- One mobile phone may manage both a single device and a number of devices. includes voice control capability and Google Home and Amazon Alexa compatibility.
- Automatic or manual function -Touching keys, surface made of tempered glass
- Rear light
Through a mobile APP, the brightness can be changed, and the backlight can be turned off.
Advanced setup options
- Press andbutton 5s simultaneously while the power is off to access the advanced options setting.
- : Select the following choice
- Adjust the value using +/-.
- Leaving the advanced option setting
- Temperature adjustment
- Sensor choice
- Temperature limit temperature setting
- Difference in temperature
- Antifreeze capability
- Day-off selection and programming for exit week
- Reverse selection, both primary and secondary
- Setting the passive output delay
- Specify the maximum temperature.
- Return to default mode
Packing List
- Temperature and humidity control
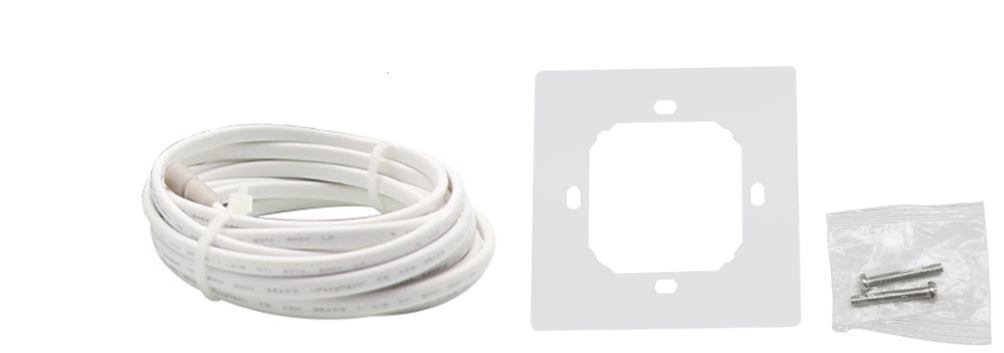
- one (1) Only electric floor heating includes a sensor cable
- one sensor probe
- Screws Manual
- Only include sensor cable for electric floor heating; cable length: 3m
Product parameters
- Product Name: water and electricity floor heating thermostat
- Product size: 90 * 90 * 19mm
- Set temperature range: 350C-950C
- Temperature control range: 5c- 60c
- Control accuracy:+-0.5c
- Installation mode: wall mounted
- Product color: White/black
- Load current: 16A
- Temperature difference start: 1-10 oc
- Working power supply: AC95V-240V
Five breakthrough functions
- Precise temperature control
The temperature control precision is 0.5 - Time programming
5 + 2 / 6 + 1 working day mode supports 6 kinds of temperature operation in 6 periods every day. - Child lock
The child lock key can be set - Adjustable temperature difference
That is, the range of automatic start and stop of the air conditioner (1-10 C) - Mode setting
Set manual and automatic mode control
Intelligent app remote control
Downloading the Graffiti Genie app enables intelligent functioning, allowing field workers to also regulate their home’s temperature controller.

Intelligent A1 voice control
Automatic A1 voice control voice controls free up the hands. Connect a smart speaker, free up your hands with voice control for the thermostat, and quickly update A1 smart living.
Wiring
Setting the temperature controller’s wiring
The control panel’s wiring is straightforward and easy to install.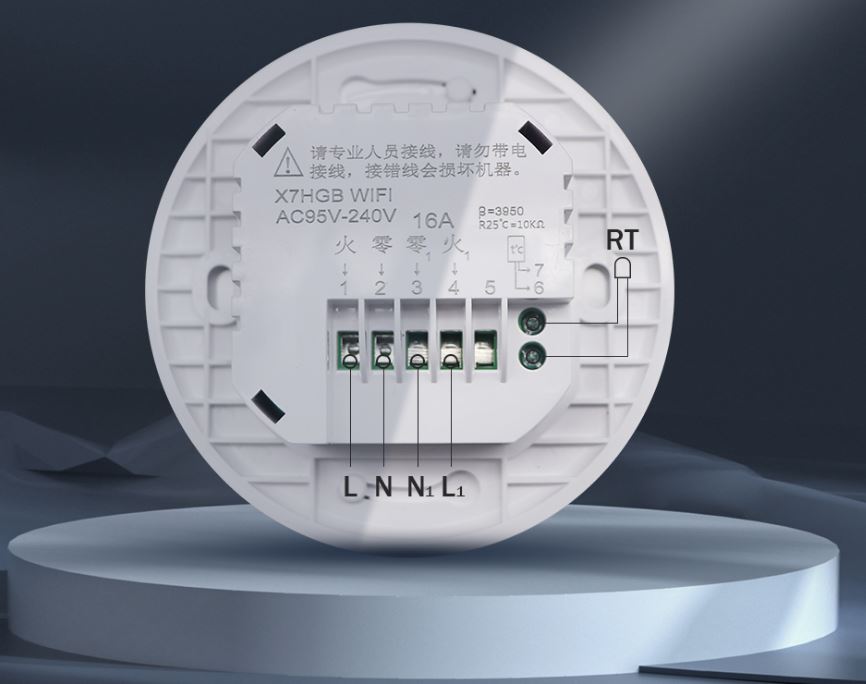
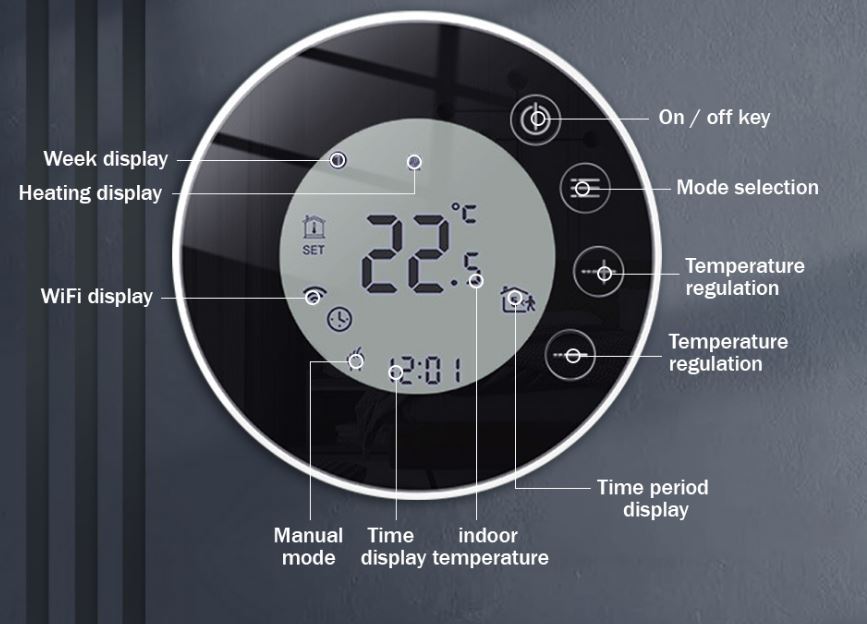
Touch function key
The operation interface has the function of setting the cooling air speed and adjusting the temperature.
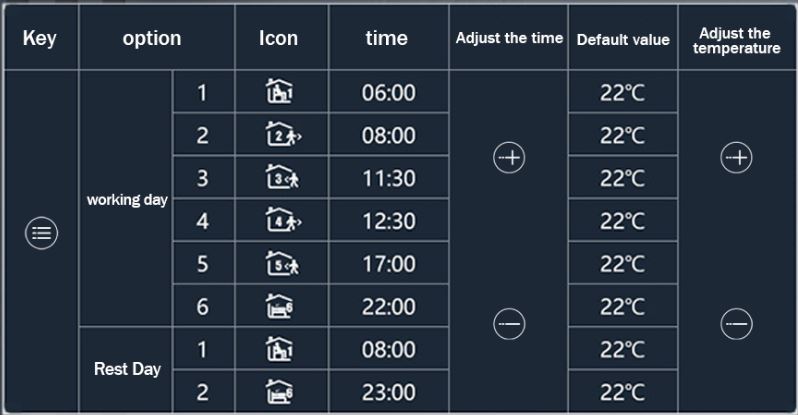
Time programming description
Long press the key to enter the programming setting, short press keyto switch options, press the key+or key – to adjust the parameters of options, and press a key to push out and save.
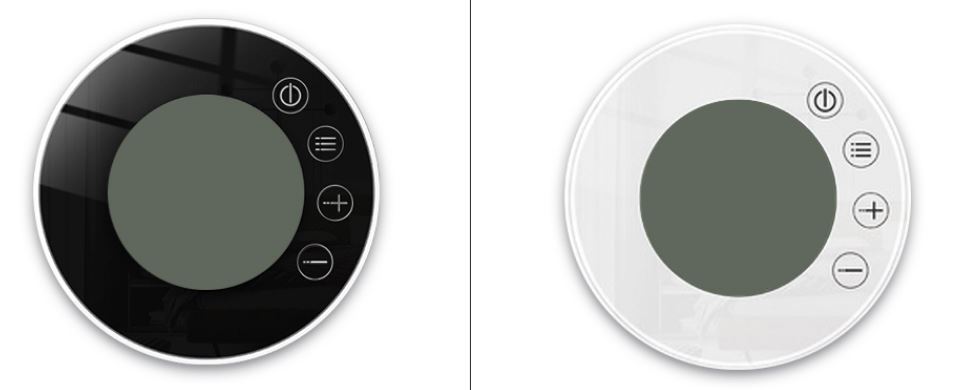
Two color
What’s in the box
APP
How to Use
With the help of your smartphone or tablet, you can regulate the temperature of your heating and cooling system using the EARU WIFI-X7GA-B Electric WiFi Thermostat. The steps to use it are as follows:
- Install the thermostat: The thermostat needs to be mounted on the wall before use. To install the thermostat, adhere to the directions in the user manual. Before you begin, make sure the power to your heating or cooling system is turned off.
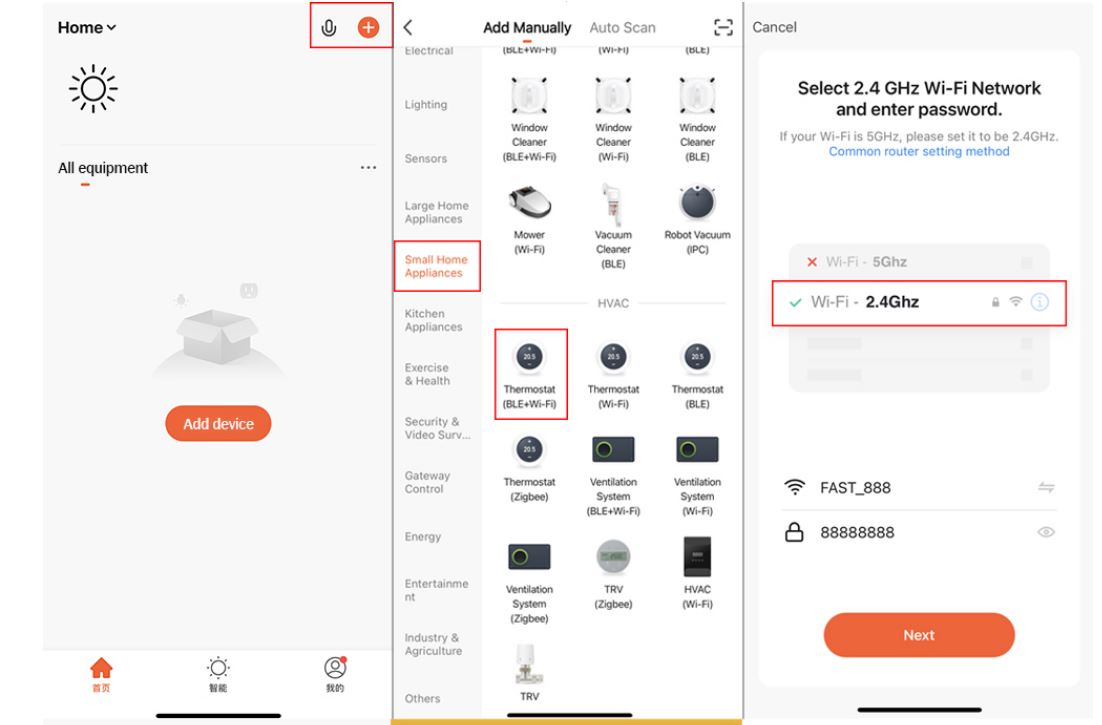
- The “Smart Life” app must be downloaded on your smartphone or tablet in order to connect the thermostat to your WiFi network. Following the instructions to create an account and add the thermostat to your app after installing the app.
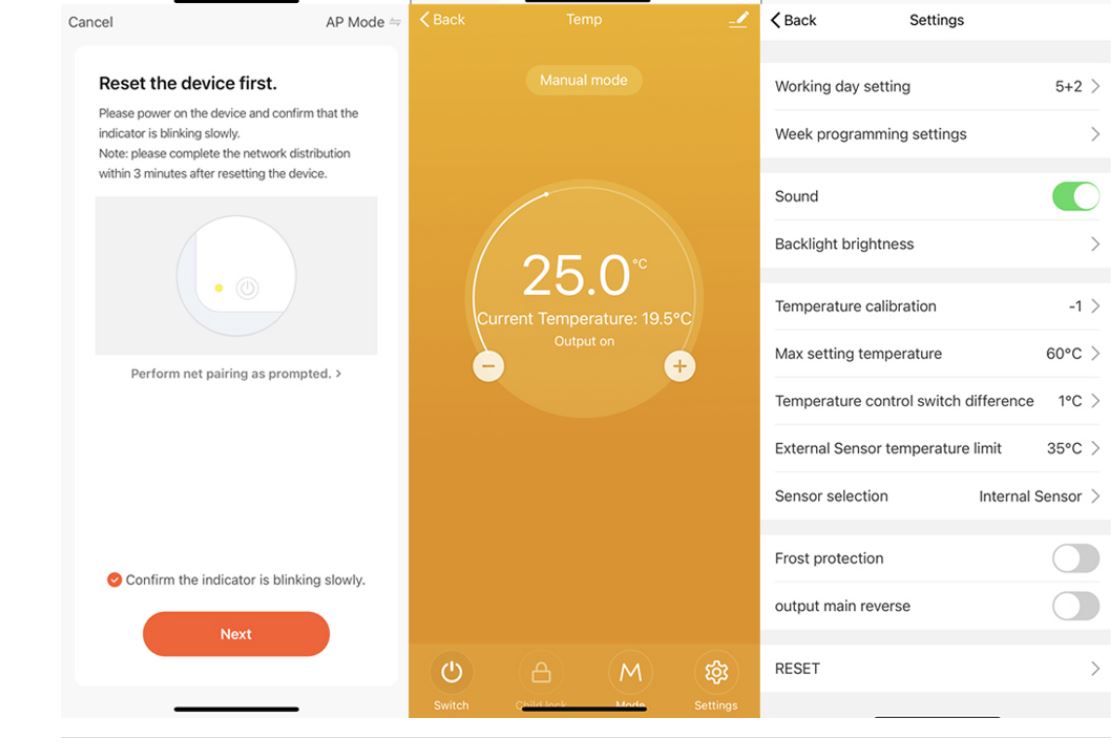
- Create a schedule: You can create a schedule to regulate the temperature after the thermostat is connected to your app. Different temperatures can be set for various times of the day or week. You can create a schedule for your absence from home.
- Utilize your app to control the thermostat: As long as you have an internet connection, you can use the app to operate the thermostat from anywhere. The system may be turned on or off, and the temperature can be changed.
- Track your energy use: The thermostat can track your energy use and provide you with energy-saving advice. On the app, you can view your energy usage and make changes to lower your energy costs.
The EARU WIFI-X7GA-B Electric WiFi Thermostat is generally simple to use. Simply set it up according to the instructions in the user manual and on the app to begin managing your heating and cooling system from any location.
How to Installation
- Verify the directions provided by the manufacturer: The EARU WIFI-X7GA-B Electric WiFi Thermostat’s manufacturer must to include a thorough installation guide that details the required procedures, equipment, and safety measures.
- Electricity down: Prior to beginning the installation, make sure to shut off the HVAC system’s electricity at the breaker or fuse box.
- Remove the old thermostat: Carefully take the old thermostat out of the wall and unplug the wires. When installing the new thermostat, take a photo or make a note of the wiring connections for reference.
- Install the new thermostat: Using the provided screws, attach the base of the new thermostat to the wall. Make sure it is firmly connected and level.
- Connect the wires: Attach the HVAC system’s wires to the base of the new thermostat by connecting them to the correct terminals. Observe the manufacturer’s instructions and the preceding sketches or notes.
- Install the batteries: If the new thermostat needs batteries, install them. Consult the manufacturer’s instructions once again.
- Connect to Wi-Fi: To connect the thermostat to your Wi-Fi network, follow the on-screen instructions. To finish this stage, you might need to download an app and make an account.
- Test the thermostat: Restart the electricity and check that the thermostat is operating properly. The temperature, programming schedules, and other aspects should be configured according to the instructions.
Please keep in mind that these instructions are only broad suggestions; for precise information and safety warnings, you should always refer to the manufacturer’s instructions. It would be preferable to engage a professional to install the thermostat if you are not confident performing DIY installs.
