Hotwire TR8100V Programmable THERMOSTAT
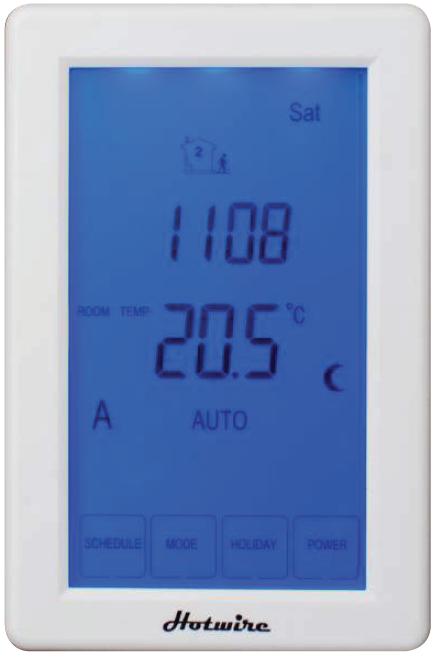
LCD symbols
| LCD symbols | |
| Icon Legend | |
| The buttons are locked | |
| Heating is turned on | |
| Frost protection activated | |
| Programme number | |
| Manual mode | |
| AUTO | Automatic mode, executes the programmed schedules |
| Override | Temporary temperature override |
| Err | The floor sensor is not being read by the thermostat |
| |
Economy temperature |
| |
Comfort temperature |
| Setting the clock and day of the week |
| This thermostat is fitted with a real time clock. It is essential that the clock time and day are set accurately if you require your programmed events to start on
time. To set follow the steps below: |
| (1). Touch the time display and the time will start flashing. Use the up and down arrows to set the time. By holding the arrow down the time will change
faster. |
| (2). Press NEXT to move to the Day setting and use the up and down arrows
to get to the correct day. |
| (2). Press DONE to store and exit. |
Setting the Programme Schedules
This thermostat has the ability to programme each individual day of the week separately, or program 7 days of the week at once. You can also program weekdays (5 days) to one schedule and then weekends (2 days) to a different schedule. See the Menu information for details on how to set this up.(refer to Menu 10) See page 4 of this manual.
| This will help you programme your thermostat to come on and off automatically.
If you want to simply turn it on and off when required skip this section. |
||||
| (1). Press SCHEDULE and the day display will start flashing. Using the arrow to select the day you wish to programme. Then press Next. (If your thermostat
is set to 5+2 day programmable mode, the programming will skip to step 3) |
||||
| (2). To select every day to be the same simply press All Days. | ||||
| (3). Press |
NEXT |
and |
||
| (4). The time is now flashing. Select the time you want the heating to come on
in the morning. Then press next. |
||||
| (5). The temperature is now flashing. Set the temperature that you want the floor
to heat to. Then press next. |
||||
| (6). The LCD screen will show programme 2( This is the time that the thermostat will switch off in the morning. |
||||
| (7). Use the morning on the selected day or days. |
||||
| (8). Press NEXT and the temperature will start flashing. This can be used to
maintain a minimum temperature. In most cases this is not required and the temperature should be set to 5. |
||||
| (9). Press NEXT and the NOTE: If you do not wish the heating to come in the afternoon, simply set the “off” time for only a couple of minutes after the “on” time. |
||||
| (10). Press |
NEXT |
and set the temperature required in the afternoon. | ||
| (11). Press NEXT and the LCD screen will show programme 4 This is the time that the thermostat will switch off in the afternoon / evening. Press NEXT
and set the temperature. As per above we recommend 5. Then Press DONE |
||||
| (*). Hint: During setting programs, press DELETE will clear a programme entry and thermostat will maintain the temperature setpoint of the last executed
programme until the beginning of the next programme. |
||||
| (*). Hint: If you use the default programming of 5 week days plus 2 weekend
days you will now need to repeat the above steps for the weekend. |
||||
Default Programming is as follows.
| Programme | Start Time | Setpoint | Explanation |
|
01 |
WAKE 07:00 |
22 °C |
This is the time the heating will come on in the morning. |
|
02 |
LEAVE 09:30 |
16 °C |
This is the time the heating will switch off in the morning. It can also be used to set a minimum temperature for the day. |
|
03 |
RETURN 16:30 |
22 °C |
This is the time the heating will come on in the afternoon. |
|
04 |
SLEEP 22:30 |
16 °C |
This is the time the heating will switch off in the afternoon / evening. If you do not require the heating in the afternoon / evening, simply set this time to a couple of minutes after the “on” time. |
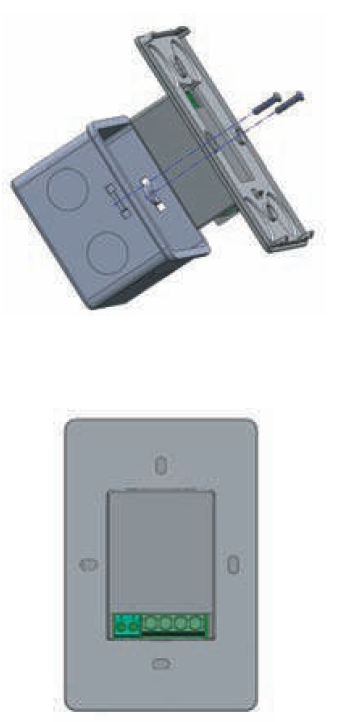
Installation and Wiring
Carefully separate the front half of the thermostat from the back plate by placing a small flat head terminal driver into the slots on the bottom face of the thermostat. Carefully unplug the ribbon connector which is plugged into the front half of the thermostat. Place the thermostat front half somewhere safe. Terminate the thermostat as shown in the diagrams below. Screw the thermostat back plate onto the flush box Reconnect the thermostat ribbon cable and clip the two halves together.
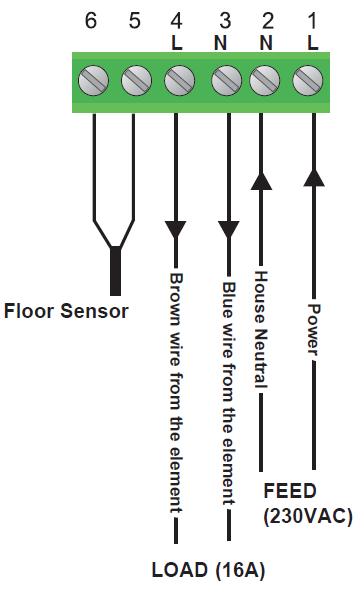 Connect green wire from the element to the house earth. This product should be installed by a qualified electrician.
Manual Mode
Press MODE to select Auto/Manual mode. In Manual mode(![]() ), the thermostat maintains a constant set temperature manually set by the user. Simply press the temperature and increase it to the required level. In Auto mode, the thermostat executes the preprogrammed schedules.
), the thermostat maintains a constant set temperature manually set by the user. Simply press the temperature and increase it to the required level. In Auto mode, the thermostat executes the preprogrammed schedules.
Holiday Function
The Holiday function reduces the temperature in your room to the frost protection temperature. The thermostat will maintain this temperature for the duration of the holiday and will then automatically return to the programme mode on your return.
- Press HOLIDAY enter the duration of your holiday by or
 or
or
- Press DONE To cancel a Holiday, reduce the holiday period to 00 days.
Lock the Keypad
To lock the keypad, press and hold the top left corner of display for 5 seconds, you will see a lock symbol![]() . To unlock, repeat the steps above and the lock symbol will disappear.
. To unlock, repeat the steps above and the lock symbol will disappear.
Reset to Factory Setting
With thermostat turned off, press and hold OFF for 5 seconds until you can see — : — on LCD.
Temporary Temperature Override
Touch the temperature display, and it will start to flash. Use up or down buttons to adjust. Press DONE to accept, and you will see “Override” above the temperature display. Thermostat will maintain the new set temperature until the next programmed event (comfort level). To cancel the override setting, press Run Schedule
To enter into the setting menu please follow the steps below:
- Step 1. Turn the thermostat off by pressing POWER
- Step 2. Press MENU you will then see menu 01.
- Step 3. Use the up and down arrows to adjust the sensor selecti on which is Menu 01(Air sensing;Air and Floor, or Floor only)
- Step 4. Press NEXT to move to the next Menu and once you have all the menu options set,
- Setp 5. Press DONE to accept and store
| Menu # |
Feature |
Explanation |
Adjustment
(Press up & down buttons to adjust) |
|
01 |
Mode/Sensor Selection |
This thermostat is a combination model which allows you to choose 3 different modes.
A mode = Air Sensing Only(Has built in sensor) AF mode = Air & Floor sensing (Floor probe must be installed) F mode = Floor Sensing(Floor probe must be installed) |
A / AF / F |
|
02 |
Switching differential |
The number of degrees difference before switching.
The default is 1°C which means the thermostat will switch the heating on 0.5°C below the set temperature and will turn it off 0.5°C above the set temperature.With a 2°C differential the heating will switch on 1°C below the set temperature and will switch off 1°C above the set temperature. |
1 Deg C, 2 Deg C. 10 Deg C ( 1 Deg C by default) |
|
03 |
Air Temp Calibration |
This is to recalibrate the air temp if required |
-1 Deg C = decrease 1 °C , 1 Deg C = increase 1 Deg C |
|
04 |
Floor Temp Calibration |
This is to recalibrate the floor temperature if required |
-1 Deg C = decrease 1 °C , 1 Deg C = increase 1 Deg C |
|
05 |
Temperature Readout (AF mode only) |
This gives you the option to show the Air Temp, Floor Temp or to show both Air & Floor at intervals |
A = Show Air Temperature F = Show Floor Temperature
A-F = Show Floor and Air Temperature in 5 sec intervals |
|
06 |
Maximum Floor Temp ( AF Mode only) |
This is to protect the floor surface |
20 Deg C – 40 Deg C (40 Deg C by default) |
|
07 |
Temperature Format |
This allows the temperature to be set to show Deg Celsius or Deg Fahrenheit |
Deg C / Deg F |
|
08 |
Clock Format |
You can select the clock to show in either 12 or 24 hour time |
24 (default), 12- hour or 24-hour clock format |
|
09 |
Frost Protection |
This is to avoid your room temp going below 5 DegC |
On = activated, Off = deactivated |
|
10 |
5+2 / 7 Day mode |
This allows you to programme either 5 days at once, then the 2 days of the weekend separately, or a full 7 days at the same time or 7 days separately. |
01 = 5 + 2 Day Programming 02 = 7 Day Programming |
Reference
Download Manual:
Hotwire TR8100V Programmable THERMOSTAT INSTRUCTION MANUAL