PTC20 WIFI Programmable Room Thermostat

Overview
This wireless programmable room thermostat kit can be used to control gas or oil boiler, a variety of valves and actuators.
This thermostat is a programmable room thermostat 5+2 Days/ 7 Days/1 day product. 5+2 days allows you to set a program for weekdays and a program for the weekend. 7 days allows you to set a same program for every day of the week. 1 day functionality allows you to set a different program for every day of the week. Each program type allows you to set 12 time and temperature events.
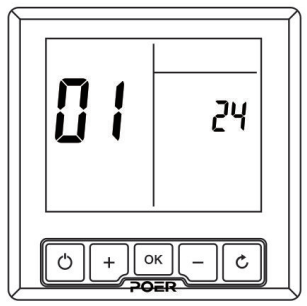
Controls and Display Layout
Installation
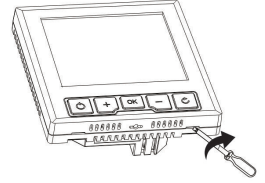
Installation of PTC20
Follow the installation diagrams to install and connect the PTC26 correctly. This thermostat is adapted to 86mm hidden box and 60mm European box.
- The installation and wiring should be operated by trained personal.
- The PTC20 needs a 100~240V AC mains supply to operate, and this should be fused appropriately (SA max.).
- The PTC20 should be mounted in a location where it will not come into contact
Note: with water, moisture or condensation. 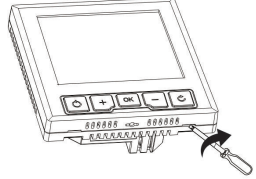
- Use a flat-blade screwdriver to open the front cover of the thermostat from snap hole at the bottom.
- Wiring the terminal correctly, then fasten the screws.
- Secure the thermostat back cover to the junction box with 2 screws.
- Close the front cover.
Wiring thermostat PTC20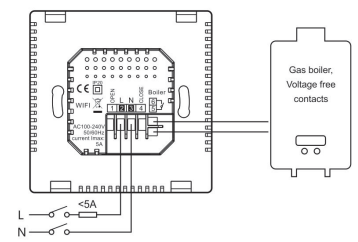
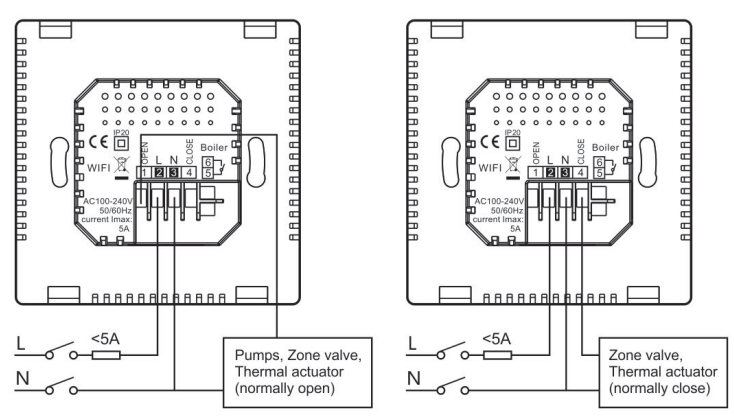
Note
- Install in accordance with local wiring regulations.
- The wiring should be operated by trained personnel. A
- Observe ambient temperature and current limits (see product data sheet).
- These wiring diagrams must be referenced and combined with the corresponding instructions provided by the actual equipment manufacturer.
- Lancable accepts no liability for any loss or damage arising from any errors or omissions that may be inadvertently contained within these diagrams. They are proposal diagrams only, not certified wiring diagrams.
System settings
Thermostat WIFI settings
- Scan the QR code below or search “poersmart” in Google play or APP store to download and install ii. Aller installation, register the account as required.
- Add the thermostat PTC20 as prompted on the APP under registered account.
Thermostat operation
Time setting
Follow the installation diagrams to install and connect the PTC20 correctly. This thermostat is adapted to 86mm hidden box and 60mm European box.
- Enter Menu Selection by long pressing
 until there is a flashing
  , then enter Clock Setting by pressing
- Firstly set Year after entering Clock Setting, when
 appeared on Temperature Area, press
  to select the current year and pressto set.
 - When
 appeared on Temperature Area, press
  to select current month and press to set.
 - When
 appeared on Temperature Area, press to select current date and press set.
 - When clock setting is flashing on Time Area, press 0 C=J to select current time and pressto confirm.
- Back to the last setting menu by pressing

Pre-set Program
This thermostat comes with the following default settings pre-programed for your convenience:
Working days’ pre-set program
| Event | 1 | 2 | 3 | 4 | 5 | 6 | 7 |
| Time | 00:00 | 6:30 | 8:30 | 12:00 | 14:00 | 16:30 | 22:30 |
| Temperature | 7 | 20 | 16 | 16 | 16 | 21 | 7 |
Weekend’s pre-set program (Sat., Sun.)
| Event | 1 | 2 | 3 | 4 | 5 | 6 | 7 |
| Time | 00:00 | 7:00 | 9:00 | 12:00 | 14:00 | 16:30 | 23:30 |
| Temperature | 7 | 20 | 18 | 21 | 18 | 21 | 7 |
To adjust the pre-set program
After adding the device, please operate it in the programming function of the app. For offline operation, please scan the QR code to view it.
AUTO mode
In AUTO mode, if you want to temporarily adjust the current temperature value, you can change the current temperature setting by operating the control panel.
- Under AUTO mode, enter Override mode by pressing
 AUTO MAN appeared on upper right when changing the setting., if you want to temporarily adjust the current temperature value, you can change the current temperature setting by operating the control panel.
 - The current programming period is recorded when entering the override mode, and the end time of the override mode is the programming end time of the period.
Temperature manually
Manual Mode-to set a constant room temperature manually.
Switch between AUTO and Manual Mode by pressing ![]() Adjust required temperature under MAN mode by pressing
Adjust required temperature under MAN mode by pressing![]() Setting temperature display to the bottom left of the display.
Setting temperature display to the bottom left of the display.
Holiday Mode
- Make a holiday plan, it will keep your room at the pre-set temperature until your return time is coming. The default temperature for Holiday Mode is 7 C, you also can change this default value in User Options or APP.
- Offline local setting holiday mode Please scan the QR code to view it.

ECO Mode
It is an quick access to energy saving but also maintain comfort. Under ECO Mode, the room will be always kept at a pre-set temperature unless you exit this mode. The default temperature is 9 C, you can change this default value in User Options or APP.
- Enter ECO Mode by pressing

- Exit ECO Mode by pressing
OFF Mode (Frost Protection)
Under OFF Mode, your room’s Frost Protection will be automatically turned on unless you exit the mode; The default temperature is 7 C, you can change this default value in User Options.
- Enter OFF Mode by long pressing
- Exit OFF Mode by pressing
Child Lock
To avoid wrong operation by child, this thermostat has Child Lock function; once started this function, there will be no reaction if short press on any button.
- Long press to enter Menu Selection, select by confirm by pressing to enter Child Lock function when
 is flashing.
 - Cancel Child Mode by long pressing
Turn off the display
Long press ![]() and
and ![]() simultaneous to turn off the display, Press
simultaneous to turn off the display, Press ![]() to turn on the display.
to turn on the display.
User Option
You may change user option after entering User option by Pressing ![]() when User option is flashing under Menu Selection.
when User option is flashing under Menu Selection.
- Under User Option, the option ID is showing on Temperature Area(screen left side), the Option Content is shown on Time Area(screen right side).
- Option ID is flashing under User Option(details to see User Options Table below ), press to scroll through selectable options, select the target Option ID by pressing then, adjust the User Option by pressing and set it down by pressing . Press GJ U to set other User Options.
- To cancel User Operation’s setting, press when Option Content flashing.
- To exit User Operation’s setting, presswhen Option ID flashing.
User Options Table
| ID | Option Content | Min. | Max. | Default |
| 1 | Change 12h or 24h clock | 12 | 24 | 24 |
| 2 | Change to another pre-set program | 1 | 3 | 1 |
| 4 | Change temperature offset°C (0.5°C / step) | -10 | 10 | 0 |
| 5 | Restore the factory Settings | OFF | ON | OFF |
| 6 | To disable Off function | OFF | ON | OFF |
| 7 | Frost Protection | OFF | ON | ON |
| 8 | Pre-set the lowest temperature | 0 | 5 | 5 |
| 9 | Pre-set the highest temperature | 32 | 60 | 32 |
| 10 | Pre-set the ECO temperature | 5 | 32 | 9 |
|
11 |
Valve Protection(unit: min., if the valve has not been opened for 24hours, it will be automatically opened every 1O:OOam ; “O” means no Valve Protection. ) |
0 |
5 |
0 |
| 12 | Change degrees Celsiusor or Fahrenhieit | C | F | C |
| 17 | Change humidity offset | -30 | 30 | 0 |
| 18 | PIO control function | OFF | ON | OFF |
| 19 | PIO control hysteresis adjustment | 0.1 | 1.0 | 0.3 ( ±0.3 °C ) |
|
20 |
Temperature control hysteresis adjustment |
0.1 |
1.0 |
0.3 ( ±0.3 °C ) |
| 21 | Window opening function | OFF | ON | OFF |
| 22 | Window opening stop heating time | 0 | 60 | 60 (minute) |
|
23 |
OFF mode target temperature range setting |
ld8 |
ld9 |
s0 c |
| Warning: User option 19, 20 substantial reduction in sensitivity may lead to frequent on and off heating, especially when using automatic PIO control, in the worst case it may damage the heat source. | ||||
Thermostat PTC20
| Operating Temperature | o – so0 c |
| Control mode | Heating system |
| Display | LCD with backlight |
| Temperature control range | 5′ C – 32’C (0.5’C/step)adjustable in useroption from O’ C to 60’C |
| Temperature control accuracy | ±0.3°C/adjustablefrom ±0.1°C to ± 1.0°c |
| Antifreeze temperature | s0 c |
| Humidity range | 10to90%RH |
| Humidity accuracy | ±5%RH |
| Time display | 12 hour/24 hour |
| Dimensions (HxWxD) | 86 x 86 x 40.5mm |
| IP class | lp30 |
| Standard | CE |
| Power | 2W |
| Power supply | 100VAC – 240VAC, 50Hz |
| Switch rating | 240VAC 50Hz , 5A |
| Switch type | SPOT relay |
Technical specifications are subject to change without notice
Reference
Download Manual:
Poer PTC20 WIFI Programmable Room Thermostat User Manual