
Mco-home MH-F500 SMART Thermostat
Introduction
MH-FS00 thermostat is used to control up to 3 stages heating and 2 stages cooling system with 8 types control system, EM heat activation, adjustable compressor delay time and O/B changeover. It is with tempered touch sensitive screen, quick connecting terminals to save installer’s time. 7days programmable and four modes everyday make users’ life convenient and comfortable.
Technical Parameters
- Power Supply: AC24V
- Resistive Load:< lA
- Self-Consumption: <2W
- Thermistor: NTC thermistor
- Temp.SettingRange: 10-35C(50-951′)
- Precision: 0.1 C(l 1′)
- Outcase: Tempered glass + PC
- Dimension: 102*102*20rnm
- Installation: 60mm or 82mm hole pitch
- Active Element: Relay switch µ
- Maximum Transmitting Power: +3dBm
- Z-Wave Frequency: Operating frequency range, defined by the regulatory bodies (for Z-wave in Europe: 868.0 -868.6 MHz. 869. 7 – 870.0 MHz)
Features
- Application range: gas/fuel boiler, electric heating, water heating, heat pump etc. 8 types control systems.
- 4.3″ LCM display, touch screen operation interaction.
- Simpler way to connect wires without screw driver.
- 7 days 4 time periods scheduling. Set the target heating and cooling temperature respectively.
- Schedule, hold modes for different situations.

Declaration of Conformity
![]() Hereby, MCOHome declares that the device is in compliance with the essential requirements and other relevant provisions of Directive 2014/53/EU.
Hereby, MCOHome declares that the device is in compliance with the essential requirements and other relevant provisions of Directive 2014/53/EU.
WEEE Directive Compliance
![]() The device marked with this symbol should not be disposed of with household waste. It is the user’s responsibility to deliver the used appliance to a designated recycling point.
The device marked with this symbol should not be disposed of with household waste. It is the user’s responsibility to deliver the used appliance to a designated recycling point.
Z-Wave Compliance
![]() MCOHome thermostat is a fully compatible Z-Wave Plus device.
MCOHome thermostat is a fully compatible Z-Wave Plus device.
Important Safety Information
 Read the instructions before starting up the unit!
- This product is not a toy. Keep out of reach of children and animals!
- Do not expose the device to moisture, water or other liquids. Do not place liquids near or on the device!
- Do not attempt to disassemble, repair or modify the device yourself!
- This product is for indoor use only. Do not use outdoors!
![]() CAUTIONS! Compressor protection is bypassed during testing. To prevent equipment damage, avoid cycling the compressor quickly.
CAUTIONS! Compressor protection is bypassed during testing. To prevent equipment damage, avoid cycling the compressor quickly.
![]() CAUTIONS! Compressor protection is bypassed during testing. To prevent equipment damage, avoid cycling the compressor quickly.
CAUTIONS! Compressor protection is bypassed during testing. To prevent equipment damage, avoid cycling the compressor quickly.
![]() MERCURY NOTICE
MERCURY NOTICE
If this product is replacing a control that contains mercury in a sealed tube, do not place the old control in the trash. Contact your local waste management authority for instructions regarding recycling and proper disposal.
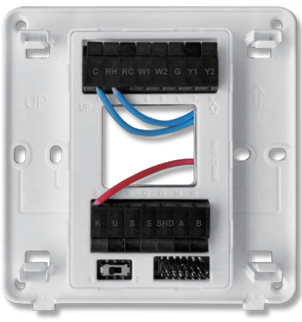
Wires Connection Instruction
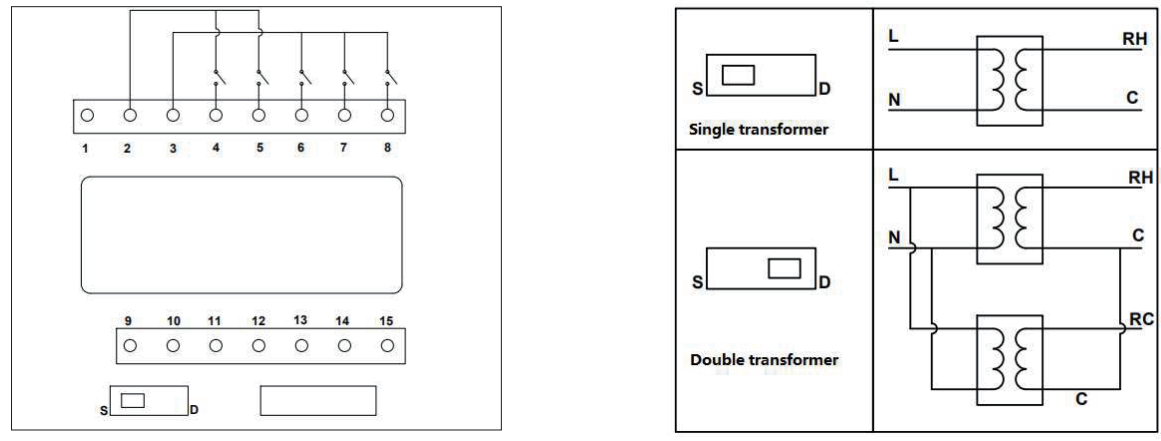
| Terminal | Conventional | Heat pump | |
| C | C | 24V AC power supply | |
| Rh | Rh | ||
| Re | Re | ||
| W1 | 0 / B | Heating or changeover | |
| W2 | AUX | 2nd stage heating or auxiliary heating | |
| G | G | Faa | |
| Y1 | Y1 | Compressor stage 1 | |
| Y2 | Y2 | Compressor stage 2 |
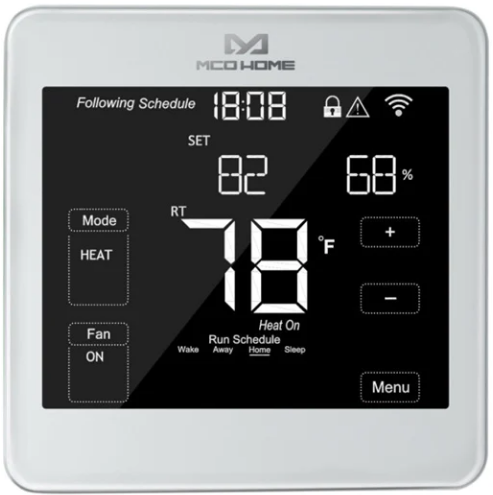
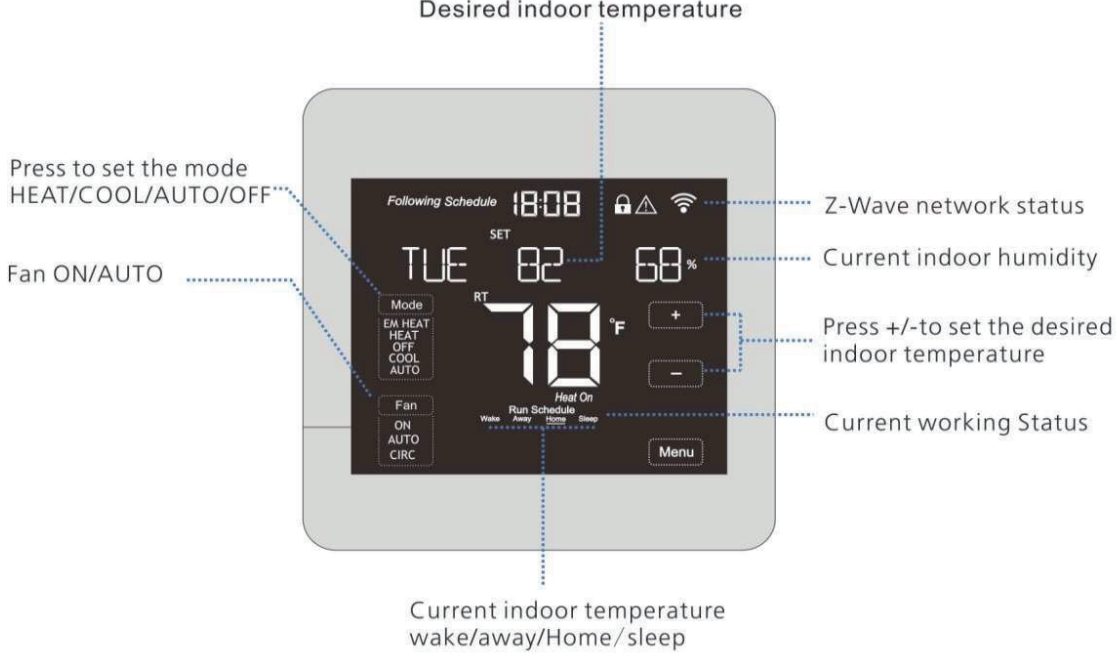
Display
Functions & Settings
Set system status
System status: EM Heat, Cool, Heat, Off. EM Heat is only used for heat pump system with auxiliary heating.
Change fan status
- Press to change the options in the fan status area from Fan On and Fan Auto.
- Fan On: The screen displays Fan On. In this status, the fan will be normally on and will be OFF until the device is under OFF status.
- Fan Auto: The screen displays Fan Auto. In this status, the fan will be on automatically once the device is heating or cooling. The fan is OFF when the device does not heat or cool.
Set the desired indoor temperature
Press “+”or “-” to set the desired indoor temperature. Setting range: IO—35C (50—95 T ).
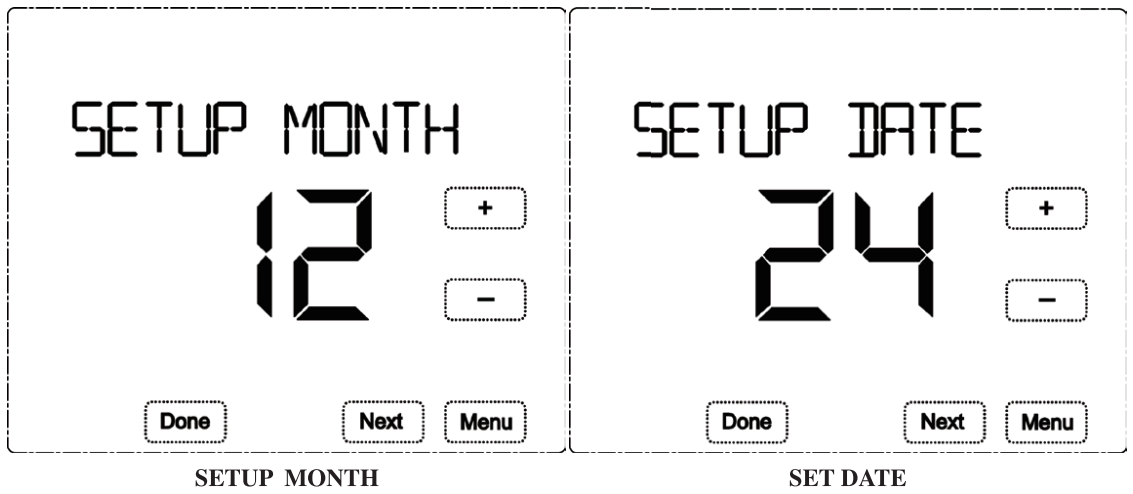
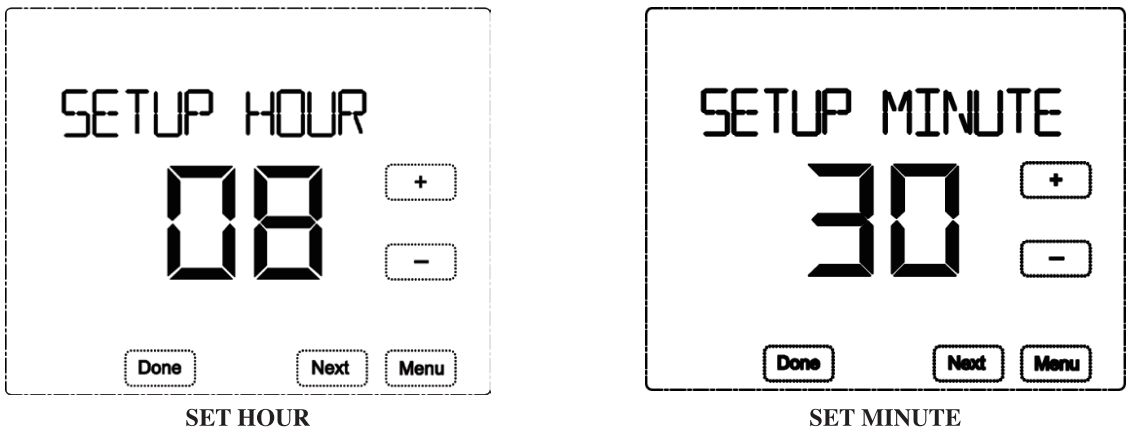
Set time & date
Press “MENU”-“DATE-TIME”-“Edit””SETUP YEAR”-“+/-“to chnage – “NEXT”-“SETUP DATE”/”SETUP HOUR”/”SETUP MINUTE”-“D|one”save the settings. By pressing “Menu”, the device will return back to the upper-level setting interface without storing the changes. Please check the following figures:
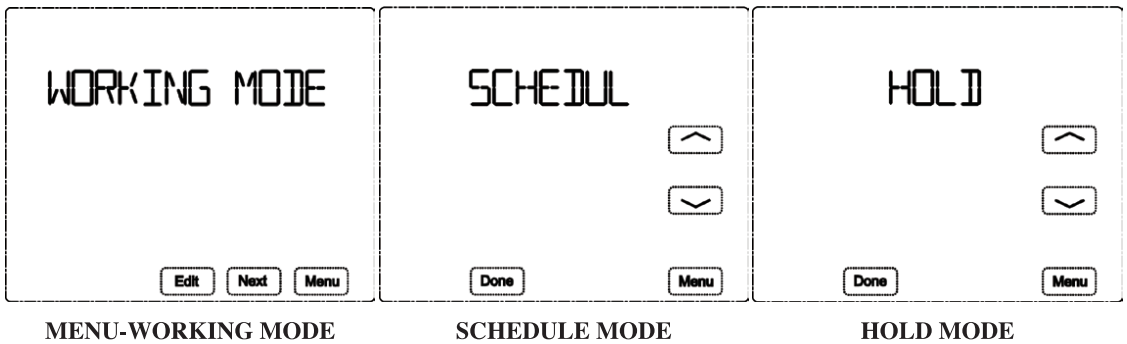
Set working mode
The device provides two modes for the users: Scheduling, Hold Press “MENU”-“NEXT”until the displays shows —”WORKING MODE”-“EDIT”: When the screen shows.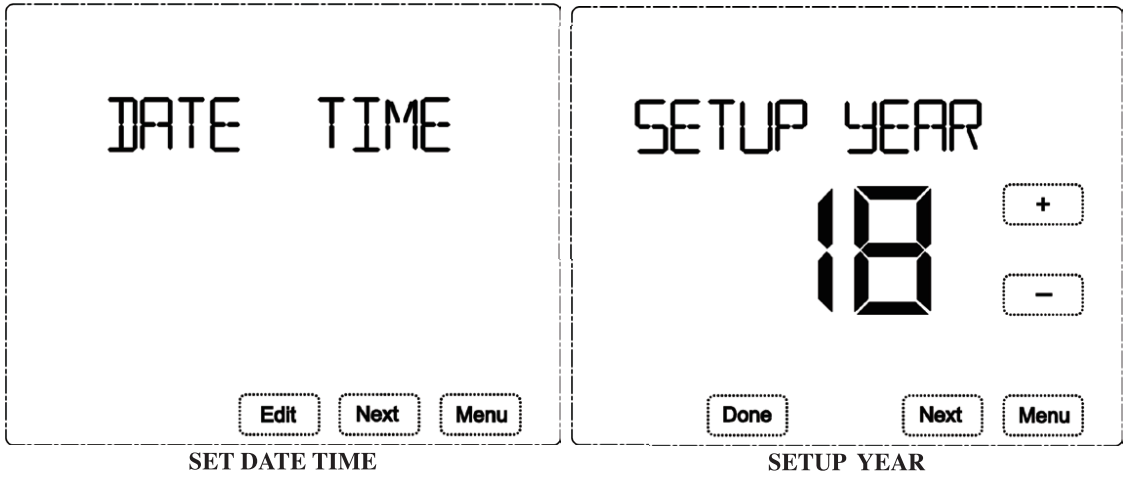
“SCHEDULE”, press ‘A’ or ‘V’ to switch to “Hold” mode—press “Done” to save the settings and return back to the upper-level interface. By pressing “Menu”, the device will return back to the upper-level setting interface without storing the changes. Please check the following figures:
- a. When the screen shows “Following Schedule”, it represents that the device is working under schedule mode. The device works based on the set time periods and target temperatures during each period. If pressing +1- to set the desired indoor temperature, this set temperature will be valid only for the current period.
- b.When the screen shows “Hold”,it represents that the device is working under hold mode. The device controls to heat or cool based on the desired fixed indoor temperature until the working mode is changed.
Z-Wave Configuration
Press Device will enter learning mode to get a node ID. If inclusion is succeeded, a node ID will display on the screen in a few seconds. —»Press “Done” A node ID can always inform us whether the device is in the network or not.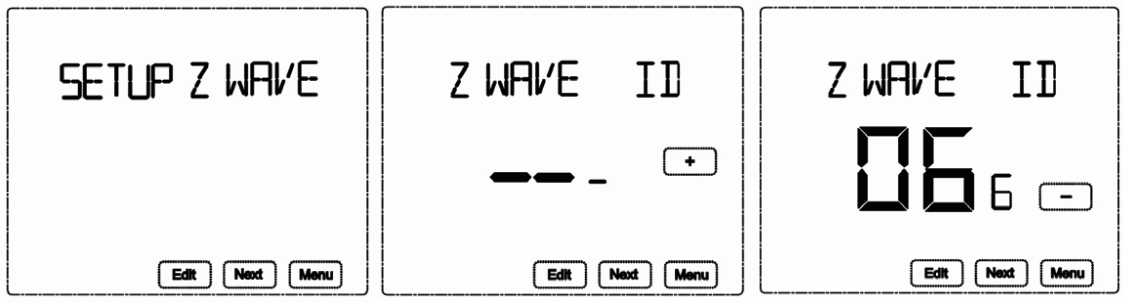
Set schedule
The device provides 4 times periods each day/7days for both heating and cooling status. Press 3 to select HEAT or COOL under Mode area to set heating or cooling 06:00 00 (blinking) or -“to change the period start F (Blinking)—*”+ or -“to set the desired or -“to change the 2nd period start F (Blinking)—»”+ or-“to set the desired (blinking) —+”+ or -“to change the Yd period start F or -“to set the desired (blinking) or -“to change the 4th period start or -“to set the desired temp.—» TUESDAY 06:00…
Then follow the same procedure to do the schedule setting. Finally, press “Done” to save all the settings and return back to the main interface. Please check the following figures:
PRE-set time and temp. from factory for the 7 days 4 time periods:
| WORKING MODE | Wake | Away | Home | Sleep |
| COOL Mode | 6: 00 25.5 C
(78 1′ ) |
8: 00 29_5· c
(85 1′ ) |
18: 00 25_5·c
(78 1′ ) |
22: 00 28(
(821′ ) |
| HEAT Mode | 6: 00 25_5· c
(781′) |
8: 00 29.5 C
(851′) |
18: 00 25.5 C
(781′ ) |
22: 00 28· c
(821′) |
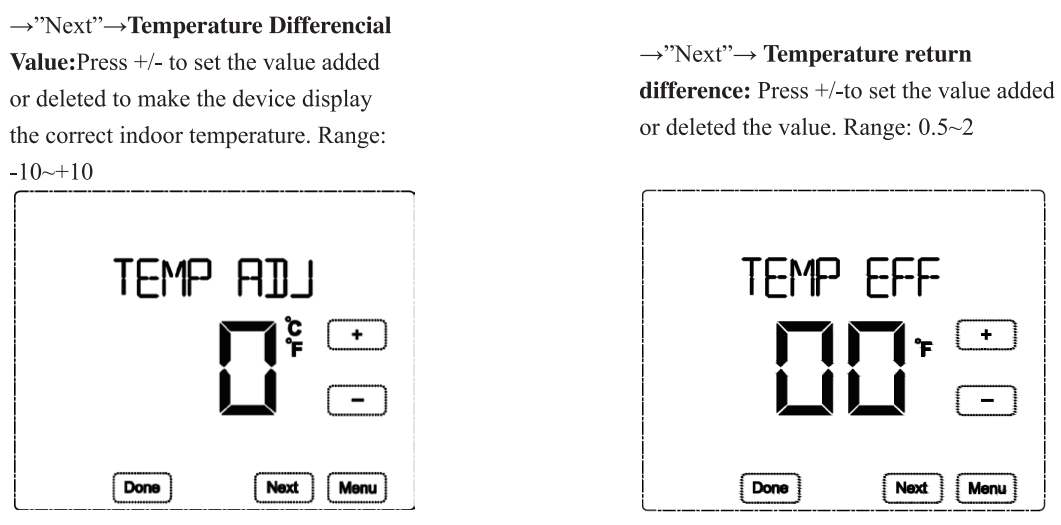
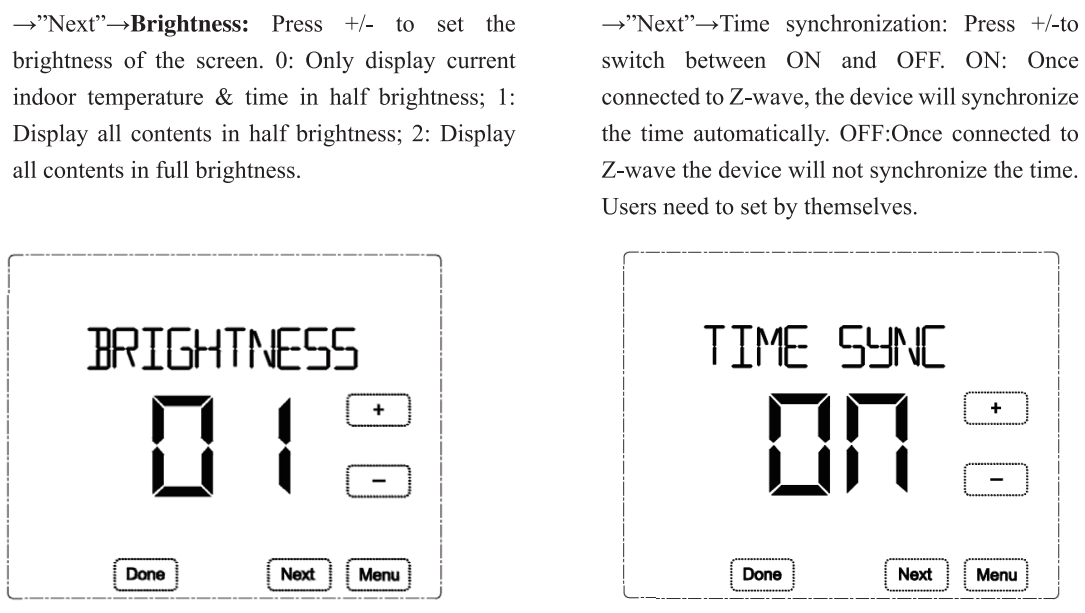
User Setup
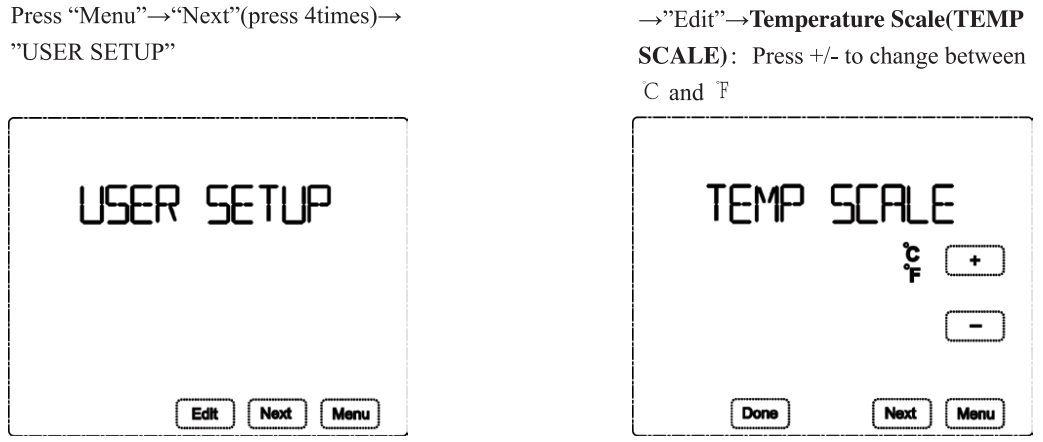
System type:
| Conventional Type | 0 Single stage cool | single stage heat | I Heat 1 Cool | ||
| Heat pump Type | Single stage cool | 4 si ngle s tage heat | 2Heat | 6 Multi-cool 1 Heat | Multi-cool 2 Heat |
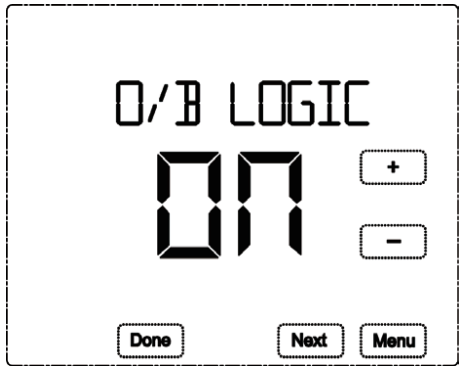
O/B Change over logic:
Compressor protect:
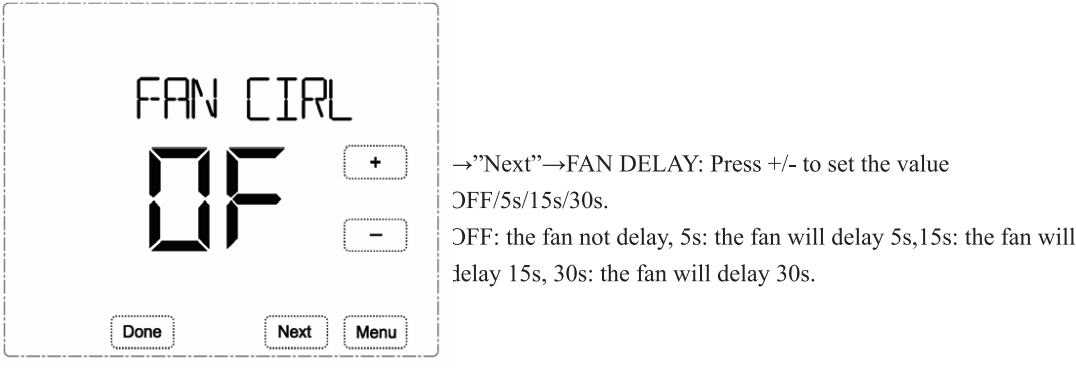
Compressor delay time setting from 00 to 10 minutes.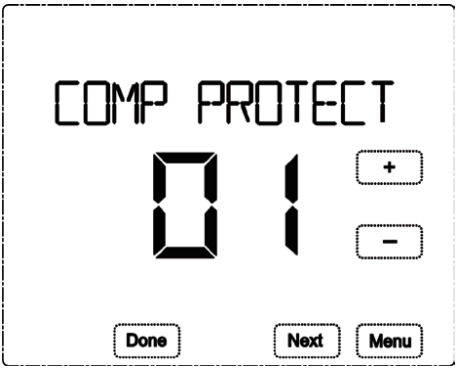
EM HEAT MODE:
Emergency heat. Default is OFF. Users can set it to ON so that the thermostat will start EM heat when the outdoor temperature is extremely low so as to protect the outdoor unit.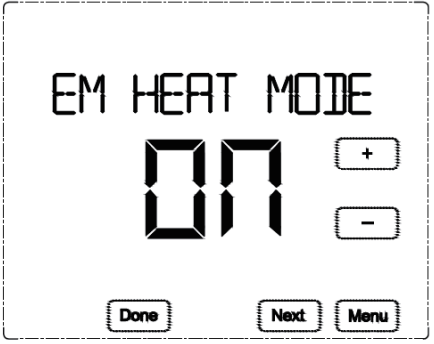
CHANGE OVER:
When change over is ON, the device will start heating or cooling automatically according to the desired temp. When change over is OFF, the device will not start heating/cooling automatically so as to save energy when there is nobody at home.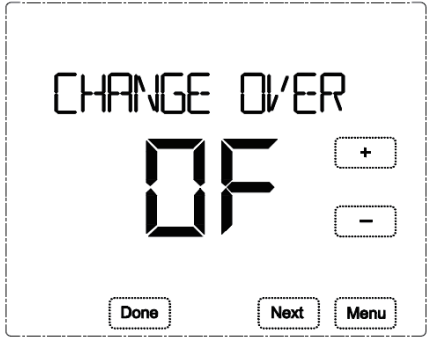
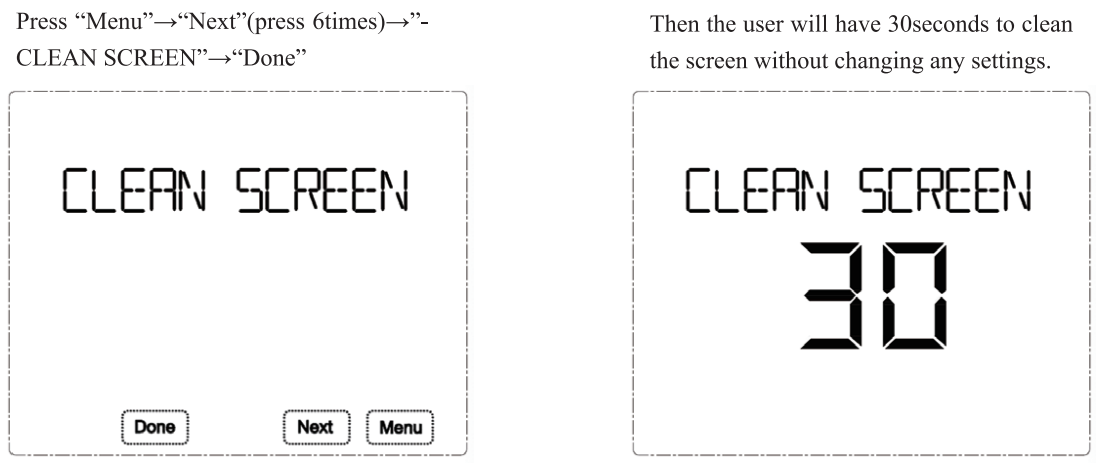
Clean Screen
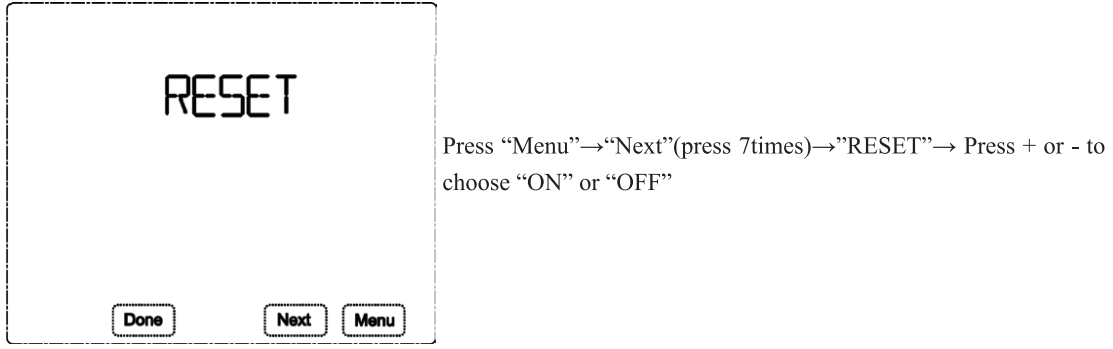
Reset to factory default
Z.Wave Function
- The device supports S2 function
- Z-WAVE supported Command Class:
- COMMAND CLASS ZWAVEPLUS INFO,
- COMMAND CLASS VERSION,
- COMMAND CLASS MANUFACTURER SPECIFIC,
- COMMAND CLASS POWERLEVEL,
- COMMAND CLASS ASSOCIATION,
- COMMAND CLASS ASSOCIATION GRP INFO,
- COMMAND CLASS SENSOR MULTILEVEL,
- COMMAND CLASS THERMOSTAT SETPOINT,
- COMMAND CLASS THERMOSTAT MODE,
- COMMAND CLASS THERMOSTAT OPERATING STATE,
- COMMAND CLASS THERMOSTAT FAN MODE,
- COMMAND CLASS THERMOSTAT FAN STATE,
- COMMAND CLASS BASIC,
- COMMAND CLASS TIME,
- COMMAND CLASS TIME PARAMETERS,
- COMMAND CLASS CONFIGURATION,
- COMMAND CLASS TRANSPORT SERVICE V2,
- COMMAND CLASS SECURITY 2,
- COMMAND CLASS SUPERVISION,
- COMMAND CLASS FIRMWARE UPDATE MD
Association Group
| AG Identifier | Max Node ID | Command Class | Trigger Situation |
| OxOI | COMMAND_CLASS_SENSOR _MU LTI LEVEL_V5, SENSOR _MUL TI LEVEL _REPORT _V5 | When parameter 2 set to I , the detected temperature change is greater than the value set by parameter 3.
When the parameter 2 set to 2,when the report is the in te rva l time is greater than the value set by parameter 4. When parameter 2 set to 3, the detected temperature change is greater than the value set by parameter 3 or the reported time is greater than the value set by parameter 4. |
|
| COMMAND_CLASS_THERMOSTAT_MODE_V2, TH ERMO STAT_MODE_REPORT | Thermostat mode changes | ||
| COMMAND_CLASS_THERMOSTAT _OPERATING _STATE, THE RMOSTAT _OPERATING_STATE_REPORT | Thermostat status changes | ||
| COMMAND_CLASS_THERMOSTAT _SETPOINT_V2, THERM OSTAT_SETPOINT _REPORT_V2 | Set point value changes | ||
| COMMAND_CLASS_THERM OSTAT_FAN_MODE, THERM OSTAT_FAN_MODE_REPOR T | Fan mode changes | ||
| COMMAND_CLASS_ THERMOSTAT _FAN_ STATE, TI-I ERMOS TAT_FAN _STATE_RE PORT | Fan status changes | ||
| COMMAND_CLASS_DEV ICE_RESET_LOCALLY, DEV ICE_RESET_LOCALLY _NOTI FICATION | Restore the factory setting |
Z-Wave Parameter Setting
| Number | Function | Size | Description | Default | Possible Values |
| Automatic Temp Scale Reporting | 0: Celsius 1: Fahrenheit 2: Follow the main page display | 0-2 | |||
| Automatic Temperature Value Reporting | 0: OFF
I: Only report the difference, the current temperature and the last temperature of a certain value to trigger the reporting 2: Regular reporting only 3: Difference reporting + Interval reporting |
0-3 | |||
| Temperature Difference Setting | Unit: 0.1 C Default: 5 s•o.1 c–o.s c | 3-1000 | |||
| Timed Report Intervals | Based on Is unit, it is recommended to set it above 30s. | 30 | 10- 3 2768 | ||
| FF | Factory Setting | 85: Restore factory setting(write only) | 85 |
1-Year Limited Warranty
We warrant this product to be free from defects in material and workmanship under normal and proper use for one year from the purchase date of the original purchaser. We will, at its option, either repair or replace any part of its products that prove defective by reason of improper workmanship or materials. THIS LIMITED WARRANTY DOES NOT COVER ANY DAMAGE TO THIS PRODUCT THAT RESULTS FROM IMPROPER INSTALLATION, ACCIDENT, ABUSE, MISUSE, NATURAL DISASTER, INSUFFICIENT OR EXCESSIVE ELECTRICAL SUPPLY, ABNORMAL MECHANICAL OR ENVIRONMENTAL CONDITIONS, OR ANY UNAUTHORIZED DISASSEMBLY, REPAIR OR MODIFICATION. This limited warranty shall not apply if: (i) the product was not used in accordance with any accompanying instructions, or (ii) the product was not used for its intended function. This limited warranty also does not apply to any product on which the original identification information has been altered, obliterated or removed, that has not been handled or packaged correctly, that has been sold as second-hand or that has been resold contrary to Country and other applicable export regulations.
Reference
Download Manual:
Mco-home MH-F500 SMART Thermostat User MANUAL
Leave a Reply