
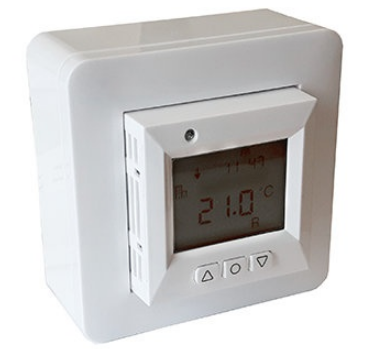
Frico PLTB16R Programmable Electronic Thermostat
Introduction
For the guarantee to be valid, the product must be installed and operated as indicated in this manual. This means it is extremely important that you read the manual. This applies both to the person installing the thermostat and the person who is going to use it. You will also find troubleshooting details and technical specifications.
Important The underfloor heating system is an electrical power installation and must therefore be installed in accordance with the current regulations and under the supervision of a qualified electrician.
This is a microprocessor-controlled thermostat with LCD display. The dis-play has dimmed background lighting which lights up fully by pressing any button. The display stays lit for 30 seconds after the last button pressed. The front is fitted with an on/off button and three control buttons.
There are two temperature reduction programs to choose from for energy-smart heating.
Temperature control is carried out by means of an algorithm that uses fuzzy technology. The technology entails the thermostat testing and collecting data from start-up, and based on this, calculating when to turn on and off. This technology reduces temperature variations and thus provides a more constant temperature and lower energy consumption. The floor temperature varies less than +/- 0.3 degrees.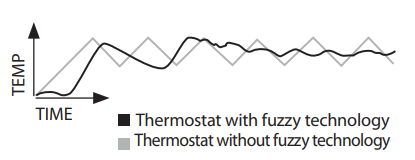
In the package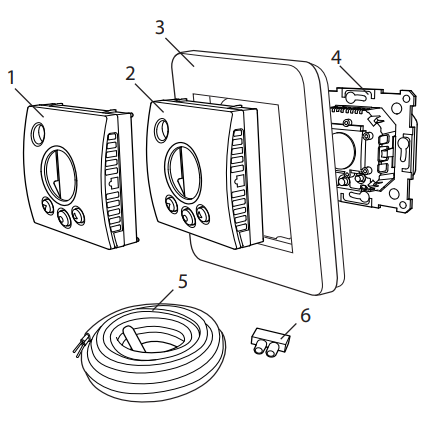
- Front for ELKO Plus/RS
- Front for Schneider Exxact
- Frame
- Thermostat
- Floor sensor
- Connection clip
Manual Quick guide
Installing the thermostat
Important the thermostat must not be installed where it may be exposed to the following:
- direct sunlight and draughts.
- extreme fluctuations in temperature or high air humidity.
The floor sensor should be mounted in a spiral hose laid in the floor. The hose en-dings should be sealed so that the floor sensor can easily be replaced. All tubes leading into the appliance box must be sealed so that the air temperature sensor cannot be affected by draughts.
Installation
Mount the thermostat in a 65 mm standard appliance box.
- Make sure the box is level with the wall.
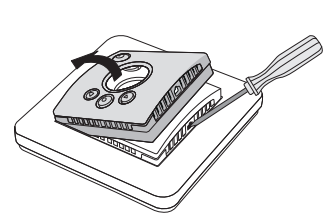
- Take off the front and frame by pres-sing in the latch on the right-hand side with a screwdriver or similar tool, as shown in the illustration.
- Connect power, voltage 230 VAC, load and any floor sensor cable. Any extension to the floor sensor cable must be by means of high-voltage cur-rent. Protective conductors for the incoming feed and for the heating cable are connected with a connection clip in the box. See wiring diagram below.
- Insert the thermostat into the appliance box and screw tight with the existing screws.
- Fit the frame and front.
- If the thermostat is mounted in a multi-compartment frame, the internal corners of this frame must be removed.

Getting started
After installation, wait 2-4 weeks before starting the underfloor heating. Precisely how long you wait depends on the type of floor you have and the instructions for the floor filler. Then increase the heat gradually. This does not apply to those who have laid a wooden/laminate floor on the floor heating.
There is a quick guide that helps you to get started easily with the thermostat. You will find it in the package. The guide describes the most important functions and settings.
In order to adapt the underfloor heating system to your own heating requirements as much as possible, it is important that you read the entire manual.
How the thermostat works
This section describes all you need to know about how the thermostat works. To learn how to enter settings to suit your own requirements, read the How to set the thermostat section.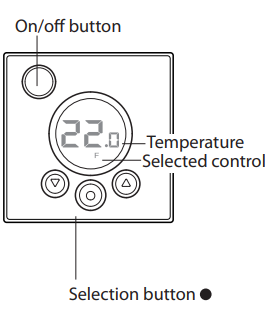
Display
The light in the LCD display is fully lit when you press any button, and remains lit for 30 seconds after the last button pressed. The light then dims again. It is possible to set the display to turn the light off entirely. This is des-cribed in the How to set the thermostat/Light and contrast section.
If the display is empty, it means that the thermostat is turned off or that it is not connected to the power supply.
When the thermostat is started for the first time the display shows the factory settings as shown in the illustration. How to enter personal settings is described in the How to set the thermostat section.
There is an explanation of the symbols on the display in the Symbols section.
Using the buttons
The buttons are used to raise and lower the temperature as well as to scroll the menus.
You access the menus by pressing the selection button,![]() . Use the arrows to scroll to a menu option and then confirm
. Use the arrows to scroll to a menu option and then confirm![]() with to select it. The menu system is a scrolling system, in other words you come to all submenus regardless of the direction you scroll.
with to select it. The menu system is a scrolling system, in other words you come to all submenus regardless of the direction you scroll.
If you want to exit a menu, scroll until the display shows END. Then press the selection button![]() . You can also wait for 30 seconds and the menu exits automatically. How to navigate the menus is described in the How to set the thermostat section.
. You can also wait for 30 seconds and the menu exits automatically. How to navigate the menus is described in the How to set the thermostat section.
Turning on and off
Keep the on/off button pressed for one second to get to standby mode. Return to normal mode by once again pressing the button for a second.
The heating cannot be controlled in standby mode. The clock runs as nor-mal, and selected programmes and set temperatures are stored in the memory.
Locking the keypad
The keypad can be locked to prevent anyone touching the buttons by mistake. This is shown with the LOCK symbol in the display.
Press![]() and scroll to LOCK. Confirm with
and scroll to LOCK. Confirm with![]() to lock.
to lock.
Unlock by holding down both arrows until the LOCK symbol has disappeared.
Temperature
Displaying current temperature (actual value)
Lock the keypad first. Press![]() . The light will come on and the current tempera-ture in the floor (F) is displayed. This is the case if the thermostat is set to Floor thermostat. Otherwise the actual temperature (R) in the room is displayed. The temperature is shown for 30 seconds after the last button pressed.
. The light will come on and the current tempera-ture in the floor (F) is displayed. This is the case if the thermostat is set to Floor thermostat. Otherwise the actual temperature (R) in the room is displayed. The temperature is shown for 30 seconds after the last button pressed.
Time and date
Time is set in 24-hour format. The correct day of the week is worked out automatically. The calendar resets itself in leap years and adapts to DST. Read how to set the correct time and date in the How to set the thermostat/Time and date section.
Adaptive function
The thermostat has a function which works out when the heating should start to give the correct temperature at the correct time. It is activated on delivery, but can be turned off:
Press![]() and scroll to SET. Select with
and scroll to SET. Select with![]() . Scroll to AF, select with
. Scroll to AF, select with![]() .
.
Scroll between ON/OFF, then confirm with![]() .
.
Ventilation mode
If the room temperature falls by more than 3 °C in a single minute, e.g. when airing the room, the ventilation mode is activated. The thermostat will then stop heating for 15 minutes before returning to normal mode. This function is always active.
Delay between turning off and on There is a built-in delay in order to avoid unnecessary wear and tear on internal components and to extend the life of the thermostat. If you raise the desired temperature so that the thermostat comes on, and then lower it shortly afterwards, it takes four minutes before it goes off again.
Current status![]()
The heat symbol allows you to see the current status. See the Symbols on the display section.
Symbol on – the thermostat is on and the underfloor heating is activated. Symbol off – the thermostat is on and the underfloor heating is switched off.
Control functions
The thermostat can regulate the temperature in three different ways. This enables the comfort temperature and any flooring temperature requirements to be combined.
How you select the function you want is described in the How to set the thermostat/Control functions section.
Floor thermostat – A sensor in the floor measures the temperature and then regulates the heating accordingly. If the floor sensor is connected when the thermostat is turned on for the first time, this function is selected automatically. The preset value is 22 °C.
Room thermostat – the thermostat has built-in sensors for measuring the room’s temperature and controlling the heating. The control function cannot be selected when the floor sensor is connected.
Room and floor thermostat – The built-in sensor regulates the room temperature and the sensor in the floor functions as a floor temperature limiter. The limitation can be set to between 5 °C and 45 °C. The factory setting of 35 °C gives a surface temperature of approx. 27 °C. The cut-out temperature can be changed, see the How to set the thermostat/Temperature section.
Important
In rooms with large windows that are ex-posed to solar insolation, we recommend the Room and floor thermostat function.
In rooms with wooden flooring, the Room and floor thermostat function must always be used.
Symbols on the display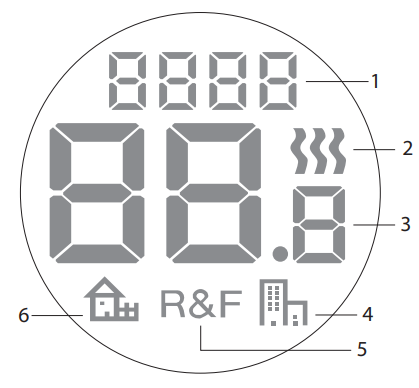
- Selected menu/LOCK for locked keypad
- Heating symbol
- Current temperature (actual value) /Set temperature (set point) °C
- Symbol for energy saving programs, office
- Selected control
- Symbol for energy saving programs, home
How to set the thermostat
This section describes how to set the thermostat to suit your requirements. By entering these settings you can fully utilise the underfloor heating system to meet your own heating requirements.
If you want to find out more on how to scroll the menus or use the keypad, read the How the thermostat works section.
Reset
You use the Reset function to revert the thermostat to the default factory settings. All your personal settings will be deleted.
Press![]() and scroll to SET. Select with
and scroll to SET. Select with![]() . Scroll to RST and select with
. Scroll to RST and select with![]() .
.
Scroll between NO/YES, then confirm with![]() . YES deletes the settings, NO returns to the menu.
. YES deletes the settings, NO returns to the menu.
Light and contrast
Set the display background lighting
The display stays lit for 30 seconds after the last button pressed. The light then dims again. It is also possible to set the display to turn the light off entirely.
Press![]() and scroll to SET. Select with
and scroll to SET. Select with![]() . Scroll to DISP and select with
. Scroll to DISP and select with![]() .
.
Scroll between ON/OFF, then confirm with![]() . ON sets the display to a weak light 30 seconds after the last button pressed, while OFF turns the display light off completely.
. ON sets the display to a weak light 30 seconds after the last button pressed, while OFF turns the display light off completely.
Set display contrast
Press![]() and scroll to CONT. Press
and scroll to CONT. Press![]() to select. The display shows a number between 1 and 8 depending on the current setting. Scroll to regulate the contrast. Confirm with
to select. The display shows a number between 1 and 8 depending on the current setting. Scroll to regulate the contrast. Confirm with![]() when you have found the correct level.
when you have found the correct level.
Time and date
Set time and date
Press![]() and scroll to SET. Select with
and scroll to SET. Select with![]() . Scroll to CLK and select with
. Scroll to CLK and select with![]() .
.
First set the hours by scrolling to the correct time and confirm with . Set the minutes in the same way and confirm with .
Set the day, month and year in the same way. Confirm with . The week-day is not shown in the display, but the system set the correct weekday automatically.
Turn off DST
The calendar switches to DST automatically. This function can be turned off.
Press![]() and scroll to SET. Select with
and scroll to SET. Select with![]() . Scroll to S and select with
. Scroll to S and select with![]() .
.
Scroll between ON/OFF, then confirm with![]() .
.
Temperature
Change desired temperature (set point) Each press of the up or down arrow increases or decreases the temperature by 0.5°C.
Control functions
These are described in more detail in the How the thermostat works/Control functions section.
Select control function
Press![]() and scroll to SET. Select with
and scroll to SET. Select with![]() . Scroll to RNF and select with
. Scroll to RNF and select with![]() .
.
The symbol for the current function (R, F or R & F) flashes. Scroll between the different options and confirm with![]() .
.
Important R cannot be selected if the floor sensor is connected.
Change cut-out temperature for room and floor thermostat (R & F)
Press![]() and scroll to SET. Select with
and scroll to SET. Select with![]() . Scroll to OH and select with
. Scroll to OH and select with![]() .
.
The set temperature now flashes on the display. Scroll to the desired temperature and confirm with![]() .
.
Energy saving programs
A smart way to save energy is to adapt the heating to your actual daily requirements and, for example, lower the temperature when the house is empty. There are two preset program options for temperature reduction in the thermostat : one for home and one for office users.
The heat-up time is always included in the programs thanks to the adaptive function. Read more about this in the How the thermostat works/Adaptive function section.
Start a program
Press![]() and scroll to PROG. Select with
and scroll to PROG. Select with![]() .
.
The![]() symbols are shown. The cur-rent program symbol flashes. If none of the symbols are flashing, no program has been selected. Scroll between the symbols. Select with
symbols are shown. The cur-rent program symbol flashes. If none of the symbols are flashing, no program has been selected. Scroll between the symbols. Select with ![]() and the program starts. The program symbol is displayed when the program is run.
and the program starts. The program symbol is displayed when the program is run.
Stop a program
Press![]() and scroll to PROG. Select with
and scroll to PROG. Select with![]() .
.
The current program symbol flashes. Scroll until none of the symbols flash and confirm with .
Different program options
The two preset programs are suitable for most home and office environ-ments.
Programme for home environment The temperature is automatically reduced by 5 °C during the following periods:
Mon – Fri, 8.30am – 3pm
Mon – Sun, 11pm – 5am
Programme for office environment The temperature is automatically re-duced by 5 °C at all times except for: Mon – Fri, 6am – 6pm
Troubleshooting
Important
The underfloor heating system is an electrical power installation and any faults must therefore be rectified by a quali-fied electrician.
Error codes
When an error occurs, the thermostat will turn off the heating. The display flashes and shows a flashing error code.
- E1: Short circuit in room sensor.
- E2: Breakdown in room sensor.
- E3: Short circuit in floor sensor.
- E4: Breakdown in floor sensor.
Test values for floor sensor
The following values apply when the floor sensor’s measurements are checked.
| Temperature | Resistance |
| 10 °C | 18.0 kΩ |
| 15 °C | 14.7 kΩ |
| 20 °C | 12.1 kΩ |
| 25 °C | 10.0 kΩ |
| 30 °C | 8.3 kΩ |
Technical specifications
| Voltage | 230 VAC-50 Hz |
| Air temp. range | 5-37 °C |
| Floor temp. range | 5-37 °C |
| Temp. limiter | 5-45 °C |
| Breaking capacity | 16A/230 VAC/ single-pole |
| Connection cable | max 2.5 mm2 |
| Load | cos φ = 1 |
| Hysteresis | +- 0.3 °C |
| Protection class | IP21 |
| Run reserve | 4 h |
| Max. length sensor cable | 50 m, 2 x 1.5 mm2 |
Adapted for Schneider Exxact and ELKO Plus/RS frame systems.
EMC certified and can handle an overvoltage of 2,500 VAC.
Approvals:
Complies with the RoHS and the WEEE Directive.
Reference
Download Manual:
Frico PLTB16R Programmable Electronic Thermostat User Manuals
Frico PLTB16R Programmable Electronic Thermostat User Manuals
Leave a Reply