FINDER 1C.71 PROGRAMMABLE THERMOSTAT
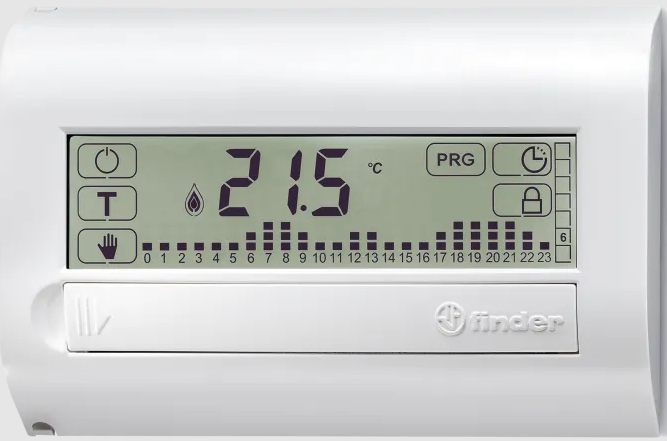
TECHNICAL CHARACTERISTICS
- Power: 2 x 1.5 V AAA alkaline batteries
- Settable temperature range – WINTER: (+5…+37)°C
- Settable temperature range – SUMMER: (+5…+37)°C
- Settable temperature range – FROST PROTECTION: (+2…+8)°C Temperature differential ΔT: (0.1…0.9)°C
- Calibration: Yes
- Resolution: 0.1°C
- Tolerance: +/–0.5°C
- Display: Touch screen
- Daylight saving time: User selectable automatic time adjustment function Programmable thermostat lock: Yes, with PIN code
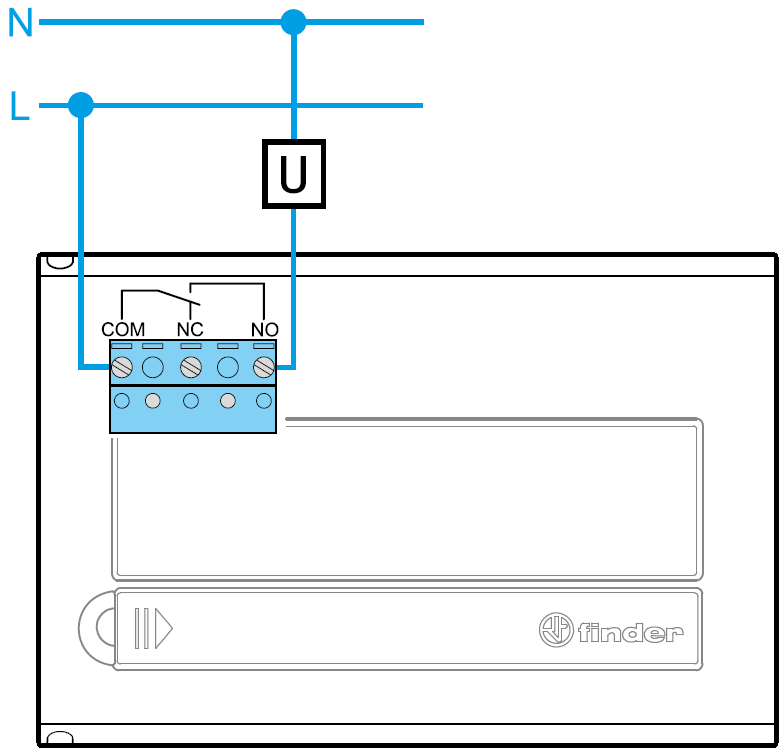
- Output: 5 A 250 V AC SPDT relay (potential free contact)
- Installation: Wall mounted
- Protection rating: IP20
CONNECTION DIAGRAM
INSTALLATION
SAFETY INSTRUCTIONS
Electrical equipment must only be installed and assembled by expert personnel. Before connecting the programmable thermostat, ensure that all associated utilities (pumps, valves, boiler etc.) are not connected to the supply and that the load is within the ratings marked on the thermostat.
LOCATION Install the programmable thermostat approximately 1.5 m above the floor, and away from sources of heat (radiators, sunlight, cookers) and from doors and windows.
CLEANING Clean with a damp cloth only.
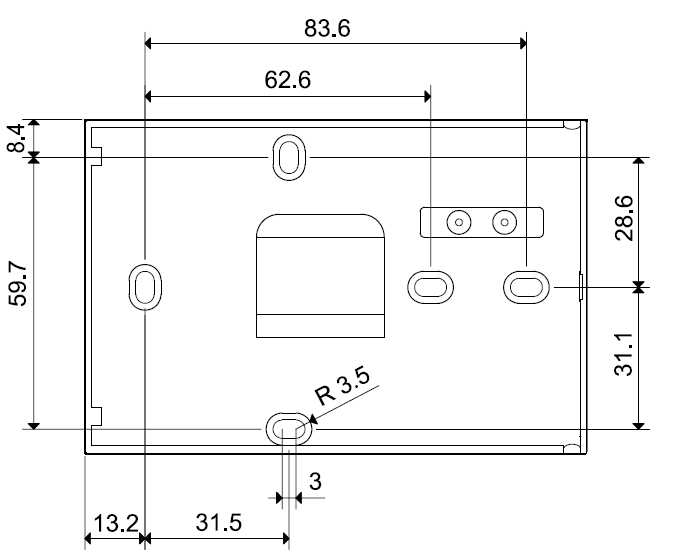
IMPORTANT Do not overtighten the screws when installing, as this may warp the base and compromise the functions of the touch screen.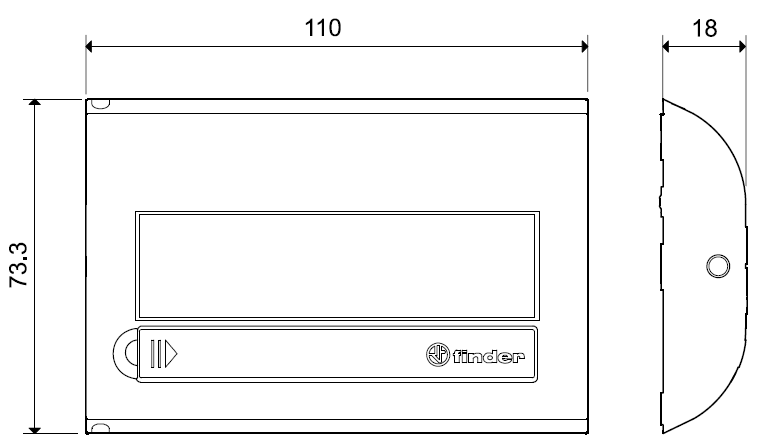
BATTERY
Fit the batteries in the compartment, ensuring that the polarities are correct as indicated.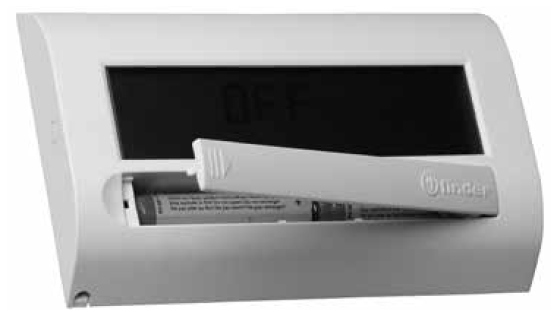
IMPORTANT
- Fitting the batteries with the wrong polarity may damage the programmable thermostat
- If battery charge drops below the minimum permissible level, the programmable thermostat switches to OFF state and the relay contact opens
- Remove the batteries if the programmable thermostat is not used for a prolonged period of time
- The programmable thermostat has the following three different low battery warning modes:

- Low battery icon displayed
 STEADY: the functionality of the programmable thermostat will soon be compromised
 - Low battery icon
 FLASHING: programmable thermostat requires imminent battery replacement
 - Messages flashing in alternation, programmable thermostat switches to OFF state and the relay contact opens
FIRST TIME USAGE
After fitting the batteries, the display shows all the icons and the software version for a few seconds, and then prompts the user to set the time and date. Use ![]()
![]() the keys to modify the value and press
the keys to modify the value and press ![]() to confirm. The main screen is then displayed.
to confirm. The main screen is then displayed.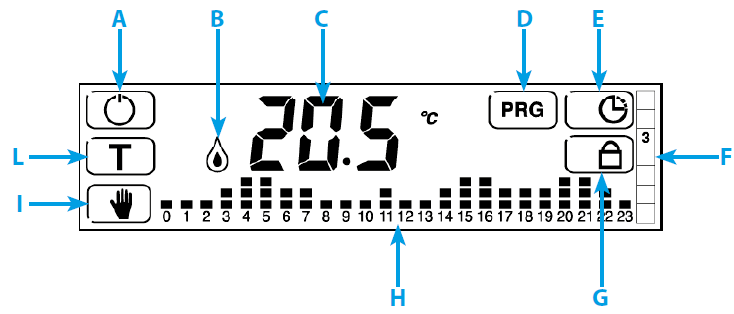
- A. ON/OFF LOCK function to be available
- B. Active icons
 = air conditioning ON
 = heating ON
- C. Temperature in °C
- D. Access programming mode
- E. Set time and date
- F. Day of week (indicated as a number from 1 to 7)
- G. Lock/unlock display or thermostat
- H. Time/temperature profile
- I. MANUAL mode ON/OFF
- L. Set temperature levels
NOTE Touch the centre of the display to view the time
DESCRIPTION
DESCRIPTION OF KEYS
 Programmable thermostat ON/OFF
 Setting the 3 temperature levels
 Activate MANUAL mode. Press and hold for 3 sec. to programme MANUAL TIMER MODE (vacation)
 Access programming menu Press and hold for 3 seconds to activate PARTY FUNCTION
 Press and hold to activate or deactivate display lock
 Set time and date
 Press and hold for 3 seconds to access the advanced menu
 Increase
 Decrease
 Confirm
 Go back to previous setting Press and hold for 3 seconds to exit function
 Go back to previous setting. Press and hold for 3 seconds to exit advanced menu
DESCRIPTION OF SYMBOLS
 Indicates if TIME and DATE setting mode is active of if current time is displayed
 Heating ON (in WINTER mode)
 Air conditioning ON (in SUMMER mode)
 Frost protection mode active
 Low batteries
 Unit of measurement (degrees celsius)
 Temperature differential
 Locked display or thermostat
 24 hour time / temperature profile
 Days of week
 Days of week selected
SET TIME AND DATE
- Press
 to set the time and date.
 - The following values are shown in the order indicated: HOURS / MINUTES / DATE / MONTH / YEAR
- Use the
 or
or keys to modify the flashing values.
 - Press
 to confirm and move to the next screen.
 - Press
 to go back or exit the menu.
 - EXAMPLE
- Press
 .
. - The HOURS value flashes.
- Use the
 or
or buttons to set the correct hours value.
- Press
- Press
 to confirm the hours value entered and set the MINUTES value.
- Press
 to confirm the minutes value entered. Now set the DATE.
- Press
 to confirm the DATE value and set the MONTH.
- Press
 to confirm the MONTH value and set the last two figures of the YEAR.
- Press
 to confirm and exit the TIME / DATE setting menu. The main screen is displayed.
- NOTES
- Once the date is set, the correct number for the day of the week is set automatically according to an internal calendar
- Press
 to go back to the previous step
 - Press and hold
 for more than 3 seconds to return to the main screen and save all values confirmed previously by pressing
MANUAL SETTINGS
- From the main screen, press
 .
. - The manual mode temperature value set previously is displayed.

- To modify the setting, press to increase
 or
or to decrease the value.
 - Press
 to exit this mode.
NOTE The current temperature reading is displayed if there is no user input for 3 seconds.
DISPLAY LOCK
This function locks the display to prevent accidental changes to the settings caused by unintentionally touching the screen. Press and hold the button![]() to activate the function.
to activate the function.
The![]() icon appears on the display.
icon appears on the display.
Press and hold ![]() for 3 seconds to deactivate the function
for 3 seconds to deactivate the function
NOTE The PIN set in the advanced LOCK menu must be![]() for the DISPLAY A ON/OFF LOCK function to be available.
for the DISPLAY A ON/OFF LOCK function to be available.
PROGRAMMABLE THERMOSTAT LOCK (with PIN)
This advanced function may be used to lock the thermostat. To activate the function, set a 3 figure PIN code, which will be requested each time the user wishes to lock or unlock the thermostat.
To set the PIN:
- Turn the thermostat off by pressing

- Press and hold
 for 3 seconds to access the ADVANCED MENU
 - Press button
 repeatedly to access the screen
 for entering the desired PIN code
- Use the
 and
and keys to set the desired PIN code number, then press
  to confirm. After setting the PIN, exit the advanced menu by pressing
 repeatedly or by pressing and holding
 .
. - When the thermostat is switched on again, the main screen is displayed.

- To activate the thermostat lock with PIN code, press and hold
 for 3 seconds. The following screen is displayed
- Use the
 and
and keys to enter the PIN number set previously in the advanced menu, then press
 .
.
- To unlock the thermostat, press and hold
 for 3 seconds.
 - The
 value is displayed.
 - Enter the PIN number and press to confirm.
IMPORTANT After three failed unlock attempts, no further PIN entry attempts may be made for 20 seconds.
The message Err is displayed.
NOTE
- The display lock remains active even if the batteries of the thermostat are removed and refitted.
- Enter the emergency unlock code 513 if you have forgotten the PIN.
- After unlocking the unit with the emergency unlock code 513, it is strongly recommended to access the advanced menu and check and/or modify the user-defined PIN set previously.
SET TEMPERATURE
- Used to set the three 3 temperature levels (LOW-NIGHT-COMFORT).
- Press
 .
. - The first level value flashes. Set the desired LOW temperature value using
 and
and .
.

- Press
 .
. - The second level value flashes. Set the desired NIGHT temperature value using
 and
and .
.

- Press
 .
. - The third level value flashes. Set the desired COMFORT temperature value using
 and
and .
.

- Press
 to return to the main screen.
 - NOTE
The temperature level sequence is reversed for SUMMER mode. i.e. The third level represents the lowest temperature.
PROGRAMMING
Press to access the programming menu.
PROGRAMMING DAY/S
- The day value 1(Monday) flashes.
- Press
 or
or to change the day selection.
- Select the desired day/s (e.g. 2, 3 and 4) with OK .
- The selected days are highlighted against a black background.
- Press on the profile to programme hours/temperatures.

PROGRAMMING INDIVIDUAL HOURLY SETPOINT TEMPERATURES FOR 24 HOUR PERIOD
- The HOUR bar 0 flashes on the hours/temperature graph.
- Use
 and
and to select the temperature level.
 - Press to confirm and move to the next hour.
- Repeat the same procedure for each hour.

NOTE
- Press
 to go back to the previous setting.
 - Press and hold the button for 3 seconds to exit programming mode and save all settings confirmed previously by pressing.
- Only the remaining days are now displayed.
- Now programme the remaining days, following the procedure described above, or
 press to exit the menu.
The main screen is displayed.
NOTE
- Press and hold
 for 3 sec. at any time to exit programming mode and return to the main screen. All parameters confirmed previously by pressing
 are saved.
 - To review the settings programmed for a specific day, press
 in the main menu and scroll between 1 and 7 with the arrow keys. Selecting a day displays the respective profile programmed
COPY FUNCTION
- Press
 to access the programming menu.
 - Day 1(Monday) flashes. Press
 or
or to change the selection.
 - For example, to copy the programme settings for day 2 into days 3 and 4, select the days by pressing
 , selecting the day you want to copy (in this case 2) first.
 - The selected days are highlighted against a black background.
- Now press the time/temperature profile.
- The first hour bar in the profile flashes.

- Now press and hold
 for 3 seconds.
TIMED MANUAL MODE (vacation)
- This function may be used to maintain a temperature value for a period of time set by the user.
- Once the set period of time has elapsed, the unit returns to the main screen.
- From the main screen,

- press and hold
 for 3 seconds.
- Use the
 and
and keys to set the hour value of the time at which the function will end.
 - Press
 to confirm, then set the minute value with the same procedure.
 - Now follow the same procedure to set the date

- the month

- and the year

- After pressing
 to confirm, use the and buttons to set the desired temperature
- After setting the temperature and pressing
 to confirm.
 - The thermostat starts operating in timed manual mode, and a cycling animated graphic is shown on the right hand side of the display to indicate that the function is active.

NOTE
- The display shows the measured temperature, not the set temperature, when this function is active. To view or modify the set time, press
 .
. - Then press
 repeatedly to reach the screen with the value you want to modify.
 - Use the
 and
and buttons to modify, then press
  to confirm and exit the menu.
 - Press
 to deactivate the function while it is still active.
 - The main screen is displayed
PARTY FUNCTION
This function may be used to temporarily modify the set temperatures. From the main screen, press and hold ![]() for 3 seconds.
for 3 seconds.
- The display shows the profile for the current day, with the current hour bar flashing (hour bar 8 in this example).
- Use
 and
and to modify the temperature.
 - Press
 to confirm and move sequentially onto the next bar to the right, to set the other hours in the day, or press
 to go back to the previous value.
 - After modifying as desired, simply press no other keys to activate the programme.
- The function starts after a few moments, with a cycling animated graphic shown on the display to indicate that the function is active.

- Only the modified hour bars are displayed while the function is active.
NOTE
- The modification is only effective for up to 24 hours, after which the original programme is restored.
- The main screen is displayed again once the function ends.
- Press
 at any time to exit the function. To view or modify the profile, simply press
  and repeat the modification procedure described previously.
FROST PROTECTION FUNCTION
- The frost protection function is active when the thermostat is set to WINTER mode and is off.
- This function protects the system against damage caused by very low temperatures.
- When the set temperature threshold is reached, the function is activated and the icons

 appear on the display.
- Press the ON key
 at any time to turn the thermostat on and display the main screen.
The advanced menu may be used to personalise the setup of the thermostat.
- SUMMER – WINTER MODE
- FROST PROTECTION FUNCTION
- TEMPERATURE DIFFERENTIAL
- PUMP ANTI-SEIZE FUNCTION
- DAYLIGHT SAVING SETTINGS
- PROGRAMMABLE THERMOSTAT LOCK (with PIN)
- RESET
To enter the advanced menu, press![]() from the main screen and switch off the thermostat.
from the main screen and switch off the thermostat.
Press and hold![]() for 3 seconds.
for 3 seconds.
- SUMMER – WINTER MODE
One of the following screens is displayed.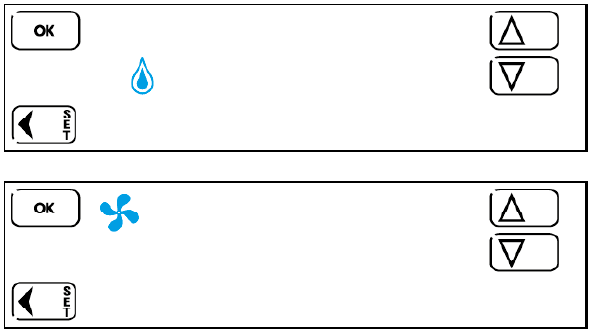
- The
 icon indicates winter mode (heating), while the icon
 indicates summer mode (cooling). Use the
 and
and keys to set the desired mode. Press
  to confirm and go to the next menu.
 - To exit the menu, press
 or press
  repeatedly until the OFF screen is displayed.
- The
- FROST PROTECTION FUNCTION
- After setting Summer or Winter mode, press OK to view the frost protection function screen.
Set the desired temperature within a range from 2°C to 8°C with the and
and keys.
keys.
Press to confirm and go to the next menu.
- Press
 to go back to the previous menu, or exit the advanced menu by pressing and holding
 for 3 seconds or pressing
 repeatedly until the OFF screen is displayed.
- After setting Summer or Winter mode, press OK to view the frost protection function screen.
- TEMPERATURE DIFFERENTIAL
After confirming the desired frost protection temperature with , the following screen is displayed.
- The temperature differential setting is used to set the thermostat correctly for the type of system to be controlled.
- Set the temperature differential within a range from 0.1°C to 0.9°C with the
 and keys.
 - Press
 to confirm and go to the next menu.
 - Press
 to go back to the previous menu, or exit the advanced menu by pressing and holding
  for 3 seconds or pressing
  repeatedly until the OFF screen is displayed.
- PUMP ANTI-SEIZE FUNCTION
After programming the temperature differential, press to display the following screen:
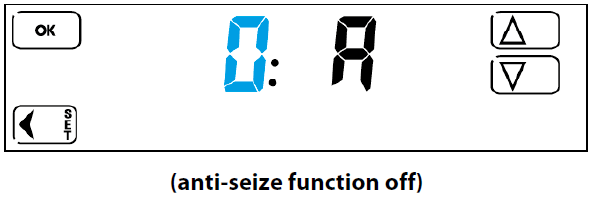
- The pump anti-seize function makes the thermostat function as an on-off timer.
- With a value between 1 and 99 HOURS set for the function, the programmable thermostat closes the relay contact for a period of 30 seconds at each time interval set.
Example:
- If a value of 48 (48 hours = 2 days) is set with the
 and
and keys and confirmed by pressing
  , the thermostat closes the relay contact for 30 seconds once every 2 days. When the function is enabled in the menu, the timer starts from the last time the relay contact was switched off.
 - Press
 to go back to the previous menu, or exit the advanced menu by pressing and holding
  for 3 seconds or pressing
  repeatedly until the OFF screen is displayed.
- DAYLIGHT SAVING SETTINGS
This function configures the thermostat to:- change the clock for daylight saving time automatically (dat1)
- not change the clock for daylight saving time automatically (dat0)
- set day “1”, for example, as Monday or Sunday (dat2)
The following screen is displayed:
- By pressing
 to confirm, the thermostat changes the clock for daylight saving time automatically.
 - Set this value to (zero) with the
 and
and  keys to disable automatic clock adjustment for daylight saving time and change the clock manually.
- Set the value to 2 with the
 and
and keys to enter the day of the week manually with the TIME and DATE keys.
- Press
 to confirm and go to the next menu.
 - Then exit the advanced menu and modify the day 1 setting as follows: press and hold
 for 3 seconds (the OFF screen is displayed).
 - Press
 to turn the thermostat on.
 - Press
 to view the hours and minutes and then the week bar.
- Use the
 and
and keys to select the correct day.
For example: - If the current day is Wednesday and you want to set Sunday as day 1 (start of week), select 4 on the display and press
 to confirm.
NOTE
Only one of the three settings may be configured. If this parameter is set to 1 or 0, the first day of the week is set as Monday by default. If the parameter is set to 2, the first day of the week may be selected but the clock will not be adjusted automatically for daylight saving time.
- By pressing
- LOCK FUNCTION (with PIN)
This menu option may be used to enable a LOCK function protected by a numerical access code to prevent tampering. From the advanced menu, press repeatedly to view the following screen:
- To set the display lock only, set 000 as the PIN with the
 and
and keys.
keys. - To set the PIN-protected thermostat lock function (to prevent tampering), set a PIN number between 001 and 999.
- After enabling the lock function, from the main screen, press and hold
 for 3 seconds to lock the display, or press and hold
  for 3 seconds, enter the PIN set previously, then press
  to confirm to activate the anti-tampering lock.
 - Perform the same procedure to unlock.
NOTE
Enter the emergency unlock code 513 if you have forgotten the PIN. After unlocking the unit with the emergency unlock code 513, it is strongly recommended to access the advanced menu and check and/or modify the user-defined PIN set previously.
- To set the display lock only, set 000 as the PIN with the
- RESET
- Used to restore all the original factory settings.

- Use the and keys to set .

- Press OK to confirm. The thermostat switches off completely and then restarts, displaying the software version and then the main screen.
- The unit has now been reset and all factory settings have been restored.
NOTE
Resetting does not cancel the time and date.
- Used to restore all the original factory settings.
CALIBRATION
- The thermostat is calibrated in the factory.
- Should it be necessary to modify the temperature value measured and shown on the display, proceed as follows.
- From the main screen, press and hold the OFF button for 4 seconds. The screen
 is displayed, followed by:
- Use the
 and
and keys to set the desired value, then press
  to confirm the modification and exit calibration mode.
 - If no other keys are pressed, the unit exits the menu automatically after a few seconds and returns to the main screen.
- To restore the factory settings, access the advanced menu and reset the thermostat.
IB1C71FEN – 07/19 – Finder S.p.A. con unico socio – 10040 ALMESE (TO) – ITALY
Reference
Download Manual
FINDER 1C.71 PROGRAMMABLE THERMOSTAT Instruction Manuals


Leave a Reply