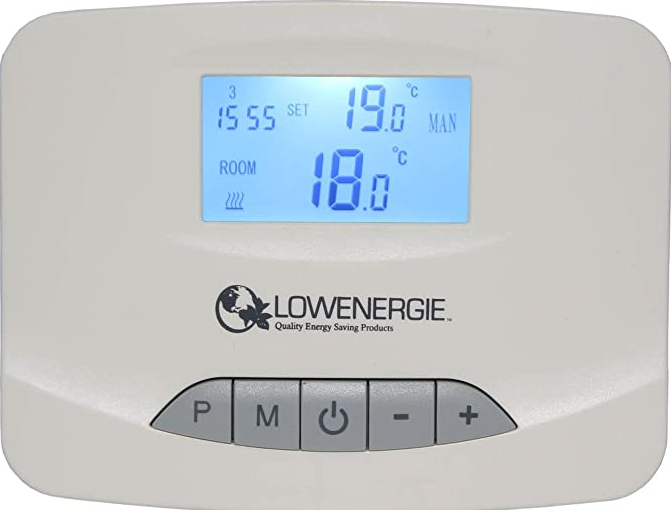
Lowenergie WT-15 Wireless Room Thermostat
INTRODUCTION
This surface-mounted radio thermostat has been developed to be able to switch electric and conventional heating systems on and off using a set temperature and time.
Functions
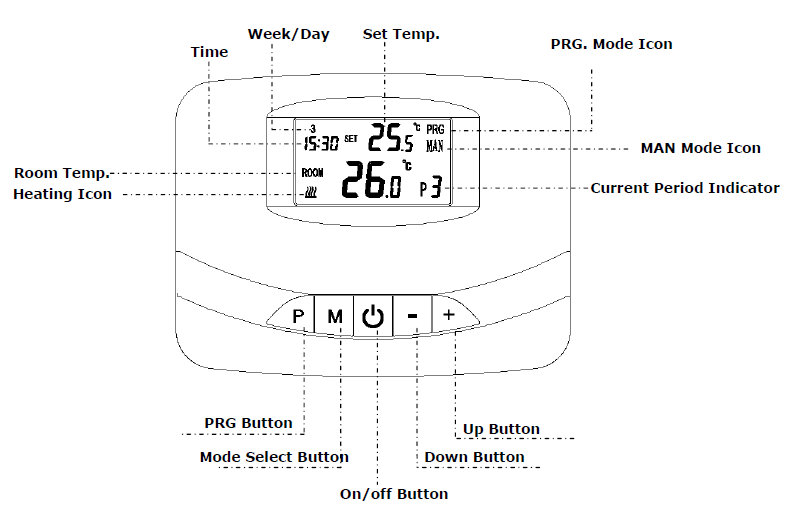
- LCD display can be clearly read with the background lighting.
- Easy to fit thermostat and receiver.
- Five buttons make it easy to use.
- 4 periods of each day programmable(5+1+1)
- The display shows the set temperature as well as the measured temperature, and time.
- Temperature display in degrees Celsius.
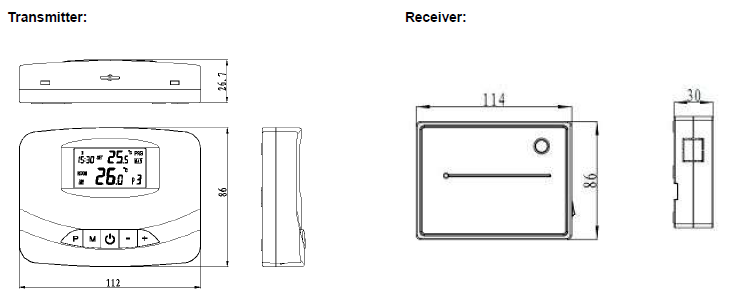
- The thermostat is supplied with a wall-fixing frame, base, and a very compact receiver (surface-mounted).
Technical Data
- Thermostat operating voltage: 2 x AA1.5 V, alkaline batteries.
- Backup storage: EEPROM
- Receiver operating voltage: 230 VAC, 50/60 Hz
- Maximum voltage / (ohmic) load: 250 VAC/10 A.
- Frequency: 868 MHz/433Mhz
- Channel selection: By programming the thermostat and the receiver.
- Switching options: 5+1+1 day, 4 periods each day.
- Receiver switch contacts: NO and NC.
- Temperature settings: 5°C ~ 35°C, 0.5°C increments.
- Accuracy: +/- 0.5°C
- Thermostat dimensions: Surface mounted, 112mm x 86mm x 22.7mm.
- Receiver dimensions: Surface mounted, 86mm x 86 mm x23mm.
- Color: White
- IP protection rating: 20.
- Certification: CE
PRG. Schedule Setting
Long press the P button to enter the PRG setting. The weekday is fixed from Monday to Sunday(1~7), and each day has 4 periods(1~4). Each press of the P button can into the next item setting. The time and temperature of each period can be set in the following steps.
- Press P and hold for 3 seconds, the time display flash, change the value of + and – buttons. (each press is 15mins)
- Press P button, the temperature display flash, and change the temperature by + and – buttons.
- Press P button to the next period.
- The other period settings follow the same way.
EXAMPLE
| Monday to Friday | Saturday | Sunday | ||||||||||
| Period | 1 | 2 | 3 | 4 | 1 | 2 | 3 | 4 | 1 | 2 | 3 | 4 |
| Time | 6:30 | 8:00 | 18:00 | 22:30 | 8:00 | 10:00 | 18:00 | 23:00 | 9:00 | 12:00 | 19:00 | 0:00 |
| Temp. | 21°C | 18°C | 21°C | 16°C | 21°C | 21°C | 21°C | 16°C | 23°C | 21°C | 16°C | 21°C |
Clock Adjustment
- Press and hold the M button for around 3 seconds. The minute’s display (top left in the display) flashes.
- Change this value using the + and – buttons.
- Press the M button. The hour display (top left in the display) flashes.
- Change this value using the + and – buttons.
- Press the M button. The day display (top left in the display) will flash as a number.
- Change this value using the + and – buttons. Use 1 for Monday, 2 for Tuesday, 3 for Wednesday, 4 for Thursday, 5 for Friday, 6 for Saturday and 7 for Sunday.
Temp. Calibration & IP Address Setting
- Temp. Calibration: Turn the thermostat off, then press M button for 3 sec. to calibrate Temp. by pressing “+” and “-“ buttons. Range : -8°C ~8°C
- IP address :

- 1st Press the ID study button on the receiver, Green LED light blinks.
- 2nd Turn the thermostat off, and long press the M buttons for 3 sec. The screen shows a series number, then press M button again a
- BUZZ voice occurs, the green light stops blinking, IP address shows on the LCD display, the transmitter and receiver finish pairing.
- If you have two or more receivers, the second or more receivers do the same steps to make an IP address setting.
- The transmitter can control two or more receivers at the same time.
Wiring Diagram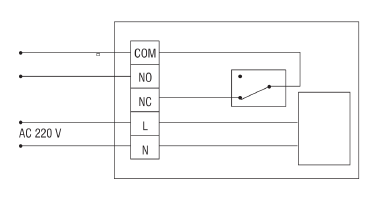
Dimensions
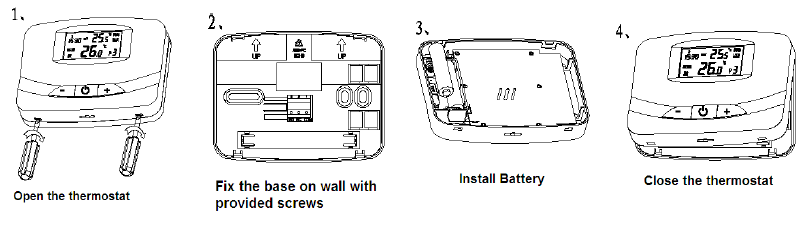
Installation
Mounting Method
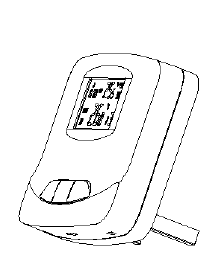
Put on the desk
Reference
Download Manual:
Lowenergie WT-15 Wireless Room Thermostat User Manual
![]()