
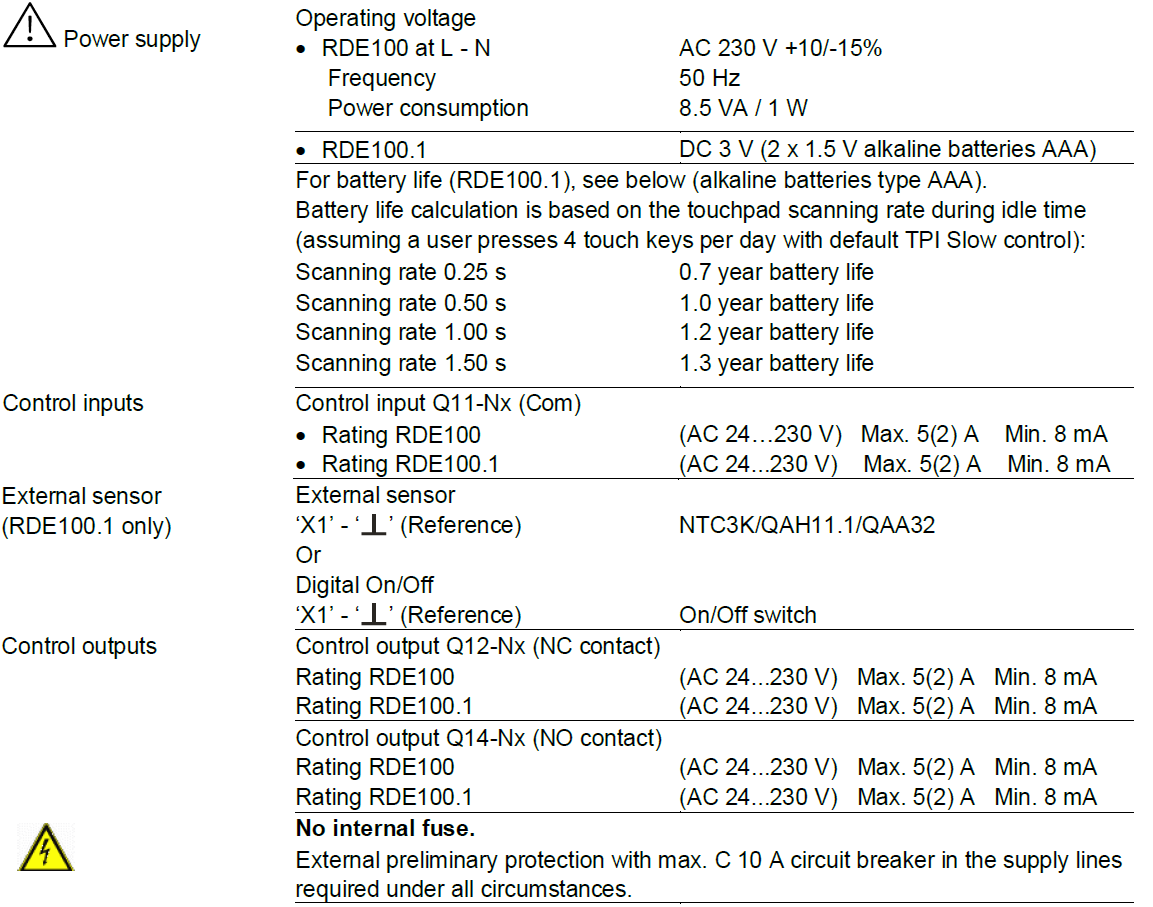
SIEMENS RDE100 Room Thermostat
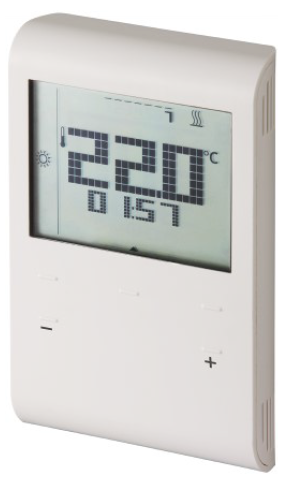
Room thermostat with Auto Timer, Option External Input RDE100.. for heating systems
- Room temperature control
- 2-position / TPI control with On/Off output for heating
- Optimum Start / Stop
- Comfort, Economy, Auto timer and Protection mode
- Auto time switch
- Adjustable commissioning and control parameters
- Mains-powered AC 230 V (RDE100) or battery-powered DC 3 V (RDE100.1)
- Multifunction input (RDE100.1 only) for external floor sensor, keycard contact, etc.
Use
The RDE100.. is used to control the room temperature in heating systems.
Typical applications:
- Apartments
- Commercial spaces
- Schools
For the control of the following pieces of equipment:
- Thermal valves or zone valves
- Gas or oil boilers
- Fans
- Pumps
- Floor Heating
Functions
- Room temperature control via built-in sensor or external input
- Selection of operating mode with operating mode touch key
- Setting auto time switch (individual day, 7 days or 5-2 day)
- Display of current room temperature or setpoint in C or F
- Touch key lock (manually)
- Setpoint lock
- Periodic pump run
- Optimum start/stop
- Comfort temperature limitation by Economy setpoint locked
- Reloading factory settings for commissioning and control parameters
- One multifunctional input (RDE100.1 only) freely selectable for:
- Floor Heating temperature limitation function
- Operating mode switchover contact (keycard, window contact, etc.)
Temperature control
RDE100.. comprises of both 2-position and TPI temperature controls, which can be configured by parameter P78 (Control behavior). 2-position control algorithm is to switch on and off the heating system within a switching differential according to a comparison between the setpoint setting and the measured room temperature.
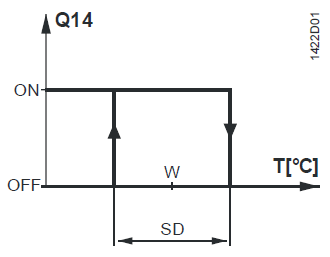
- T Room temperature
- SD Switching differential
- W Room temperature setpoint
- Q14 Output signal for heating
TPI (Time Proportional Integral) control algorithm is to periodically switch on and off the heating system. The period time and pulse length of the control signal (PWM) are determined by the setpoint and the measured room temperature
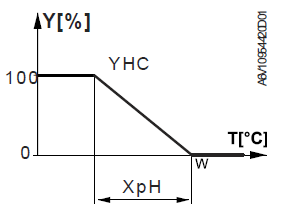
Heating mode
- T Room temperature
- Y Output signal for heating (PWM)
- W Room temperature setpoint
- YHC Control command “Valve”
- XpH Proportional band “Heating”
Floor heating limitation function (RDE100.1 only)
The factory setting for this function is Off (disabled) and must be set to “On” if floor heating is used. The external floor temperature sensor is connected to input X1,![]() and acquires the floor temperature. If the floor temperature exceeds the parameterized temperature limit xx ºC (P14 = 1, P15 = 1, P16 = xx ºC), the heating valve is fully closed until the floor temperature returns to a level below the parameterized limit. Typical application is rooms (dry floor). If the application does not require floor heating temperature limitation but instead uses the external sensor as a source for both room temperature display and control, the parameters will have to be set as follows: P14 = 1, P15 = 0. A typical application is a bathroom (wet floor) where a constant floor temperature is required. It is not recommended to have only an internal built-in room sensor for floor heating since there is a potential risk of overheating.
and acquires the floor temperature. If the floor temperature exceeds the parameterized temperature limit xx ºC (P14 = 1, P15 = 1, P16 = xx ºC), the heating valve is fully closed until the floor temperature returns to a level below the parameterized limit. Typical application is rooms (dry floor). If the application does not require floor heating temperature limitation but instead uses the external sensor as a source for both room temperature display and control, the parameters will have to be set as follows: P14 = 1, P15 = 0. A typical application is a bathroom (wet floor) where a constant floor temperature is required. It is not recommended to have only an internal built-in room sensor for floor heating since there is a potential risk of overheating.
Typical application:
Maximum temperature limitation for underfloor heating systems
Operating mode switchover function
This function allows keycard application, please refer to the section “Operating notes, Economy mode”.
Periodic pump run function
Can only be used when the circulating pump or valve is controlled! This function protects the pump or valve against seizing during longer off periods. Periodic pump run is activated for 3 minutes every 24 hours at 12:00.
| Parameter | Pump status |
| P12 = 0 (Default) | Pump runoff |
| P12 = 1 | Pump run on |
Optimum start control
The purpose of optimum start control is to reach a temperature level 0.25 K below the Comfort setpoint when occupancy according to the time program starts in Auto timer mode. For that purpose, the heating circuit must be switched on at an earlier point in time. The extent of forward shift depends primarily on the outside temperature. The maximum forward shift on time can be adjusted by parameter P89. A Forward shift on maximum “0” means the function is disabled.
| Parameter | Range | Factory setting |
| Forward shift on max (P89) | 0, 0.5,…24 h | 0 |
Optimum stop control
Optimum stop control switches off the heating circuit at the earliest possible point in time so that the room temperature will lay 0.5 K below the Comfort setpoint when the time switch changes from Comfort mode to Economy mode in Auto timer mode. The early shut down maximum time can be adjusted by parameter P90. Early shut down maximum “0” means the function is disabled.
Control behavior P78
The new control algorithm of RDE100.. family offers a choice of control actions that can be configured via parameter P78. This means that optimum control can be selected for every type of application (factory setting “TPI slow”).
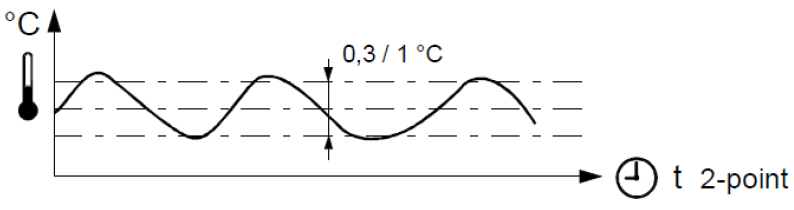
2-position, 1 K 2-Position controller with 1 [K] switching hysteresis
2-position, 0.3 K
- 2-Position controller with 0.3 [K] switching hysteresis.
- For general control situations. Provides a better comfort than 1 [K] switching hysteresis.
- Can also be used for difficult control situations
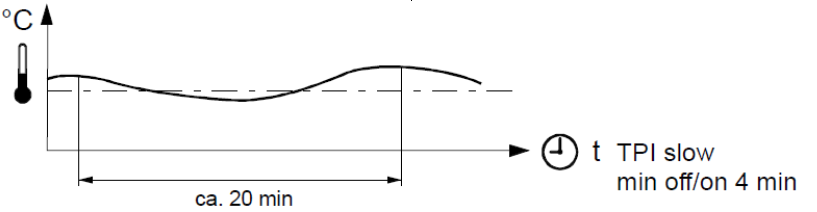
TPI slow
TPI control behavior for slow heating systems that require longer minimum On times and limited numbers of switching cycles per hour.
Typical applications:
- Floor heating systems, oil-fired boilers
- Can also be used for all other types of heating applications. (Alternative setting)
| Minimum switching on/off time | > 4 minutes |
| Average period time | Approximately 20 minutes |
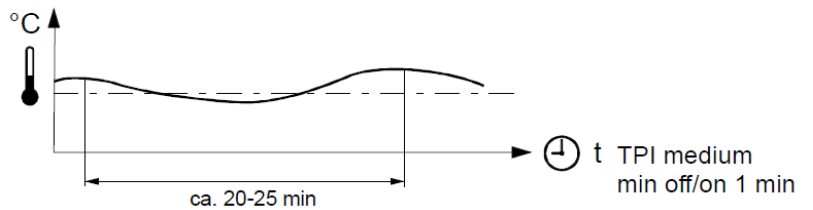
TPI medium
TPI control behavior for general heating applications such as radiator systems, thermal actuators, …
| Minimum switching on / off time | > 1 minute |
| Average period time | Approximately 20-25 minutes |
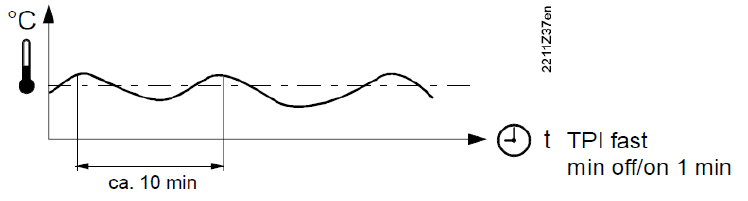
TPI fast
TPI control behavior for fast heating systems that tolerate a high number of switching cycles. Typical applications: electric heaters, gas boilers, fast thermal actuators
| Minimum switching on/off time | > 1 minute |
| Average period time | Approximately 10 minutes |
![]() Do not use TPI fast for oil boilers or electro-mechanical actuators
Do not use TPI fast for oil boilers or electro-mechanical actuators
Type summary
| Product No. | Stock No. | Features |
| RDE100 | S55770-T278 | Mains-powered AC 230 V |
| RDE100.1 | S55770-T279 | Battery-powered DC 3 V |
Ordering
- When ordering, please indicate product No. / stock No. and description.
- Example:
| Product No. | Stock No. | Description |
| RDE100 | S55770-T278 | Room thermostat |
Valve actuators/external sensor must be ordered separately.
Equipment combinations
|
Description |
Product No. |
Data Sheet *) |
Use with the type of Temperature
Control |
|
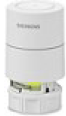
| Electromotoric actuator |  |
SFA21.. |
4863 |
2-Position & TPI slow |
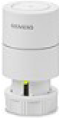
| Electrothermal actuator (for
radiator valves) |
 |
STA321 | A6V12986007 | 2-Position & All TPI |
| Electrothermal
actuator (for small valves 2.5 mm) |
 |
STP321 | A6V12986007 | 2-Position & All TPI |
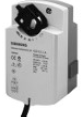
| Damper actuator |  |
GDB.. | 4634 | 2-Position & TPI slow |
|
Damper actuator |
 |
GSD.. |
4603 |
2-Position & TPI slow |
|
Damper actuator |
 |
GQD.. |
4604 |
2-Position & TPI slow |
| Rotary damper actuator | 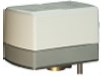 |
GXD.. | 4622 | 2-Position & TPI slow |
| Cable temperature sensor | 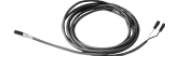 |
QAH11.1 | 1840 | N/A |
| Room temperature sensor |  |
QAA32 .. |
1747 |
N/A |
The documents can be downloaded from http://siemens.com/bt/download.
| Description | Product No. | Mounting Instruction *) | |
|
Adapter plate (for China 86 conduit box, BS4662 UK conduit box) |
 |
ARG70.5 |
A6V10563479 |
The documents can be downloaded from http://siemens.com/bt/download.
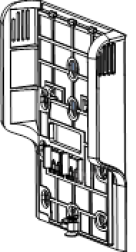
Mechanical design
The room thermostat consists 2 parts:
- Plastic housing which accommodates the electronics, the operating elements and the room temperature sensor
- Mounting plate with screw terminals
The housing engages in the mounting plate and is secured with a screw.
Operation and settings

- Operating mode touch key
- Set
- Ok
- Touch key for decreasing a value
- Touch key for increasing a value
Display

|
# |
Symbol |
Description |
# |
Symbol |
Description |
|
1 |
|
Indicating that batteries need to be replaced
(only with battery-powered version RDE100.1) |
12 |
Display of time |
|
|
2 |
|
Protection mode
(protection mode symbol can be enabled via parameter settings) |
13 |
|
Morning: 12-hour format Afternoon: 12-hour format |
|
3 |
|
Auto timer mode |
14 |
Confirmation |
|
|
4 |
View and set auto time switch |
15 |
Room temperature in degrees Fahrenheit |
||
|
5 |
|
Comfort mode |
16 |
|
Touch key lock activated |
|
6 |
|
Economy mode |
17 |
|
Room temperature in degrees Celsius |
|
7 |
|
Escape |
18 |
|
Display of room temperature, set point, etc. |
|
8 |
|
External input enabled (RDE100.1 only) |
19 |
|
Heating On |
|
9 |
|
Permanent set point setting |
20 |
Weekday 1 = Monday 7 = Sunday |
|
|
10 |
|
Day and time setting |
21 |
Timer bar |
|
|
11 |
|
Holiday mode setting |
22 |
|
Current room temperature |
Mounting and installation notes
Do not mount the thermostat in niches or bookshelves, not behind curtains, not above or near heat sources, and not exposed to direct solar radiation. Mount about 1.5 m above the floor
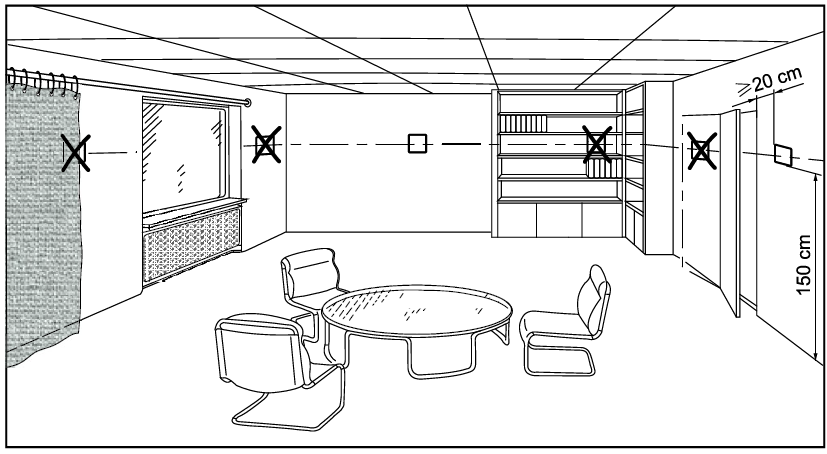
![]() Mounting Mount the thermostat in a clean and dry location without direct airflow from a heating/cooling equipment, and not exposed to drip or splash water
Mounting Mount the thermostat in a clean and dry location without direct airflow from a heating/cooling equipment, and not exposed to drip or splash water
Note: When RDE100.. is equipped with either China 86 conduit box or BS4662 UK conduit box, ARG70.5 adapter plate is suggested to provide a better fitting installation.
Wiring See Mounting Instructions M1429 enclosed with the thermostat
 Ensure that wiring, protection and earthing comply with local regulations
- Correctly size the cables to the thermostat and the valve actuators
- Use only valve actuators rated for AC 24…230 V
Warning!
No internal line protection for supply lines to external consumers. Risk of fire and injury due to short-circuits! - Adapt the line diameters as per local regulations to the rated value of the installed overcurrent protection device
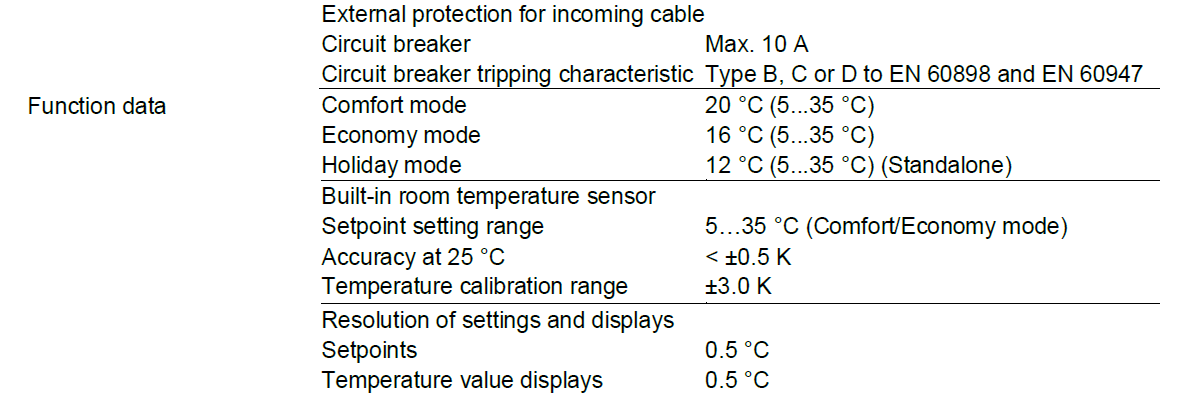
- The AC 230 V mains supply line must have a circuit breaker with a rated current of no more than 10 A
- Disconnect from power supply before removing the unit from its mounting plate
- External Inputs X1, may carry mains potential. Sensor cables or window contact must carefully install before powering up the thermostat
Commissioning notes
Commissioning
After power is applied, the thermostat carries out a reset during which all LCD segments flash, indicating that the reset was made correctly. After the reset, the thermostat is ready for commissioning by qualified HVAC personnel. The control parameters of the thermostat can be set to ensure optimum performance of the entire system. Please refer to Operating Instructions CB1B1422, section “Do you want to change parameters?”.
Sensor calibration
If the temperature on the display does not agree with the room temperature effectively measured, the temperature sensor can be recalibrated. For that purpose, adjust parameter P04.
Setpoint lock
We recommend reviewing the setpoint lock (for public areas) in parameters P06 and P08 and changing them as needed. If the Economy setpoint is locked then the Comfort temperature setpoint can not be set lower than the locked Economy setpoint.
Touchpad scanning rate
Since the thermostat uses touch technology and to minimize battery power consumption, a parameter P21 (adjustable from 0.25 to 1.5 seconds) is implemented for the user to adjust. This function is only valid for the battery-powered version and the default value is 1 second. This means that when, for a certain time, the user does not touch the touchpad, the unit operates in power saving mode and the touchpad is running at a scanning rate of 1 second. (From the calculation – assuming 4 operations per day on the thermostat, the estimated 1-second scanning rate results in a battery life of 1 year. If the user increases the scanning rate, the battery’s life is extended.)
X1 external input
Different parameter setting of X1 external input is described below: Parameter P14=0 (No Input) is a default setting, which provides no external input function.
Digital input
An external contact can switch the thermostat from any operating mode to Economy.
- Typical applications: Window contact
- Key card application
Set parameter P14 = 2 (X1 External input = Digital Input) and adapt parameter P17 (Window contact = Normally Open / Closed) accordingly. External sensor (used for controlling) The measured external sensor temperature is displayed and used for calculating heating demand instead of temperature detected by thermostat built-in internal sensor. In case of problems with the external sensor, the thermostat uses the internal sensor instead.
Typical applications: External room temperature sensor Floor heating temperature control bath room Setting parameter P14 = 1 (X1 External input = External Sensor) and parameter
P15 = 0 (Temperature limitation = Off)
Notes for floor heating temperature control:
- External safety thermostat is needed to prevent overheating of certain floor heating systems!
- Use of “Comfort setpoint lock” function (Parameter P06) is recommended.
External sensor for Floor heating application with temperature limitation
Refer to Floor Heating application section above when setting parameter P14 = 1 (X1 External input = External Sensor) and parameter P15 = 1 (Temperature limitation = On). Parameter P16 now allows to limit the maximum temperature.
Change of batteries (only with battery-powered version RDE100.1)
If the battery symbol![]() appears, the batteries are almost exhausted and should be replaced. Use alkaline batteries type AAA.
appears, the batteries are almost exhausted and should be replaced. Use alkaline batteries type AAA.
Operating notes
The RDE100.. provides Comfort, Economy, Auto timer and Protection mode. The difference between Comfort and Economy modes is only the room temperature setpoint. The changeover between Comfort, Economy, and Protection mode is made either automatically by the auto time switch or by pressing touch key mode
Comfort mode![]()
When Comfort mode is activated, symbol![]() appears on the display. The setpoint (20 ºC) can be readjusted by pressing touch keys + and –.
appears on the display. The setpoint (20 ºC) can be readjusted by pressing touch keys + and –.
Economy mode![]()
When Economy mode is activated, symbol![]() appears on the display. The setpoint (16 ºC) can be readjusted by pressing touch keys + and –. In RDE100.1, a window contact feature is that a user can connect a window contact to the input X1,
appears on the display. The setpoint (16 ºC) can be readjusted by pressing touch keys + and –. In RDE100.1, a window contact feature is that a user can connect a window contact to the input X1,![]() . Depending on whether the window contact is configured to Normally Open or Normally Close (Parameter P14 = 2, Parameter P17 = 0 or 1), a change in this status will automatically switch the thermostat from any modes to Economy mode. This feature is good for public areas. The factory setting for this function is Off (disabled).
. Depending on whether the window contact is configured to Normally Open or Normally Close (Parameter P14 = 2, Parameter P17 = 0 or 1), a change in this status will automatically switch the thermostat from any modes to Economy mode. This feature is good for public areas. The factory setting for this function is Off (disabled).
Protection mode![]()
If the temperature falls below 5 ºC, the unit automatically activates the heating output. The symbol![]() appears only, if the icon is enabled via parameter settings
appears only, if the icon is enabled via parameter settings
Time switch![]()
When Auto timer mode is enabled, the changeover between the operating modes (Comfort and Economy mode) will take place automatically. There are three options for time switch setting: individual day, 7 day or 5-2 day. You can select Comfort or Economy mode in every 15 minutes interval of the day. The 0:00 to 24:00 hour time bar will allow you to set the mode throughout the selected day(s).
| Default value | Day/s | Comfort mode | Economy mode |
| Mo (1) – Fr (5) | 6:00 – 8:00 hr
17:00 – 22:00 hr |
22:00 – 6:00 hr
8:00 – 17:00 hr |
|
| Sa (6) – Su (7) | 7:00 – 22:00 hr | 22:00 – 7:00 hr |
Please refer to Operating Instructions CB1B1422, section “Do you want to enter your own time switch?”
Holiday mode![]()
When holiday mode is activated, symbol![]() appears on the display. The set point (12 ºC) and the number of days a user is away can be readjusted by pressing touch keys + and –.
appears on the display. The set point (12 ºC) and the number of days a user is away can be readjusted by pressing touch keys + and –.
Parameters
Changing the parameters by the following steps:
- Press + and – simultaneously for 5 seconds
- Release them and parameter “P01” is displayed on the bottom segment
- Press + or – to scroll to the parameter that needs to be adjusted
- Press ok to select this parameter
- Press + or – to adjust the value
- Press ok to confirm the adjusted value
- Press mode to exit the parameters without saving or wait for the program to exit automatically
Parameter list
| Parameter no. | Description | Setting range (default) |
| P01 | Time format | 1 = 24:00 hours (default)
2 = 12:00 AM/PM |
| P02 | Selection of °C or °F | 1 = °C (default) 2 = °F |
| P03 | Standard temperature display | 1 = room temperature (default)
2 = setpoint |
| P04 | Temperature sensor calibration | -3…3 °C
Step 0.5 °C (-6…6 °F, step 1 °F) Default: 0 °C |
| P06 | Comfort setpoint lock | 0 = OFF (default) 1 = ON è locked
according to setting in permanent temperature setpoint |
| P08 | Economy setpoint lock | 0 = OFF (default) 1 = ON è locked
according to setting in permanent temperature setpoint |
| P09 | Buzzer | 0 = OFF
1 = ON (default) |
| P10 | Show frost protection icon | 0 = OFF (default) 1 = ON |
| P11 | Time switch type for auto timer | 0 = Individual Days (default)
1 = All 7 days 2 = 5/2 days |
| P12 | Periodic pump run | 0 = OFF (default) 1 = ON |
| shorter battery life. | ||
| P22 | Reload factory settings | 0 = OFF (default) |
| 1 = reload | ||
| P23 | Software version information | No adjustment possible |
| P78 | Control behavior | 0 = On/Off, 1.0 K
1 = On/Off, 0.3 K 2 = TPI fast 3 = TPI medium 4 = TPI slow (default) |
| P89 | Forward shift on max | 0, 0.5,…24 h |
| Default: 0 h | ||
| P90 | Early shutdown max | 0, 0.5,…6 h |
| Default: 0 h |
Maintenance notes
The thermostats are maintenance-free.
Disposal
This symbol or any other national label indicate that the product, its packaging, and, where applicable, any batteries may not be disposed of as domestic waste. Delete all personal data and dispose of the item(s) at separate collection and recycling facilities in accordance with local and national legislation. For additional details, refer to www.siemens.com/bt/disposal.

 |
WARNING |
| Risk of explosion due to fire or short-circuit, even if the batteries are empty Risk of injuries from by flying parts
● Do not allow the batteries to come into contact with water. ● Do not charge the batteries. ● Do not damage or destroy the batteries. ● Do not heat the batteries to more than 85 °C. |
|
 |
WARNING |
| Electrolyte leakage Chemical burns
● Only grasp damaged batteries using suitable protective gloves. ● If electrolyte comes into contact with eyes, immediately rinse eyes with plenty of water. Consult a doctor. |
|
Observe the following
- Only replace batteries with batteries of the same type and from the same manufacturer.
- Observe the polarities (+/-).
- The batteries must be new and free from damage.
- Do not mix new batteries with used batteries.
- Store, transport, and dispose of the batteries in accordance with local regulations, guidelines, and laws. Also observe information from the battery manufacturer.
Warranty
The technical data given for these applications is valid only in conjunction with the Siemens actuators as detailed under «Equipment combinations», page 4. Use with third-party actuators invalidates any warranty offered by Siemens Building Technologies HVAC Products
Technical data
Connection diagrams
RDE100
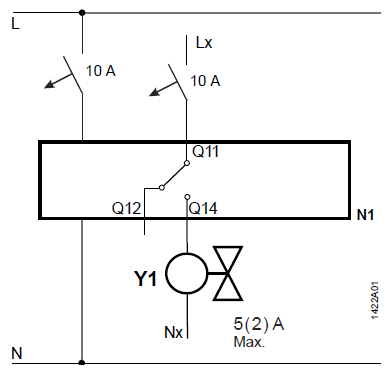
- N1 Room thermostat
- Y1 Valve actuator
- L Live, AC 230 V
- N Neutral conductor, AC 230 V
RDE100.1
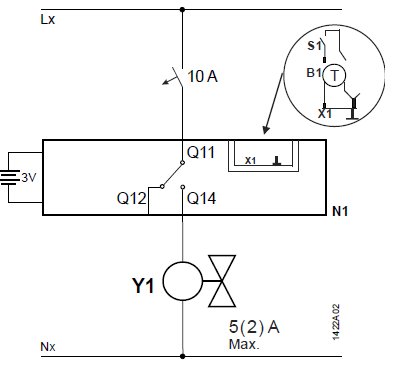
- Lx Live, AC 24 … 230 V
- Q11, Q12 NC contact (for NO valves)
- Q11, Q14 NO contact (for NC valves)
- Nx Neutral conductor, AC 24…230 V
- X1 External input signal
 Measuring neutral for external input
- B1 Temperature sensor (Floor temperature limit)
- S1 Switch (keycard, window contact)
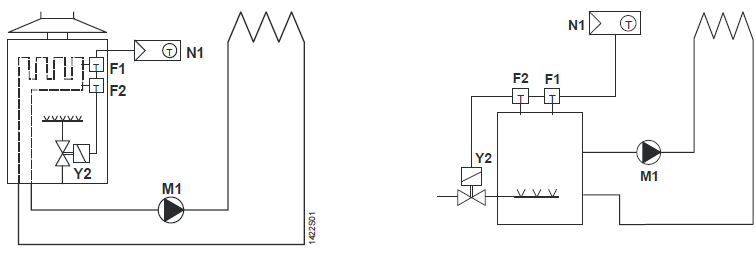
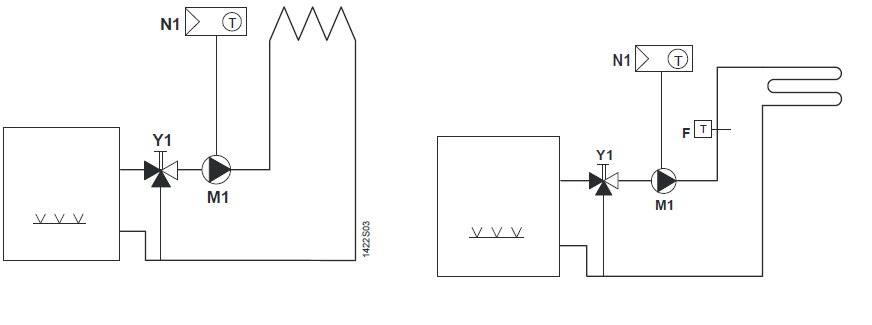
Application examples
- Room thermostat with direct control of a gas-fired wall-hung boiler
- Room thermostat with direct control of a gas-fired floor-standing boiler
- Room thermostat with direct control of a heating circuit pump (pre-control by manual mixing valve)
- Room thermostat with direct control of hydronic floor heating system
- F1 Thermal reset the limit thermostat
- F2 Safety limit thermostat
- M1 Circulating pump
- N1 RDE100.. room thermostat
- Y1 Mixing 3-port valve with manual adjustment
- Y2 Magnetic valve
Remarks
Heating:
Because of the unavoidable self-heating effects of the electrical current, any loads of more than 3 Amperes connected to the unit can influence the control behavior and temperature accuracy in a negative way.
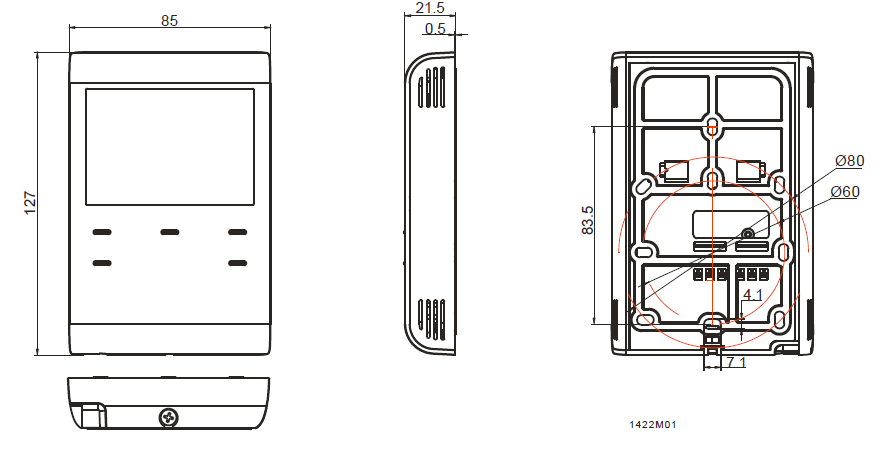
Dimensions
All dimensions in mm
Issued by Siemens Switzerland Ltd. Building Technologies Division International Headquarters Theilerstrasse 1a
- CH-6300 Zug
- Tel. +41 58 724 2424
- www.siemens.com/buildingtechnologies
© Siemens Switzerland Ltd, 2013 – 2023 Technical specifications and availability are subject to change without notice.
REFERENCE:
DOWNLOAD MANUALS:
SIEMENS RDE100 Room Thermostat Product Specifications Guide
OTHER MANUALS:
SIEMENS RDE100 Room Thermostat Operating Manual
![]()
Leave a Reply