ProWarm ProTouch Touchscreen Thermostat

DISPLAY SYMBOLS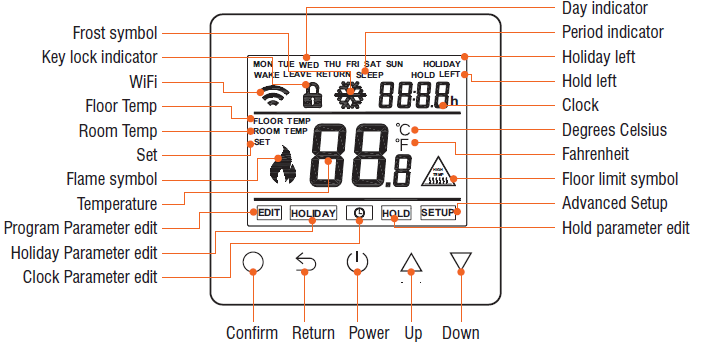
THERMOSTAT DESCRIPTION
The new ProTouch WiFi is a smart thermostat used to control your electric floor heating system or water heating system. It will keep your home at comfortable temperature whilst minimizing energy use. Install the app on your smart phone to control your heating system remotely with the WiFi thermostat.
MAIN FUNCTIONS
- Power consumption
- monitor (in APP)
- Holiday function
- Time display
- Hold function
- Key-lock
- Open window detection
- Off time frost protection
- Floor temperature limitation
- Optimum start
TECHNICAL SPECIFICATION
- Supply voltage: 50/60Hz 220-240V AC
- Max load: 3A
- Standby power < 2W IP rating: IP21
- Max wire diameter: 2.5mm²
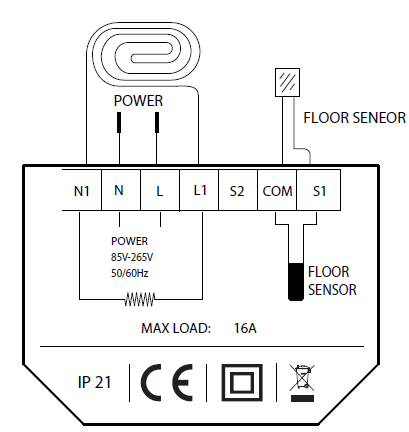
INSTALLATION AND WIRING INSTRUCTIONS
- Loosen fixing screw located in the bottom of the thermostat to get the front panel.
- Connect the thermostat according to the Wiring Instruction
- Insert the back panel into wall box with provided screws
- Align top part of front panel and back panel to fit these two parts. Then fix them with screw.

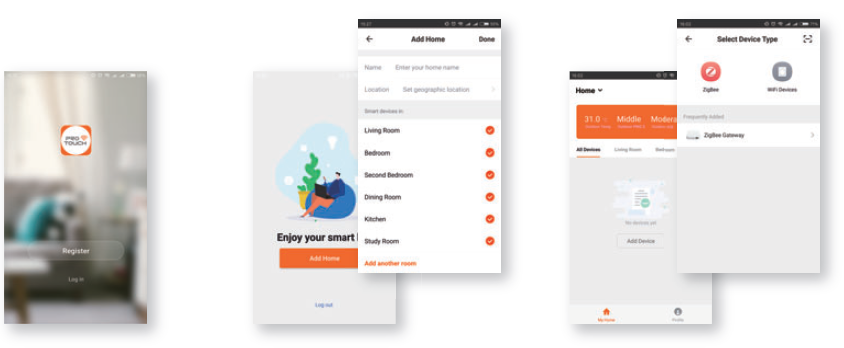
WIFI CONNECTION
- Step 1 Scan the QR code through mobile browser or download the App from APP Store or Google Play
- Step 2 Log in or sign up the APP through Phone No. or your Email address
- Step 3 Click “Add Home”, fill in the information about the Home
- Step 4 Click “+” on the top-right corner of the screen.Then click “WiFi Devices” on the top-right corner of the screen
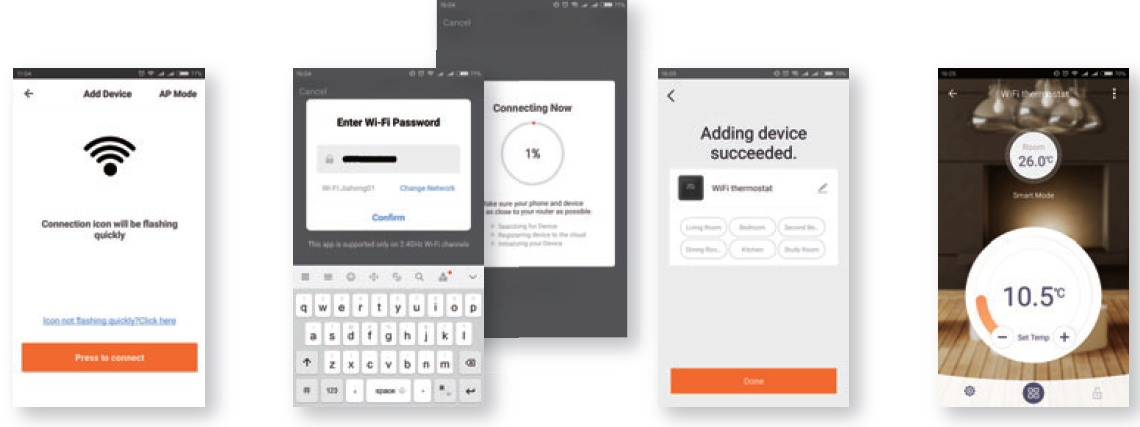
- Step 5 Set the thermostat based on APP’s instruction. Then click the bottom button
- Step 6 Log in WiFi password and click the button to continue.
- Step 7 When connection is done, Click “Done” or make a new name for your thermostat
- Step 8 You can check the actual temp, change the set temp and other operations on the control interface.
WIRING INSTRUCTIONS
FUNCTION & USER OPERATION
Press to turn on/off
Note: When frost protection mode is active, the thermostat will maintain the frost protection temperature when in power ‘off’ mode.
Set the Time
- In normal timed power ‘on’ mode, Press O and the CLOCK symbol will flash.
- Press O again to enter day set.
- Press △ or ▽ to set day.
- Press O to confirm and enter hour set.
- Press △ or ▽ to set hour.
- Press O to confirm and enter minute set.
- Press △ or ▽ to set minute.
- Press O to confirm then press
 to revert to normal screen.
Note: The WiFi version updates the time automatically when connected to internet.
Temporarily override temperature
In normal timed power ‘on’ mode, press △ or ▽ to change the current period temperature setting. The new set temperature will flash for 30 seconds. The thermostat will revert to the normal programmed setting at the start of the next time period
Key-lock
Setting Key-lock can prevent children and others from switching thermostat parameters. In normal timed power ‘on’ mode, press for 3 seconds to lock the thermostat and again for 3 seconds to cancel
Holiday mode
- The thermostat will maintain frost protection temperature until the holiday days ends.
- In normal timed power ‘on’ mode, press O to enter setting.
- Press △ or ▽ to select HOLIDAY.
- Press O to enter holiday days set.
- Press △ or ▽ to set holiday days .
- Press O to confirm and return to the normal screen.
Hold mode
The thermostat will maintain the ‘hold temperature’ until the hold time ends. In normal timed power ‘on’ mode, press O to enter setting.
- Press △ or ▽ to select HOLD.
- Press O to enter hold time set.
- Press △ or ▽ to set hour.
- Press O to enter minute set.
- Press △ or ▽ to set minute.
- Press to enter hold temperature set.
- Press △ or ▽ to set hold temperature.
- Press O to confirm and return to the normal screen.
Timer setting
Each day of the week has 4 time periods,you should allot a temperature to each time period. Set the temperature above room ambient temperature and the heating will come on until the desired temperature is reached, or, set the temperature low and the heating will not come on during that time period. The default settings are shown in the table below.
In normal timed power ‘on’ mode, press O to enter setting.
- Press △ or ▽ to select EDIT.
- Press △ or ▽ to select the day to be set.
- Press △ or ▽ to select the period to be set.
- Press △ or ▽ to select start time hour.
- Press △ or ▽ to select start time minute.
- Press △ or ▽ to select temperature.
- Press O to enter day selection.
- Press O to enter period selection.
- Press O to enter start time set.
- Press O to enter minute set.
- Press O to enter temperature set.
- Press O to confirm and move on to next time period.
- Press to revert to normal screen.
Period parameter table (Default)
| Day | Wake | Leave | Return | Sleep |
| Mon – Fri | 07:00 22삸 | 08:30 19삸 | 17:00 22삸 | 22:00 19삸 |
| Sat – Sun | 08:00 22삸 | 08:30 22삸 | 17:00 22삸 | 22:00 19삸 |
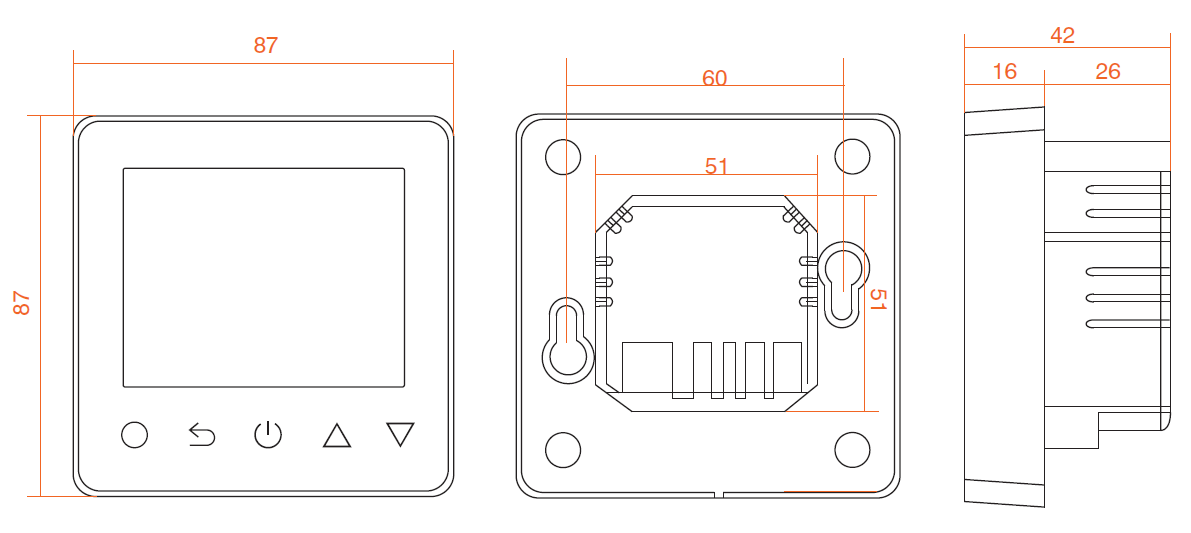
DIMENSIONS
| No. | Name | Default value | Ranges |
| 1 | Room temperature calibration | 0°C | – 5°C — 5°C |
| 2 | Floor temperature calibration | 0°C | – 5°C — 5°C |
| 3 | Frost protection mode | ON | OFF/ON |
| 4 | Frost protection temperature | 5°C | 5°C — 15°C |
|
5 |
Sensor selection |
01: Floor sensor |
00: Built-in sensor
01: Floor sensor 02: Both sensors |
| 6 | Floor temperature limit(both sensors) | 30°C | 20°C — 50°C |
| 7 | Temperature unit | 00: °C | 00: °C
01: °F |
|
8 |
Output delay |
00: 00s |
00: 00 s
01: 30 s 02: 60 s 03: 90 s |
|
9 |
Switching Differential |
01: 1.0°C |
00: 0.5°C
01: 1.0 °C 02: 2.0 °C 03: 3.0 °C |
| 10 | Reverse output | 00: OFF | 00: ON
01: OFF |
| 11 | Schedule | 00: 7 | 00: 7
01: 5+1+1 |
| 12 | Adaptive function | 01: ON | 00: OFF
01: ON |
| 13 | Reset | 00: No | 00: No
1: YES |
ADVANCED SETTING
- Room temp calibration: Calibrate the temp detected by room sensor.
- Floor temp calibration: Calibrate the temp detected by floor sensor.
- Frost Protection Mode: Frost protection allows the thermostat to turn on if the temperature drops below 5 degrees even when it is not programmed to. ❄ displays when you turn off the thermostat.
- Sensor selection:
- Room sensor: Run by room sensor.
- Floor sensor: Run by floor sensor.
- Both sensors: Run by room sensor with floor temp limit.
- Floor temp limit: If you choose both sensors, floor temp limit must be set to protect floor.
- Temp unit: °C and °F can be selected.
- Output delay: This option help you avoid inadvertent operation on heating.
- Switching Differential: The number of degrees the temperature has to change before the unit switches on/off. The default is 1 degree so if the temperature is set to 21 degrees the thermostat will switch on at 20.5 degrees and off at 21.5 degrees. 0.5 degrees either side of 21.
- Reverse output: This function works for the cooling system. When the temp is 1°C higher than set temp, the thermostat will disconnect the cooling system. otherwise, it will connect the cooling system.
- Schedule: Select a weekly schedule for the Edit. There are 2 options:
- each day from Mon to Sun can be set individually.
- 5+1+1: 5 days from Mon to Fri have the same events, Sat and Sun can be set individually.
- Adaptive function: After several days of installation and use, Adaptive function ensures that the required temp has already been reached when the next event begins.
- Reset: All parameters are restored to default values.
- Caution: These are normally set by technicians during initial installation.
- In normal timed power ‘on’ mode, press O to enter setting.
- Press △ or ▽ to select SETUP.
- Press O to enter advanced setting. Each parameter can be accessed by pressing O and adjust the values as required using the arrow keys.
- (The default values are recommended and changing these may adversely affect the way the thermostat works). Press to revert to normal screen.
Open window detection
This function only works when room sensor or both sensors is selected. The thermostat with this function will shut off automatically for 15 min when the window opens, as it can detect that the room temp plummets
TROUBLESHOOTING
- Fault Codes
- E1 = Built-in sensor short-circuit or disconnected.
- E2 = Floor sensor short-circuit or disconnected.
PROWARM
- Support: 01268 567019
- www.prowarm.com
REFERENCE:
DOWNLOAD MANUALS:
ProWarm ProTouch Touchscreen Thermostat INSTRUCTION MANUAL
![]()