
VELUS TOUCH Programmable Thermostat

FIG.1 / FIG.2
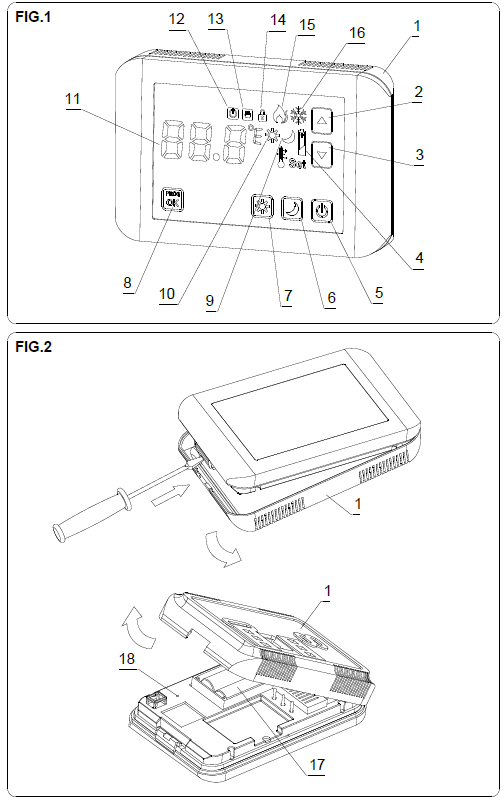
19. Mounting base
20. Increase / Next
21. Reduce / Back
22. Low battery level symbol
23. On/off icon
24. Energy-saving temperature selection icon
25. Comfort temperature selection icon
26. Programming / confirming icon
27. Energy-saving temperature-activated symbol
28. Comfort temperature activated symbol
29. Room temperature
30. Thermostat off symbol
31. Manual functioning symbol
32. Block touchscreen symbol
33. Heating functioning symbol
34. Air conditioning functioning symbol
35. 2x AA 1.5V batteries
36. RESET button
DESCRIPTION
The VELUS TOUCH thermostat is a piece of programmable electronic equipment, designed to manage the switching on and off of a heating or air conditioning system. It allows three types of programmable temperatures to be assigned (Comfort temperature, Energy-saving temperature, and Antifreeze temperature).
General characteristics:
- Large backlit touchscreen.
- 3 regulable temperature levels: Comfort
 , Energy-saving
 , and Antifreeze
 .
. - Regulation of temperature from +5 ºC to +35 ºC (Antifreeze from +1 ºC to +10 ºC).
- Convenient programming, as the device can be programmed outside the installation base.
INSTALLATION
ATTENTION. The electrical devices must be installed and assembled by an authorized installer.
BEFORE PROCEEDING TO CONNECT THE POWER SUPPLY, ENSURE THE CABLES TO BE CONNECTED ARE NOT UNDER LIFE.
The device has internal protection against interference.
ASSEMBLY
Electronically-controlled device for independent assembly on wall or appliance box. We recommend the device be installed at a minimum height of 1.5 m. Assembly of the thermostat with timer must be independent so that it is free from obstacles and not affected by other devices or sources of heat (sun, radiators, windows, etc.) To install the device on the wall and to replace the batteries, it must be detached from the mounting base, by applying pressure to the tab on the left-hand side using a flathead screwdriver (FIG.2). Mount the installation plate on the wall or appliance box using the screws included.
CONNECTION
Remove the terminal cover using a screwdriver and connect it according to the diagram in FIG.3. To control an installation using contractors we recommend fitting a capacitor of suitable value in parallel to the bobbin (0.1 μF 275 V~).
FITTING AND REPLACEMENT OF BATTERIES
The device is powered by 2 alkaline LR6 (AA) 1.5 V batteries (not included). Respect the polarity indicated in the battery housing. The approximate duration of the batteries is 1 year. When the batteries are fitted for the first time, the screen is activated and all of the display segments come on. After a few seconds, the thermostat starts to work. When the level of the batteries in the device is low and they need replacing, the following symbol will appear at the bottom of the screen: ![]() So as not to lose the current settings, it is advisable to replace the batteries in under 15 seconds. Before replacing the batteries, we recommend the thermostat be set to OFF mode. Place the used batteries in a suitable disposal container. Respect the environment
So as not to lose the current settings, it is advisable to replace the batteries in under 15 seconds. Before replacing the batteries, we recommend the thermostat be set to OFF mode. Place the used batteries in a suitable disposal container. Respect the environment
TOUCHSCREEN
To interact with the thermostat, all you have to do is touch one of the 6 touch icons shown on the display with your finger (never use pens or other sharp objects). The icons ![]() are multifunctional
are multifunctional ![]() and fulfill diverse functionalities depending on the type of pressure applied (short or long).
and fulfill diverse functionalities depending on the type of pressure applied (short or long).
BACKLIGHTING
Every time an icon on the touchscreen is pressed, the backlighting of the display is activated to enable correct visualization in conditions of low luminosity. The backlighting switches off automatically 10 seconds after the last time the screen was pressed.
PROGRAMMING THE TEMPERATURE
To establish the values of comfort and energy-saving temperatures, press the icon  on the screen. The symbol
 ![]() will appear on the screen, and the Set symbol will flash intermittently along with the comfort temperature for modification. Use the icons to increase or reduce this value. After selecting, confirm using the
will appear on the screen, and the Set symbol will flash intermittently along with the comfort temperature for modification. Use the icons to increase or reduce this value. After selecting, confirm using the ![]() icon
icon![]() (or confirmation takes place automatically when 10 seconds have passed since the last time the screen was pressed). Afterward, the symbol will appear on the screen, and the Set symbol
(or confirmation takes place automatically when 10 seconds have passed since the last time the screen was pressed). Afterward, the symbol will appear on the screen, and the Set symbol ![]() will flash intermittently along with the energy-saving temperature to be modified. Use the icons to increase or reduce this value. After selecting, confirm using the icon
will flash intermittently along with the energy-saving temperature to be modified. Use the icons to increase or reduce this value. After selecting, confirm using the icon (or
(or  confirmation takes place automatically when 10 seconds have passed since the last time the screen was pressed) and leave temperature programming. To adjust the antifreeze temperature, see the Advanced programming section below
PREDETERMINED TEMPERATURES
The predetermined factory temperatures are:

To see the values of the adjusted temperatures, simply press the ![]() or
or ![]() icons.
icons.
AUTOMATIC FUNCTIONING
The thermostat will switch the heating/air conditioning on or off in accordance with the adjusted temperature. To activate the comfort or energy-saving temperatures, press the corresponding icon, or
 , and the corresponding symbol will appear on the display along with the adjusted temperature for two seconds. When activated, the
![]() (heating mode) or
(heating mode) or ![]() (air conditioning mode) symbol will also be displayed.
(air conditioning mode) symbol will also be displayed.
MANUAL FUNCTIONING
In automatic functioning mode, we can momentarily modify the value of the programmed temperature by pressing or. Whilst the temperature is being modified, it will be shown on the screen, flashing intermittently alongside the symbols Set and![]() . After selecting, confirm with the icon (or confirmation takes place automatically when 10 seconds have passed since the last time the screen was pressed).
. After selecting, confirm with the icon (or confirmation takes place automatically when 10 seconds have passed since the last time the screen was pressed).
ATTENTION: If the upper-temperature limits (SP: HI) and/or lower temperature limits (SP: LO) have been adjusted in the Advanced programming section, manual adjustment of the temperature will be limited to that temperature range. To exit and return to automatic functioning, press one of the temperature mode selection icons, or.
OFF – FUNCTIONING
When you press![]() , if the appliance is on, it switches to off mode and will not switch on or allow temperatures to be manipulated, and appears on the screen. In this mode, the appliance measures the room temperature but does not carry out any of its functions unless the temperature drops to below the programmed antifreeze temperature, in which case the antifreeze program will be activated, and the appliance will be switched on in order to prevent freezing. To exit this mode and switch the appliance on, press the button
, if the appliance is on, it switches to off mode and will not switch on or allow temperatures to be manipulated, and appears on the screen. In this mode, the appliance measures the room temperature but does not carry out any of its functions unless the temperature drops to below the programmed antifreeze temperature, in which case the antifreeze program will be activated, and the appliance will be switched on in order to prevent freezing. To exit this mode and switch the appliance on, press the button  again
again
RESET
RESET to restore the default factory settings (values, temperature, programs, etc.). To carry out this operation, keep the buttons pressed for 5 seconds at the same time. After a RESET, the appliance must be reprogrammed once again.
ADVANCED PROGRAMMING
With the keyboard active, keep the key pressed for 5 seconds, and H-C will appear at the top left-hand side of the screen, and “Set” will flash intermittently on the right. Touching the button again enables you to modify the parameters:
- H-C – Functioning “FLA” heating in winter / “ICE” air conditioning in summer.
- ANTI – Antifreeze temperature is adjustable from 1 ºC to 10 ºC.
- DIF – Differential adjustable from 0.1 ºC to 1 ºC.
- SP: HI – Upper adjustable temperature limit in Manual functioning (from 15 ºC to 35 ºC).
- SP: LO – Lower adjustable temperature limit in Manual functioning (from 5 ºC to 25 ºC).
- CONT – Adjustment of screen contrast from 1 to 5, to improve the visibility of the screen in accordance with the installation height. Use or to select the desired value and confirm with or wait 10 seconds and the changes will be saved automatically
SCREEN BLOCK
The touchscreen can be blocked to prevent undesired manipulation. To do this, press for more than 10 seconds until the Set symbol flashes on the display and the letters LOC appear in the top left-hand part of the display. You can now enter a numeric password of between 000 and 999, setting it digit by digit using or accepting it. When the touchscreen is blocked the ![]() symbol will appear. To unblock the touchscreen press on any icon on the screen and the will appear, with the flashing Set symbol, and in the top left-hand part of the display the letters LOC will appear. Now you can enter the password digit by digit using or accepting with. This enables one to make changes to the thermostat adjustments for 30 seconds, during which the symbol will flash. And if you wish to permanently remove the block from the touchscreen, press
symbol will appear. To unblock the touchscreen press on any icon on the screen and the will appear, with the flashing Set symbol, and in the top left-hand part of the display the letters LOC will appear. Now you can enter the password digit by digit using or accepting with. This enables one to make changes to the thermostat adjustments for 30 seconds, during which the symbol will flash. And if you wish to permanently remove the block from the touchscreen, press  for more than 10 seconds until the Set symbol flashes on the display and the letters LOC appear in the top left-hand part of the display. You can then enter “—” using and accept with . If you forget the password, you can unblock the appliance by removing the batteries and using a pointed object to press inside the hole of the RESET button (FIG.2 – 18) beside the battery compartment.
CLEANING THE DISPLAY
Clean with a soft, damp cloth. Do not use abrasive products or detergents.
TECHNICAL CHARACTERISTICS
- Power supply: 2 alkaline LR6/AA 1.5 V batteries (not included)
- Breaking capacity: μ 10 (3) A 250 V~
- Contact: Changeover AgNi 90/10
- Duration of batteries: Approximately 1 year
- Precision of temperature measurement ± 0.5 °C
- Updating of temperature Every 60 seconds.
- Resolution 0.1 °C.
- Range of measurement on LCD: 0 ºC to 50 ºC
- Type of action: 1B
- Updating of output relay: Every 60 seconds
- Regulation of control temperatures: Energy-saving: From +5 ºC to +25 ºC
- Comfort : From +15 ºC to +35 ºC
- Antifreeze : From +1ºC to +10 ºC
- Manual
 : From +5 ºC to +35 ºC
 - Type of regulation: ON-OFF with adjustable hysteresis of 0.1 ºC to 1 ºC (by default 0.2 ºC).
- Screen block: Activated / De-activated by Password
- Regulation of display contrast: From 1 to 5 (by default to 5)
- Operating temperature: From 0 ºC to +50 ºC
- Transportation and storage temp.: From -10 ºC to +60 ºC
- Protection class: II in the correct assembly
- Protection degree: IP40 according to EN 60529 installed correctly
- Contamination situation: 2
- Transient pulse voltage: 2.5 kV
- Ball test temperature: 75 ºC (21.2.5); 105 ºC (21.2.6)
- Connexion: By means of screw terminals for a maximum conductor section of 2.5 mm².
WARNING: When the charge exceeds the maximum breaking capacity current, contractors must be used. Subject to technical changes – additional information available at: www.orbis.es
REFERENCE”
DOWNLOAD MANUALS:
Orbis VELUS TOUCH programmable Thermostat Instruction Manual
OTHER MANUALS:
Orbis VELUS TOUCH Programmable Thermostat User Guide
![]()
Orbis VELUS TOUCH programmable Thermostat Instruction Manual
Leave a Reply