hotowell HTW-31-WKT13-WF Wireless Room Thermostat

INTRODUCTION
This surface-mounted radio thermostat has been developed to be able to switch electric and conventional heating systems on and off using a set temperature and time.
Functions
- Large display can be clearly read with the background lighting.
- Easy to fit thermostat and receiver.
- Five buttons make it easy to use.
- 4 periods of each day programmable
- The display shows the set temperature as well as the measured temperature, time.
- Temperature display in degrees Celsius.
- The thermostat is supplied with a wall-fixing frame, base and a very compact receiver (surface-mounted).
Technical Data
- Thermostat operating voltage: 2 x AA1.5 V, alkaline batteries.
- Backup storage: EEPROM
- Receiver operating voltage: 230 VAC, 50/60 Hz
- Maximum voltage / (ohmic) load: 250 VAC/10 A.
- Frequency: 868 MHz
- Channel selection: By programming the thermostat and the receiver.
- Switching options: 7day, 4 periods each day.
- Receiver switch contacts: NO and NC.
- Temperature settings: 5°C ~ 35°C, 0.5°C increments.
- Accuracy: +/- 0.5°C
- Thermostat dimensions: Surface mounted, 135mm x 87.5 mm x 23.2mm.
- Receiver dimensions: Surface mounted, 86mm x 86 mm
- Color: White
- IP protection rating: 20.
- Certification: CE, Rohs, R&TTE

PRG. Schedule Setting
- Long press PRG button to enter PRG setting. The weekday is fixed from Monday to Sunday(1~7), each day have 4 periods(1~4). Each press of PRG button can into next item setting.
- The time and temperature of each period i can be set in following steps.
- Press PRG and hold for 3 seconds, the time display flash, change the value by + and – button. (each press is 15mins)
- Press PRG button , the temperature display flash, change the temperature by + and – button.
- Press PRG button to next period.
- The other period settings follow the same way
Default Setting
| Period | 1 | 2 | 3 | 4 | ||||
| Time | Temp | Time | Temp | Time | Temp | Time | Temp | |
| 12345(Mon.~Fri.) | 7:00 | 22℃ | 8:30 | 19℃ | 17:00 | 22℃ | 22:00 | 19℃ |
| 6(Sat.) | 8:00 | 22℃ | 8:30 | 22℃ | 17:00 | 22℃ | 22:00 | 19℃ |
| 7(Sun.) | 8:00 | 22℃ | 8:30 | 22℃ | 17:00 | 22℃ | 22:00 | 19℃ |
Clock Adjustment
- Press and hold the SET button for around 3 seconds. The minutes display (top left in the display) flashes.
- Change this value using the + and – buttons.
- Press the SET button . The hour display (top left in the display) flashes.
- Change this value using the + and – buttons.
- Press the SET button. The day display (top left in the display) will flash as a number.
- Change this value using the + and – buttons. Use 1 for Monday, 2 for Tuesday, 3 for Wednesday, 4 for Thursday, 5 for Friday, 6 for Saturday and 7 for Sunday
Code Pairing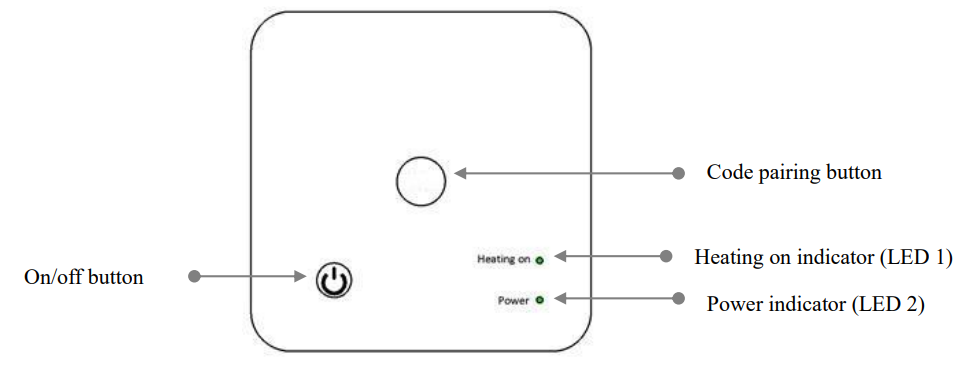
Code Pairing with Sender
- Long press the code pairing button on the receiver until LED 2 is flickering quickly.
- Turn off sender, and long press SET button until the code shows on the screen, then press + button again.
- Wait for a while, LED 2 stop flickering. Code pairing done.
Code Pairing with App
- Scan the QR code, and download “Smart Life” APP from google play or app store

- Install app and register account
- Add device by press + button at top right corner
- Press “ Home Applicanes II”
- Find “ Thermostat or Heater” on the list and press
- Long press Pairing button(F) on receiver to enter wifi connection mode, the LED will flash quickly.
- Press “Confirm indicator rapidly blink” on phone.
- Wait a moment till connection done. The LED on receiver will stop flashing. Wifi connection success.
- If the LED still flash slowly, the connection fail, please try again from step. 5.
Clear all pairing
- Long press both code pairing button and On/Off button for 5s, until LED1 and LED2 light.
- And then light off, which mean the code pairing are eliminate.
Signal Lost
- In case the RF and WIFI signal lost/disconnected, LED 2 will flicker slowly
Open Window Detection
When the Open Window detect function is enabled in the parameter setting, the system will automatically stop heating when it detects a sudden drop of room temperature (2°C in 15 minutes as default). This is normally caused when a window or door is opened without turning off the heating device. The device will return to the previous mode of operation after 30mins, then OP disappear. Press any button will exit OWD function during the heating off period.
Parameter Setting
Under off mode, press and hold SET button and + button for 6s to enter parameter setting. Each press of SET button will go to next item setting. Adjust the value by pressing + or – button.
| Menu | Description | Range | Default Value |
| 01 | Temp. calibration for internal sensor | -8 ℃ ~8 ℃ | 0℃ |
| 02 | Set Point Max. | 5 ℃ ~35℃ | 35 ℃ |
| 03 | Set Point Min. | 5 ℃ ~35℃ | 5 ℃ |
| 05 | Frost Protection Temp. | 5 ℃ ~15℃ | 5 ℃ |
| 09 | Dead zone | 0~3℃ | 0℃ |
| 10 | Display | 0: Room temp.
1: SET temp. |
0 |
| 12 | Open window detect function | 1: Enable 0: Disable | 0 |
| 13 | OWD Detect Time | 2~30mins | 15mins |
| 14 | OWD Drop temp. select
(within detect time) |
2.3.4‟C | 2 „C |
| 15 | OWD Delay time select
(Return to previous working status) |
10~60min | 30mins |
| 17 | Factory reset | 0: No | 0 |
| 1: Yes, and then press
On/off button for 5s,wait until thermostat restart |
|||
| 18 | Software version | 7109 |
Wiring Diagram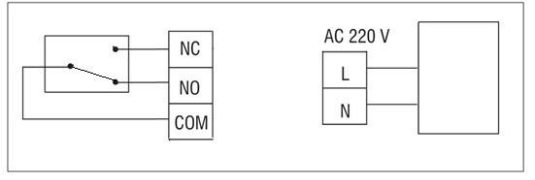
REFERENCE:
DOWNLOAD MANUALS:
hotowell HTW-31-WKT13-WF Wireless Room Thermostat User Manual
![]()
hotowell HTW-31-WKT13-WF Wireless Room Thermostat User Manual