Heatmisser neoHub Mini HW WiFi Smart Thermostat

INSTALLATION PROCEDURE
- Step 1 Using a small screwdriver, slightly loosen the screws located at the base of the neoHub Mini. You can then carefully separate the front panel from the back plate
- Step 2 Feed the cables up through the knockout sections and use the cable clamps to secure in place, alternatively remove the knockout sections in the back plate and feed the cables through the back.
- Step 3 Terminate the cables to the ub according to your system type, examples are shown in the wiring diagrams at the back of this manual.
- Step 4 Mount the front panel onto the back plate, tighten the retaining screws on the base. Switch on the power supply, the power

neoHub Mini Explained
neoHub Mini Outputs

- The neoHub Mini gives you heating zones.
- To control one heating zone, configure the neoAir in mode 1, then pair the neoAir to the CH1 heat output.
- To control two heating zones, configure both neoAir’s in mode 1, and pair the first neoAir to the CH1 heat output. Pair the second neoAir to the CH2 heat output.
Open Therm
- Open Therm increases the efficiency of the heating system by automatically adjusting the boiler’s water temperature
- This is calculated by using the actual/target temperature, plus the demand from the system.
- The neoHub Mini has an OpenTherm output to connect to a compatible OpenTherm boiler.
- Check with your boiler manufacturer to verify if your boiler is OpenTherm compatible.
- The OpenTherm connection to the boiler must be wired in shielded cable.
Pairing the neoAir V2 to the neoHub Mini
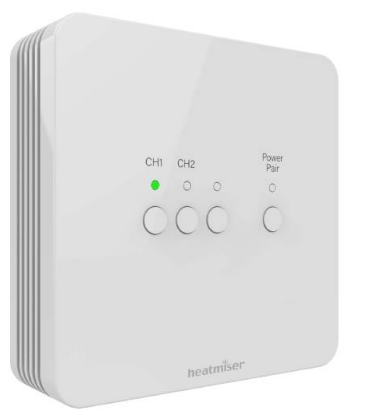
- On the neoHub Mini..
- Press and hold the ‘CH1’ or ‘CH2’ button for seconds
- The zone light on the Hub will flash green to indicate pairing mode is active, the example shown below pairing to CH1..
On the neoAir…

- Use the Left / Right arrow keys to scroll to
- Press and hold the Tick key for 3 seconds to turn off the display.
- SETUP is now highlighted, press the tick key once.
- The display will show a small 01 in the top right hand corner.
- Press the tick key once again to start the paring process, the display will appear as shown below
- Once the neoAir has successfully paired to the neoHub Mini, the zone light on the ub will turn off.
- On the neoAir, navigate to O and press tick to turn on the main thermostat display, which will now show in the top left corner.
- Repeat the process for pairing any additional zones.
- To test the neoAir is switching the output on/off, use the up/down keys to raise the set temperature above the current room temp, press the tick key once.
- The flame symbol will appear and the zone on the Hub will switch on.
- Use the up/down keys to lower the set temp then press tick once to turn the output off.
Pairing the neoHub Mini to your WiFi
- Download the Heatmiser neoApp to your smartphone or tablet.
- Sign in with an existing account or register a new account.
- Once signed in, select ‘Add neoHub’& select the neoHub Mini.
- Press the Power/Pair button once on the hub, the power light will now flash red.
- Go to your WiFi settings on your smartphone or tablet, select the neoHub Mini WiFi connection.
- Once connected to the hub’s WiFi, go back into the neoApp to configure the hub to your WiFi network.
- The Neo app will guide you through this process step by step.
- Once it’s all connected, you can re-title your zones in the app and take full control of your heating system.
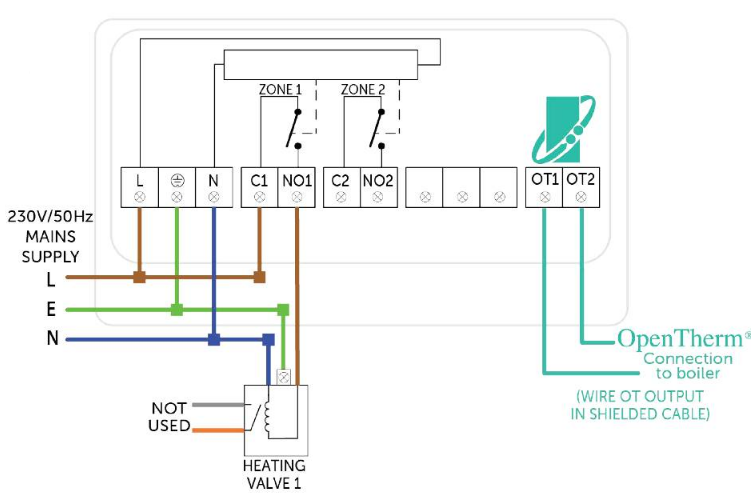
WIRING DIAGRAM
1 Heating Zone
2 Heating Zone

Channel Reset (CH1, CH2)
To reset CH1 or CH2& remove the thermostat paired to that output, press & hold the CH1 or CH2 button, the red light will flash 3 times, then release the button.
To reset CH1 or CH2& remove the thermostat paired to that output, press & hold the CH1 or CH2 button, the red light will flash 3 times, then release the button.
Factory Reset
Warning – This reset will remove any thermostats that have paired and will also reset the WiFi connection settings. You will have to reconfigure these after resetting.
- To reset all settings stored in the neoHub Mini;
- Press and hold the Power/Pairing button for 15 seconds.
- The CH1 &H2 lights will start flashing.
- Once the lights have stopped flashing, the ub vhill power light only. Factory reset has completed. show the red
- Now pair your thermostats to the ub and reconfigure the WiFi settings as explained earlier in the manual.
Heatmiser
Want More Information?
- Call our support team on: +44 (0)1254 669090
- Or view technical speci cátions directly on our website:
- www.heatmiser.com
- Heatmiser UK Ltd
- Units 1-5 Hurstwood Court, Mercer Way
- Shadsworth Business Park, Blackburn,
- Lancashire, BB1 2QU, United Kingdom.
Reference
Download manual:
Heatmisser neoHub Mini HW WiFi Smart Thermostat User manual
Other Manual:
Heatmisser neoHub Mini HW WiFi Smart thermostat Product Specification Guide
![]()
Heatmisser neoHub Mini HW WiFi Smart Thermostat User manual