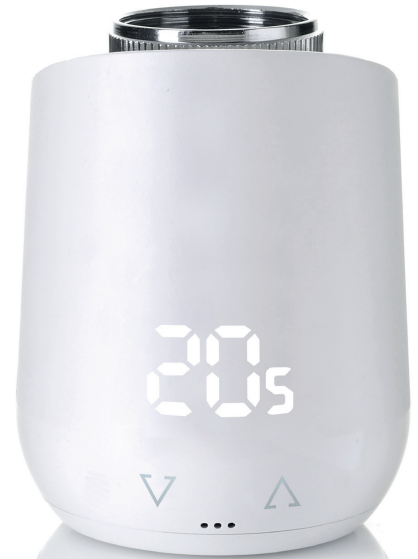
EUROtronic Comet Wifi WLAN Thermostat
SCOPE OF DELIVERY
- 1x Thermostat Comet WiFi
- 1x Quick Start Guide
- 3x Adapter (Danfoss RA / RAV / RAVL)
- 1x Screw for the adapter
- 2x Batteries AA LR6
NOTE: The illustrations below are for illustrative purposes only and may differ from the actual product.

NOTE: Check the scope of delivery for completeness and intactness.
WARNING NOTES
WARNING! This signal word indicates a hazard with a medium degree of risk which, if not avoided, may result in death or serious injury.
SAFETY NOTICE! This signal word describes circumstances that may pose a safety risk.
SAFETY NOTICE!
- Comet WiFi is intended for indoor use.
- Use Comet WiFi only as described in the operating instructions
- Comet WiFi should only be used in a dry and dust-free place without direct sunlight
- Do not continue to operate the device if it has obvious damage
- Comet WiFi must not be rebuilt, modified or opened.
WARNING! DANGER OF EXPLOSION!
Improper handling of batteries can lead to an explosion
- Do not heat batteries and do not throw batteries into an open fire.
- Do not place batteries in direct sunlight.
- Protect batteries from excessive heat.
- Do not short-circuit the batteries.
- Never attempt to charge non-rechargeable batteries.
- Never dismantle batteries.
- Do not use new and used batteries together.
- When inserting the batteries, observe the correct polarity (+/-).
- Before inserting the batteries, clean the batteries and the contacts in the thermostat.
WARNING! DANGER OF CHEMICAL BURNS!
Leaking battery acid can cause burns.
- Avoid contact of battery acid with skin, eyes, and mucous membranes.
- In the event of contact with battery acid, immediately rinse the affected areas with plenty of clean water and consult a doctor. consult a doctor
WARNING! DANGER OF INJURY!
If children play with the thermostat or the packaging, they can swallow small parts and choke.
- Do not let children play with the thermostat or the packaging
- Keep batteries away from children. Seek medical attention immediately if batteries are swallowed.
INTRODUCTION COMET WIFI
Thank you for choosing a product from Eurotronic Technology GmbH. This device can easily adjust the temperature in your rooms according to your wishes and helps you to effectively reduce your heating costs.
Development and production are 100% “Made in Germany“, which guarantees the highest quality and technology. These operating instructions will help you to put your device into operation quickly and easily.
THIS IS COMET WIFI
Comet WiFi is an energy-saving controller for radiators equipped with the WiFi radio standard, with modern and simple operation. It automatically regulates your room temperature according to your specifications and is configurable, directly on the controller or conveniently via smartphone via your WiFi network.
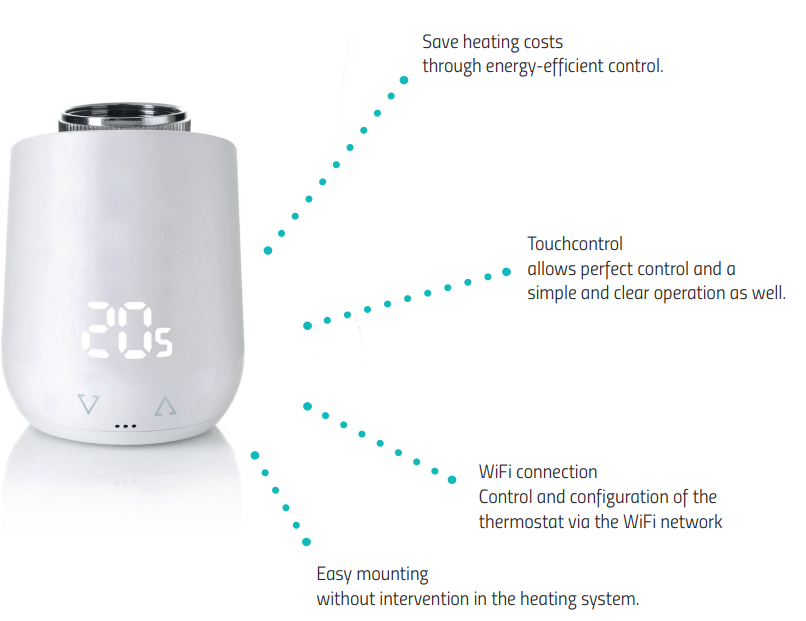
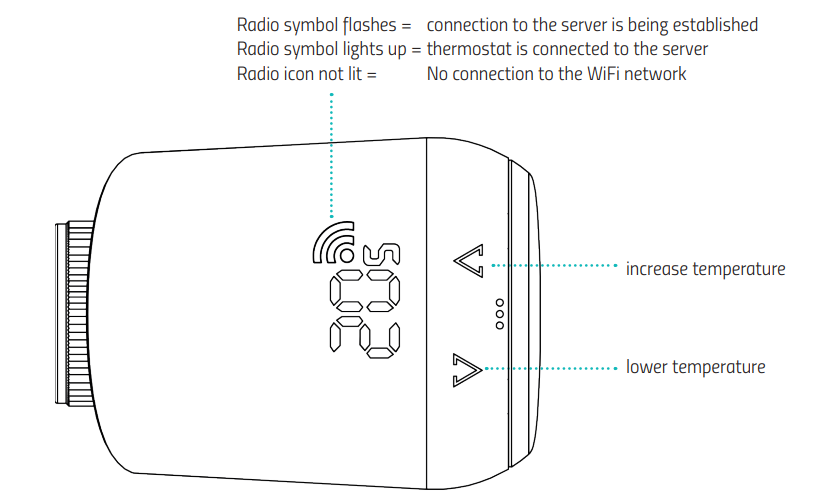
CONTROL AND DISPLAY ELEMENTS
Button in the battery compartment for performing the factory reset or activating the pairing mode:
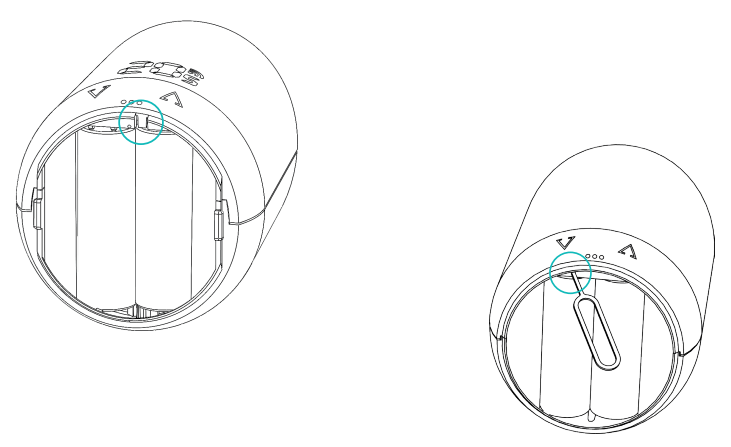
NOTE: The first model series has a lower reset button that is operated with the supplied tool.
INSTALLATION AND START-UP
The following explanations describe the procedure using an Android app (app version: 1.2) and may differ slightly for Apple. In addition, the screenshots shown may differ from newer app versions.
DOWNLOAD APP
Download the “WiFi Smart Living“ app from the Google Play Store or Apple App Store.
CREATE USER ACCOUNT
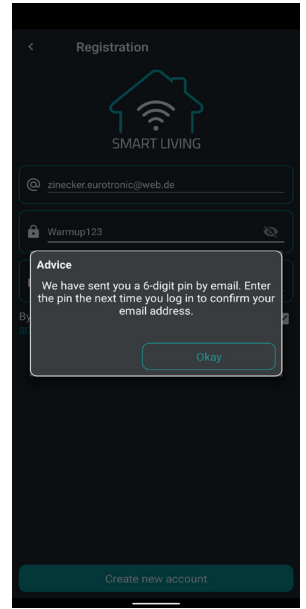
- Create a user account. Enter your email and choose a password.

Note: Make sure you enter a valid email address. The app does not check the validity of the email. - Accept our terms and conditions and privacy policy.
- Click on the “Create new account“ button.
- You will now receive an e-mail Pin for verification. Check also your spam folder.
- Enter the pin you received by email, in the field.
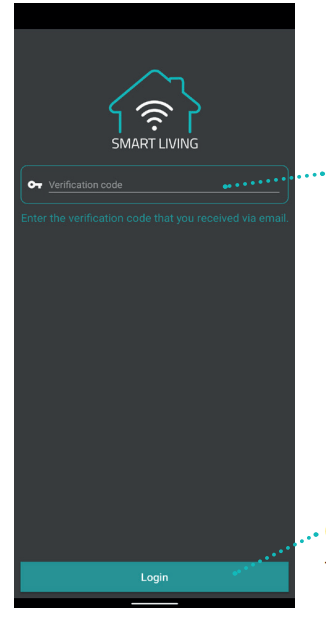
- Then click on the “Login“ button
ADD NEW DEVICE
Teach in a new device by clicking on the “Add device“ button (initial commissioning) or the “+“ button. The pairing process will then start and you will be guided through the installation of your thermostat with the help of a setup wizard.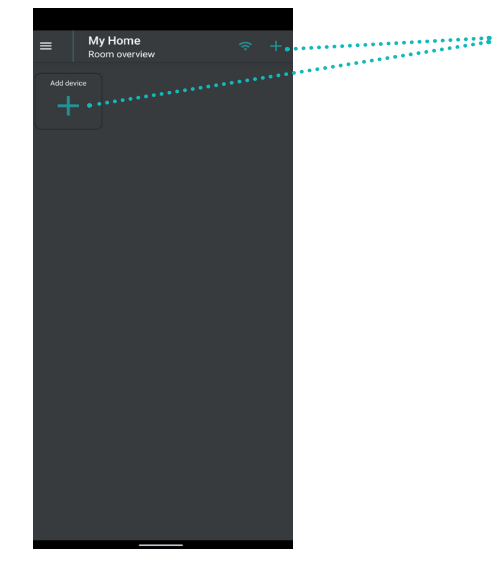
CHOOSE NETWORK
The WiFi network to which your smartphone is connected is automatically displayed in this field. If you want to integrate your Comet WiFi into a different WiFi network than the one shown to you, temporarily connect to a different WiFi network in your smartphone‘s WiFi settings and return to the app. The correct WiFi network is then displayed under “My WiFi network“.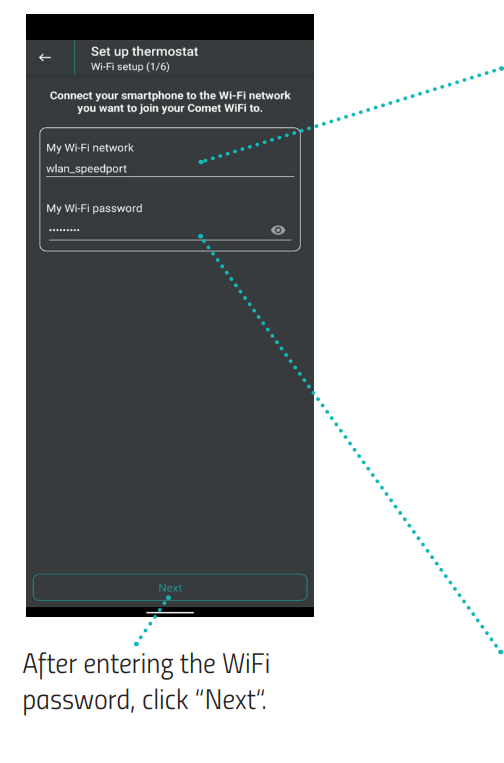
NOTICE:
So that your WiFi network in the “My WiFi network“ field automatically can be displayed, the following factors must be present:
- Your WiFi network must operate on 2.4 GHz since Comet WiFi can only be integrated into a 2.4 GHz WiFi network. This can be viewed in the settings of your WLAN router and changed if necessary.
- Your smartphone‘s location approval must be enabled.
- The WiFi Smart Living app needs permission to access your location while using the app. If you have denied location access in the app, go to your smartphone settings and adjust the permission. (Android: In the “Apps“ section, you can grant the “WiFi Smart Living“ app location access again while using the app.)
Enter the password of your WiFi network correctly. This is important because the app cannot check your home network‘s WiFi password. You will continue to be guided through the setup wizard despite the incorrect password.
After entering the WiFi password, click “Next“.
NOTICE:
Comet WiFi can only be integrated into 2.4 GHz WiFi networks. If the router transmits exclusively on 5GHz, device conrol is not possible. The router must be set to 2.4GHz or 2.4GHz/5GHz mixed networks.
INSERT BATTERIES
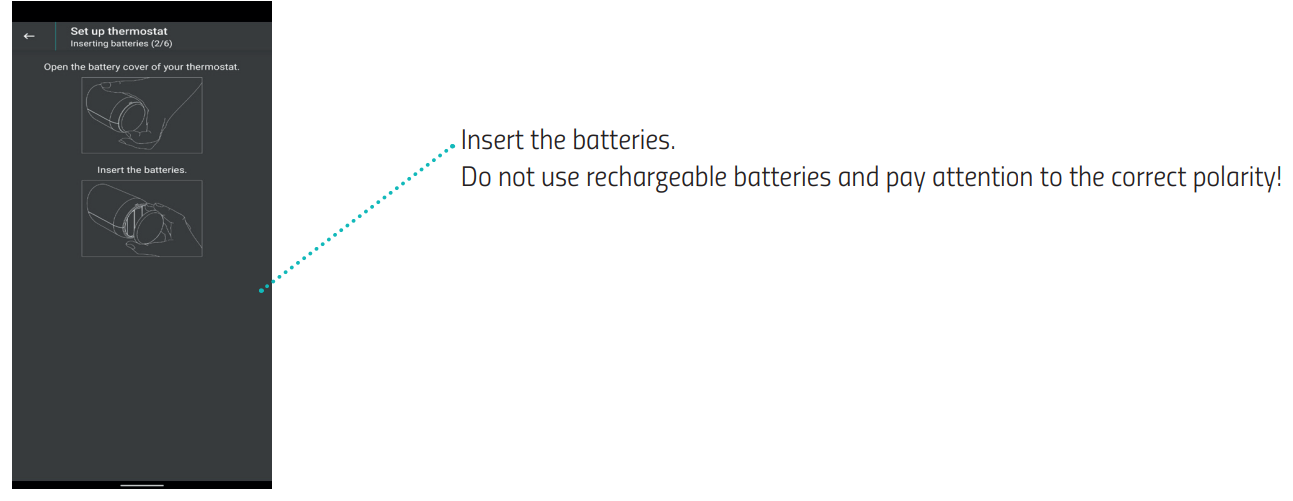
SETUP THERMOSTAT
- Go to your smartphone‘s WiFi settings and connect to your thermostat there. Depending on the software version, your thermostat is displayed with the WiFi radio name in the WiFi settings as “Comet WiFi“ or “Eurotronic“. If you have purchased a device with older software (radio name: Eurotronic), a software update will be carried out directly during setup.
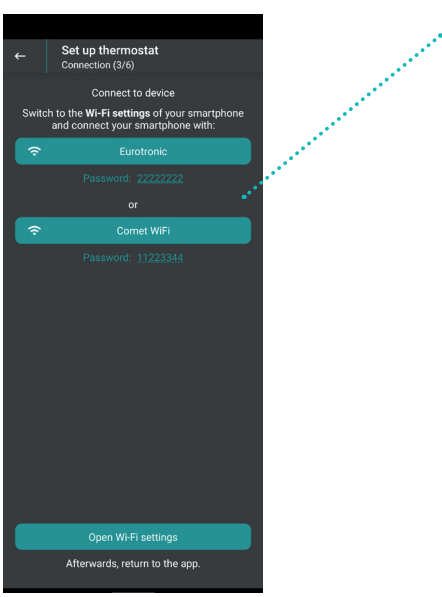
- Now connect to your thermostat. Enter the device password specified in the app.
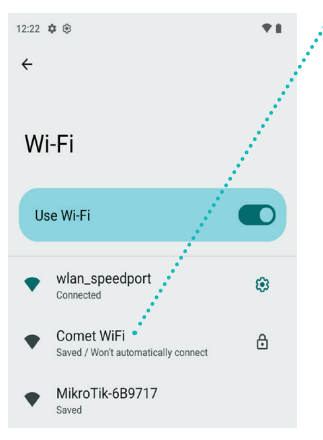
NOTE: If a connection is established later or new devices are taught in, it is possible that the device password will no longer be requested.
IMPORTANT NOTE: After you have connected to your thermostat (“Comet WiFi“ or “Eurotronic“) in the WiFi settings, do not be confused by information such as “not connected to the internet“.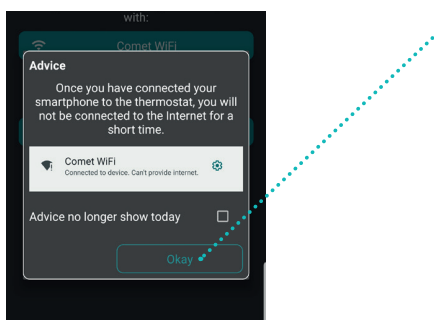
The WiFi network temporarily generated by the thermostat is not comparable to your WiFi network at home, as it is a WiFi network that is only necessary for the pairing mode. This WiFi network has no Internet access. Despite the message displayed, remain connected to the device and return to the app to complete the learning process. - Click on the “Next“ button after you have returned to the app. Your device will then be fully set up.
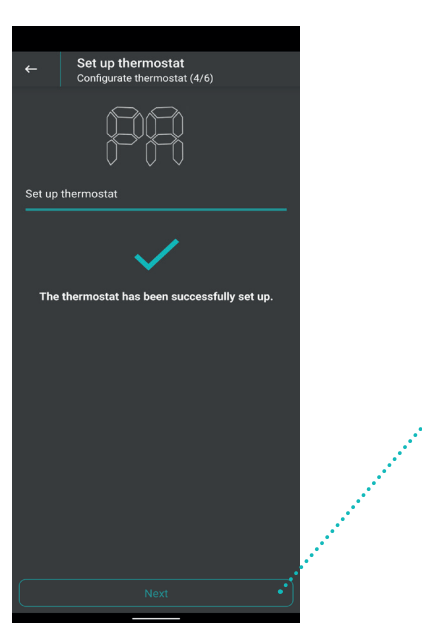
- Your thermostat will then be set up and you will be given one
Notice when the thermostat has been set up successfully.
NOTE: If the loading bar does not run through to the end, temporarily deactivate your smartphone‘s mobile data during the learning process. Also make sure that your smartphone‘s location data is enabled and that you have granted location access to the app. - After the setup has been successfully completed, click on the “Next“ button.
MOUNTING TO THE RADIATOR
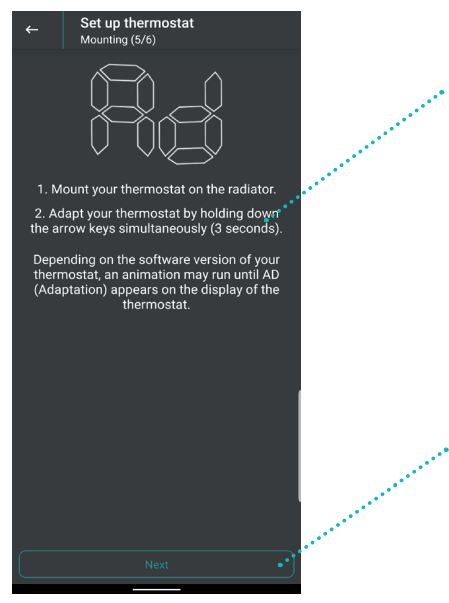
Now mount your thermostat on the radiator and start the adaptation after successful installation. To do this, hold the two arrow keys on the Comet WiFi simultaneously for 3 seconds.
NOTE:
On the following pages, you will find more detailed information on installing and adapting your thermostat.
After adaptation press “Next“.
Comet WiFi can be easily installed on all known valve bodies (see adapter list at www.eurotronic.org/service/faq).
- Unscrew the old thermostat head completely, loosen the fastening, and pull it off the valve (Fig. 3).
- If necessary, select a suitable adapter and mount it on the valve (Fig. 4).
- Screw the thermostat onto the valve or adapter by turning the union nut clockwise unscrew (Fig.5).
ATTENTION:
Make sure that your Comet WiFi is also in the adaptation mode when installing/removing it later. Remove the batteries briefly, reinsert the batteries, and wait until the motor run is complete and “Ad“ appears on the display. Only mount/ dismount your Comet WiFi in this position.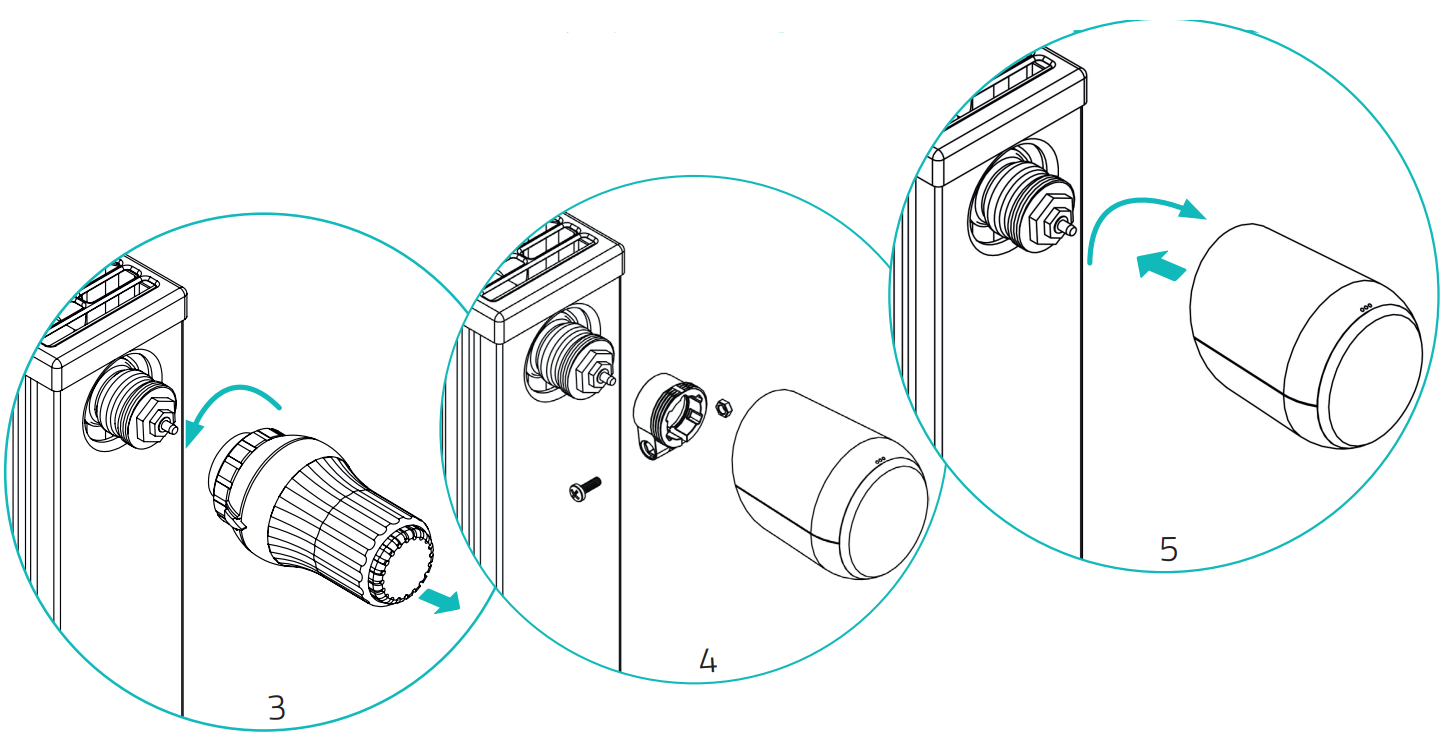
ADAPTER
NOTE:
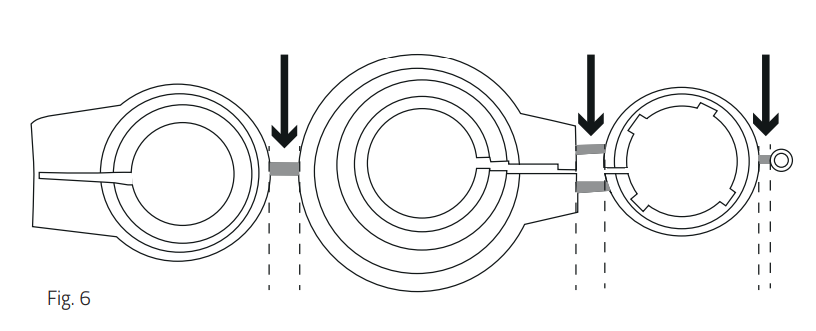
Completely remove the connecting pieces of the plastic adapter (Fig. 6) before using one of the enclosed adapters! For Danfoss RA/RAV uses the bolt and nut provided.
No adapter is required for the following valves:
home eggs; Junkers Landys+Gyr; MSG; Honeywell; Braukmann, as these have a thread size of M30 x 1.5 mm. The adapters for Danfoss RAV (pin must be plugged into the valve tappet), Danfoss RA and Danfoss RAVL are included.
You need an adapter for the following valves:
Heart M28 x 1.5 mm; Comap M28 x 1.5 mm; Vaillant 30.5 mm; Oventrop M30 x 1.0 mm; Meges M38 x 1.5 mm;
Ondal M38 x 1.5 mm; Giacomini 22.6 mm; Rossweiner M33 x 2.0 mm; Markaryd M28 x 1.0 mm; Ista M32 x 1.0 mm;
Vama M28 x 1.0 mm; Pettinaroli M28 x 1.5 mm; T+A M28 x 1.5 mm; Gampper 1/2/6; Danfoss RA/RAV/RAVL. You can purchase other chargeable metal adapters from our partners. An overview of the metal adapters and the corresponding ordering options can be found under the following link: https://eurotronic.org/produkte/zubehoer/metalladapter/
If you are not sure which valve you have, look under: https://eurotronic.org/service/faq under the button “Adapter list“.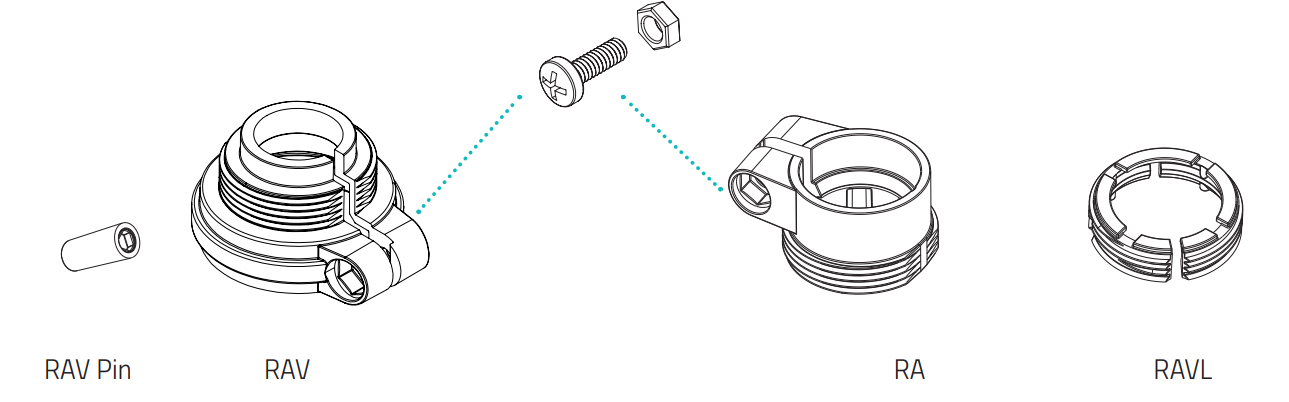
INSTALLATION AND START-UP
After installation, Comet WiFi can start with the adaptation. “Ad“ appears in the display. To start the adaptation, hold down the two arrow keys on your Comet WiFi simultaneously for approx. 3 seconds. After successful adaptation, Comet WiFi goes into normal operation, the LEDs indicate the target temperature.
If a new adaptation is necessary because an unexpected behavior of the thermostat occurs, please press the reset button in the battery compartment once briefly. The device will then perform a restart. As soon as the restart is completed, the device displays “Ad“ and can be adapted again.
You can achieve the same effect by removing the batteries and reinserting them after approx. 10 seconds.
After this, the device also performs a restart and is then ready for adaptation again.
NOTE:
After a battery change, the adaptation process must be run again.
CHOOSING A NAME AND ROOM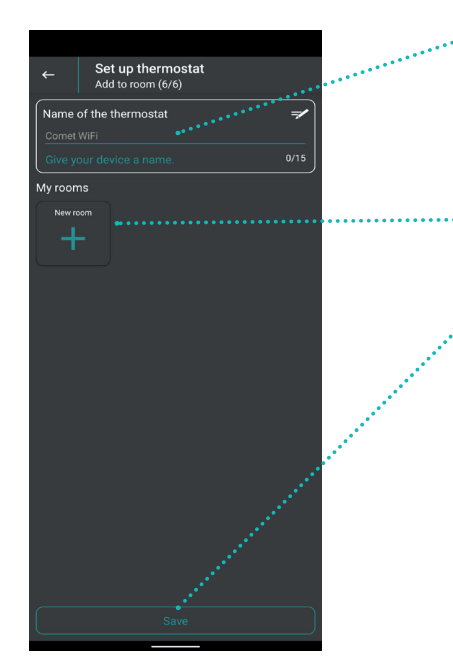
- After you have mounted your Comet WiFi on the radiator and the once you have completed the adaptation, you can give your Comet WiFi a name.
- Then add your thermostat to a room.
- Press the “Save“ button after you have specified a name and room.
NOTE:
If problems occur during storage, switch to the WLAN Settings of your smartphone and reconnect to your home WiFi network. The problem may be that your smartphone has not automatically unpaired the connection to the thermostat again. If you then return to the WiFi Smart Living app, the saving can be completed without any problems.
DISASSEMBLY
To disassemble Comet WiFi, briefly remove the batteries. Put the batteries back in and wait until the motor run is complete and “Ad” appears on the display. Now turn the union nut anti-clockwise and remove the Comet WiFi from the valve (Fig. 7).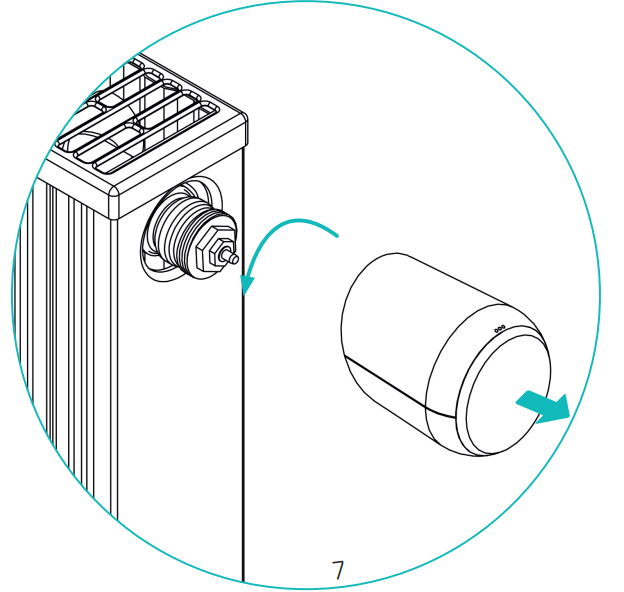
COMET WIFI APP
TEMPERATURE
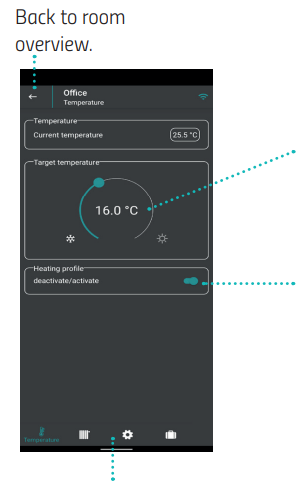
- You can adjust the current temperature to your needs at any time with the control wheel. If the network connection is established, the set temperature is immediately transferred to your thermostat.
- Deactivate: The saved heating profile is not active. activate: The saved heating profile is active. You can nevertheless make changes to the temperature at any time. The manually set temperature then remains until the next switching point. Then Comet WiFi switches back to the set heating program.
- In the menu bar you can switch between the menu items: Select “temperature“, “heating profile“, “settings“ and “holiday profile“.
HEATING PROFILE
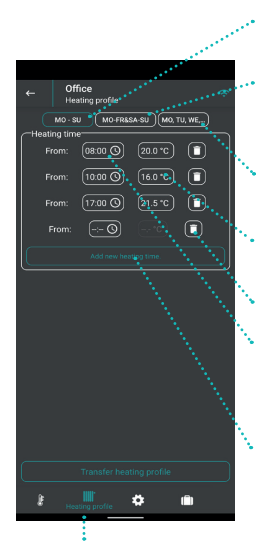
- Here you can create a heating profile for the whole week.
- Here you can create different heating profiles for weekdays and weekends
- Here you can create an individual heating profile for each day.
- Specify here which one temperature should apply.
- Here you can delete a heating time.
- In the “Heating times“ area, enter the time from which you want to switch to a new temperature.
- Add a new switching time.
- Under the menu item “Heating profile“ you can create individual heating profiles.
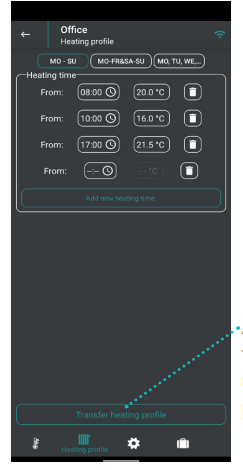
- After defining the heating times, transfer your data using the “Transfer heating profile“ button.
SETTINGS
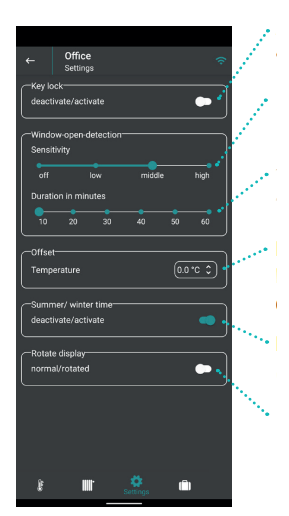
- Activating the key lock disables manual operation on the controller.
- Choose the sensitivity of the window open detection (high, medium, low).
- Set the desired length of time for which the valve should remain closed.
- If the perceived temperature differs from the set If the temperature differs, you can carry out a temperature adjustment.
- If you activate the “Summer/Winter time“ toggle switch, the time changeover is carried out automatically.
- Activate this button to rotate the Comet WiFi display by 180°.
HOLIDAY
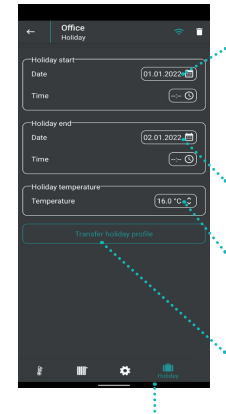
- Select the time of your departure.
- Choose the time of your return.
- Determine the temperature that should apply during your absence.
- Transfer your holiday profile with this button.
- Under the menu item “Holiday“ you can create a vacation profile for the time of your absence.
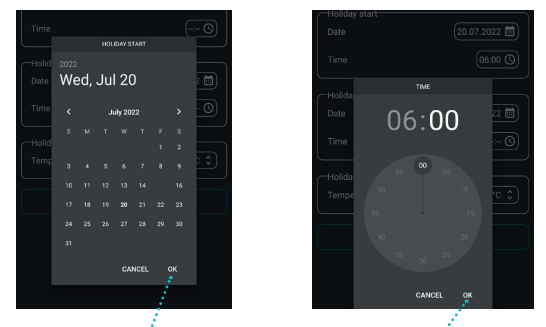
- Select your month and day and confirm with “OK“
- Select your time and confirm with “OK“.
NOTE:
Remember to send the set data to the thermostat using the “Transfer holiday profile“ button.
SOFTWARE UPDATE
- Software updates are displayed under the Software update menu item.
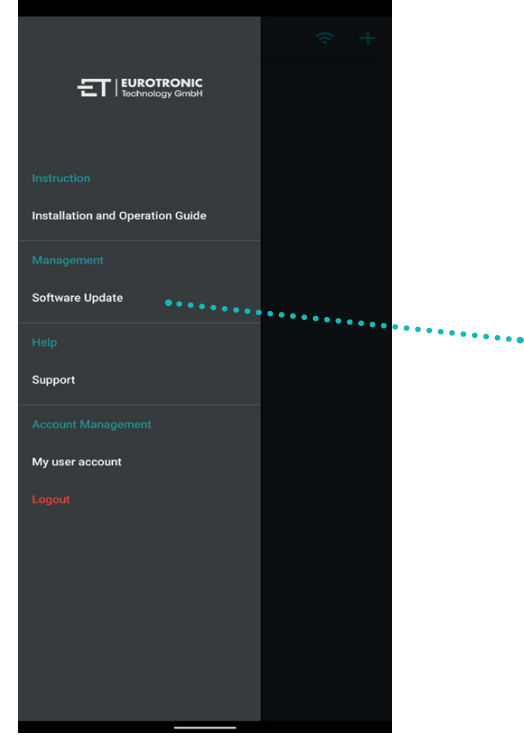
NOTE:
Leave your smartphone switched on during the software update. Do not activate the key lock of your smartphone. - If an update for the software is available, this button appears. Click on this button.
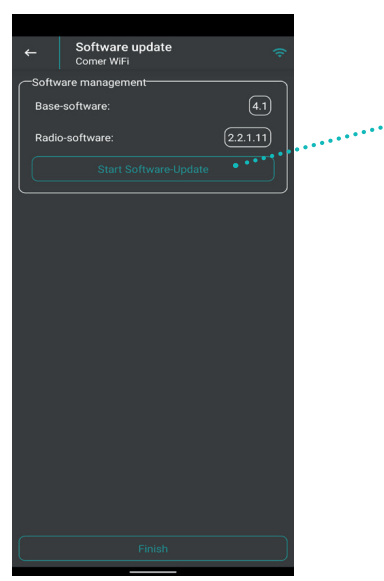
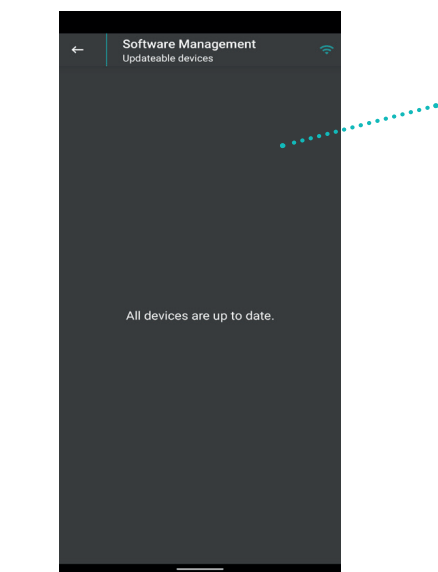
- No reason for updates when you see that screen.
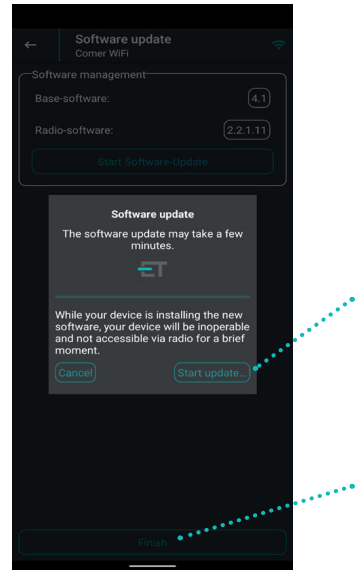
- Please note that the device will temporarily not be operable and wirelessly accessible while the new software is being installed.
- Click the “Start Update“ button to start the software update.
- When the update is done, push “Finish“ and come back to the main menu.
DEVICE MANAGEMENT
A long press on a room on the home page takes you to the thermostats that are in that room.
- Here you can see if your device is currently online or not.
- Here you can see the current software, your Comet WiFi run with.
- See the battery status of your Comet WiFi.
- Check the WiFi signal strength of the thermostat.
- See which WiFi network your Comet WiFi is connected to.
- See the Mac-adress from your device.
- Here you can remove your Comet WiFi from the room.
SUPPORT (APP)
- Stop that tick activated, so we can solve your problem can recognize it faster.
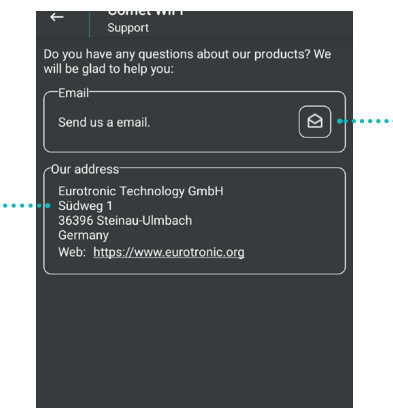
- If you have any questions, you can send an email to us.
MAIN FUNCTIONS
- DISABLED HEATING PROFILE:
If you deactivate the heating profile in the app, Comet WiFi regulates to the manually set temperature. The temperatures are not changed to the set switching point. - ACTIVATED HEATING PROFILE:
If you activate the heating profile in the app, Comet WiFi regulates it according to the set heating profile. You can still make changes to the temperature at any time (App or Comet WiFi). The manually set temperature then remains until the next switching point. Then Comet WiFi switches back to the set heating profile. - HOLIDAY MODE:
For the time of your absence, you can determine a freely selectable temperature. After the set time has elapsed, the program you set will run again automatically. To set the vacation mode, select the “Vacation profile“ menu item in the app. Here you can configure the vacation mode as desired.
If you press a button on the Comet WiFi during an active holiday profile, “Ho“ is shown in the display. If you press a button again, the target temperature is shown on the display and holiday mode is deactivated. - HEATING PROFILE:
You can set your heating profiles easily and conveniently in the app under the “Heating profile“ menu item. - WINDOW OPEN DETECTION:
If you open a window and the temperature drops sharply as a result, Comet WiFi automatically closes the heating valve to save energy. In the app you can activate and deactivate the window open detection under the menu item “Settings“. You can also define the settings for the window open detection. Set the desired length of time for which the valve should remain closed and select the sensitivity of the window open detection (high, medium, low)
NOTE:
Depending on the installation situation of the thermostat and the set sensitivity, it can happen that the open window is not recognized. It can also happen that a tilted window is not recognized if the temperature drop is not high enough. - OFFSET (TEMPERATURE ADJUSTMENT)
If the perceived temperature deviates from the set temperature, you can carry out a temperature adjustment. To do this, select the “Settings“ menu item in the app and enter your desired temperature adjustment. A temperature adjustment of -3°C to 3°C can be set.
FURTHER FUNCTIONS
- DISPLAY ORIENTATION:
Depending on the positioning of your radiator valve, it may be necessary to rotate the display on your controller by 180°. To do this, go to the “Settings” menu item in the app. Here you can rotate the display of your Comet WiFi. - KEY LOCK:
To protect against unauthorized operation of your controller, you can block Comet WiFi. You can activate/deactivate the key lock in the app under the menu item “Settings“. The key lock on the thermostat can also be activated/deactivated. To activate the key lock, hold down the two arrow keys for a few seconds. An animation appears on the display. To deactivate the key lock, hold down the two arrow keys for a few seconds until the animation has completely stopped. - FROST AND LIME PROTECTION FUNCTION
The antifreeze and limescale protection functions are automatically active.
Frost protection function: If the temperature drops below 8°C, the display shows “–“. In this case, Comet WiFi opens the valve until the temperature rises above 8°C again. Thus, the freezing of the radiator was prevented. Limescale protection function:
To prevent the radiator valves from calcifying, Comet WiFi carries out a lime protection trip every Friday at 11:00 a.m. - MANUELLE OPERATION:
The room temperature can be changed manually at any time using the touch buttons on the Comet WiFi. If the heating profile is activated, this manually set temperature remains until the next switching point. Then Comet WiFi switches back to the programmed heating profile. - PAIRING MODE:
By model 1 of Comet Wifi: To activate the pairing mode, press the lower button in the battery compartment of your Comet WiFi once until “PA“ appears on the display. - FACTORY RESET:
If you want to reset the radiator controller to factory settings:
To reset or reactivate of the pairing mode of your Comet WiFi, press and hold the button in the battery compartment of your Comet WiFi for 10 seconds. From the 5th second, a counter runs on the thermostat display. Keep the button pressed until the 10 appears on your Comet Wifi. This resets the unit to factory settings and it is now ready to be reconnected. The display will show „PA“ and flashes.
NOTE: For devices with software version 4.9, only a short keystroke is required to reset the device to factory settings.
ERROR MESSAGES AND HELP
| Problem | Reason | Solution |
| The app shows at “My WiFi Net- work” but does not indicate a WiFi network. | – Check whether your WiFi network operates on 2.4 GHz, as Comet WiFi can only be integrated into a 2.4 GHz WiFi network. This can be viewed in the settings of your WiFi router and changed if necessary.
– Activate the location permission of your smartphone. – Allow location access to the Eurotronic Wifi app. If you have declined location access in the app, go to your settings. In the “Apps“ area, you can grant the “ET Wifi“ app location access again while using the app. |
|
| C1 | 1.) WiFi password was not entered correctly in the app.
2.) WiFi signal strength is too low. |
1.) Delete your thermostat from the app and start the pairing mode again.
2.) Take appropriate measures to improve the WiFi signal strength of your home network. |
| C2 | 1.) WiFi password was changed. 2.) Demolition of the existing radio connection.
3.) The WiFi connection that was set up was temporarily interrupted (e.g. power failure, network cable) |
1.) Your Comet WiFi must be integrated into the WiFi network again (by entering the new WiFi password).
2.) Take appropriate measures to improve the WiFi signal strength of your home network. 3) Check e.g. your power supply and your network cable. |
| C3 | WiFi connection without internet access. | Check your internet connection. |
| Batteries need frequent change. | Check your WiFi signal strength. | Take appropriate measures to improve the WiFi signal strength of your home network. |
| E1-E3 | By pressing any button, the error message is deleted from the display and the ad- adaptation starts again. | |
| E1 | No adoption is possible. Comet WiFi is not mounted on the radiator. | Is your device correctly mounted on the radiator? Mount the Comet WiFi correctly on the radiator. |
| E2 | The valve lifts is too short or the battery performance is too weak. | Open and close the valve tappet several times by hand or insert new batteries. |
| E3 | No valve movement is possible. | Press any key to acknowledge. Make sure the valve lifter moves freely. |
| bt | Batteries are low. | Change the batteries. |
CLEANING AND STORAGE
RISK OF DAMAGE! Improper handling of the thermostat can lead to damage.
Do not immerse the thermostat in water or other liquids.
Do not use aggressive cleaning agents, brushes with metal or nylon bristles, or sharp or metal cleaning objects such as knives, hard spatulas, and the like. These can damage the surfaces. Clean the thermostat with a soft, dry cloth.
Turn off the device and remove the batteries if you will not be using the device for a long period of time. Store the device in a dry, dust-free place.
TECHNICAL SPECIFICATION
| Device name | Comet WiFi |
| EAN | 4260012711998 |
| Article number | 700200 |
| Supply voltage | 2 x 1,5V LR6/Mignon/AA |
| Connection thread | M30 x 1,5mm |
| Method of operation | Typ 1 |
| Dimensions | 62 x 68 x 83 mm |
| Weight | 212 g (incl. batteries) |
| Degree of protection | IP 20 |
| Degree of pollution | 2 |
| WiFi frequency | 2412 MHz ~ 2472 MHz |
| Maximum transmitting power | IEEE 802.11b: 18.29 dBm IEEE 802.11g: 19.30 dBm IEEE 802.11n: 18.41 dBm |
We reserve the right to make technical changes at any time. Compatibility information without guarantee.
SUPPORT AND CONTACT
For technical support, you can always contact us. We look forward to hearing from you to be helpful:
Telefon: +49 (0) 6667 91847- 0
Email: [email protected]
Kundenservice: Eurotronic Technology GmbH Südweg 1 36396 Steinau-Ulmbach Germany
LEGAL INFORMATION
From the date of implementation of the European Directives 2012/19/EU into national law, the following applies:
Electrical and electronic devices and batteries must not be disposed of with household waste. The consumer is legally obliged to return electrical and electronic equipment and batteries at the end of their service life to the public collection points set up for this purpose or to the point of sale return. Details are regulated by the respective state law. Batteries and rechargeable batteries are not household waste! As a consumer, you are required by law to keep all batteries and electronic devices, regardless of whether they contain pollutants* or not, should be handed in at a collection point in your community/district or in stores so that they can be disposed of in an environmentally friendly manner.
*marked with: Cd = cadmium, Hg = mercury, Pb = lead
Dispose of packaging:
Dispose of the packaging sorted by type. Add paperboard and cardboard to the waste paper, foils to the recyclables collection. The symbols on the product, the instruction manual or the packaging refer to these regulations. By recycling, material utilization, or other forms of utilization of old devices/batteries, you make an important contribution to the protection of our environment.
Declaration of Conformity:
Eurotronic Technology GmbH hereby declares that the Comet WiFi radiator thermostat complies with all applicable European Economic Area regulations of Directive 2014/53/EU. The full text of the EU Declaration of Conformity is available at the following internet address: https://eurotronic.org/service/downloads. Warranty information is available online: www.eurotronic.org.
WARRANTY
The guarantee period is 24 months and begins on the day of purchase. Keep the receipt as proof of purchase. During the warranty period, defective energy-saving controllers can be sent to the service address with sufficient postage. You will then get a new or repaired device back free of charge. Repairing or replacing the device does not start a new warranty period. Please note that we only guarantee the functions of the device, not the functionality between the interaction of the thermostat and the valve body. The application-related technical data are only guaranteed together with the valves Heimeier, Junkers Landys+Gyr, MNG, Honeywell Braukmann thread size (M30x1.5), Oventrop (M30x1.5) Danfoss RA, RAV, and RAVL. The device combinations can be found on our website (www.eurotronic.org). When operating the thermostat with third-party valves/ adapters that are not listed, the user must ensure functionality. In these cases, Eurotronic does not provide any warranty service. After the warranty period has expired, you also have the option of sending the defective device to the specified address with sufficient postage for repair. Any repairs required after the warranty period has expired are subject to a charge. Your statutory rights are not limited by this warranty.
Eurotronic Technology GmbH
Südweg 1 | 36396 Steinau-Ulmbach | Germany
www.eurotronic.org
Reference
Download Manual:
EUROtronic Comet Wifi thermostat WLAN Installational Guide
