
Saswell SAS816WHB-0 Non-Programmable Water Heating Thermostat

Thermostat Saswell SAS816WHB-0-DF is a simple wireless thermostat with analogue temperature setting and a digital display. It can be used with the combination of Saswell SCU209DE, SCU210DE or 2010DE
The instructions for use and maintenance are part of the general terms and conditions of sale. We reserve the right to change the details, technology and performance. The guarantee is valid only with the original invoice. We allow the possibility of errors in the text.
Environmental protection
Do not place electronic devices and batteries after the end of their life in mixed municipal waste, use collection points of separate waste. By properly removing the product, you will prevent negative effects on human health and the environment. Recycling of materials contributes to the protection of natural resources. More information on the recycling of this product is offered to you by administrative units, household waste treatment organizations or the point of sale where you purchased the product.
Important notes before first use, installation and maintenance:
Before use, carefully read the manual not only for the thermostat, but also for the heating device (heat pump, etc.)
- Turn off the power supply before installing the thermostat!
- We recommend that the installation is done by a qualified electrician
- the electrical circuit must be secured with a fuse that does not exceed the current load of the wiring (max 16 A)
- Please note all safety instructions before installing
- Do not expose the product to direct sunlight, extreme cold, humidity and sudden temperature changes. This would reduce the accuracy of the temperature measurement
- Do not place the product in places that are prone to vibrations and shocks – this can cause damage
- Do not expose the product to excessive pressure, shock, dust, high temperatures or moisture, as these can cause damage to one of the product of the function, shorter energy endurance, damage to batteries, and deformation of plastic parts.
- Do not expose the product to rain or moisture, dripping or spraying water.
- Do not place any sources of fire on the product, for example, spark plugs etc.
- Do not place the product in places where there is insufficient air circulation.
- Do not insert any objects into the ventilation openings.
- Do not interfere with the internal electrical wiring of the product. It may be damaged and therefore terminate the warranty. The product must only be repaired by a trained specialist.
- Use a moderately moistened cloth for cleaning. Do not use solutions or cleaning products – may damage plastic parts and electrical wiring
- Do not immerse the product in water or other liquids.
- Do not repair it yourself if the product is damaged or defective. Put it in the repair shop where you bought it
- The product should not be used by a person (including children) by a physical, sensory or mental disability or lack of experience and knowledge impeded by the safe use of the device if they are not controlled, or if they were not informed by the person responsible for their safety about the use of the device
- Children’s control is necessary to ensure that they do not play with the device.
A declaration of conformity has been issued for the product. This and other documentation is available on the website www.sen-controls.eu.
The manufacturer of this product is SASWELL CONTROLS (HONGKONG) LTD. Importer and distributor for Saswell is Sen Controls d.o.o., Belokranjska cesta 29, 8340 Črnomelj, Slovenia
Features
- Independence from wire connectivity
- Simple to use
- Connectivity between the transmitter and the receiver via wireless radio frequency RF up to a range of 100 meters
- Temperature displayed on LCD screen
- On display low battery warning
- Automatic anti-freeze protection
- Onwall or inwall installation (standard socket 60mm)
Specifications
- Power supply: 2xAA LR6 1.5V batteries
- Temperature setting range: from 5°C to 30°C
- Temperature display: from 5°C to 30°C
- Accuracy: ± 1°C
- Ambient temperature: from 0°C to 50°C
- Warehouse temperature: from -10°C to 60°C
- Dimensions: 86x86x32mm
Description and thermostat installation
Installation of the thermostat
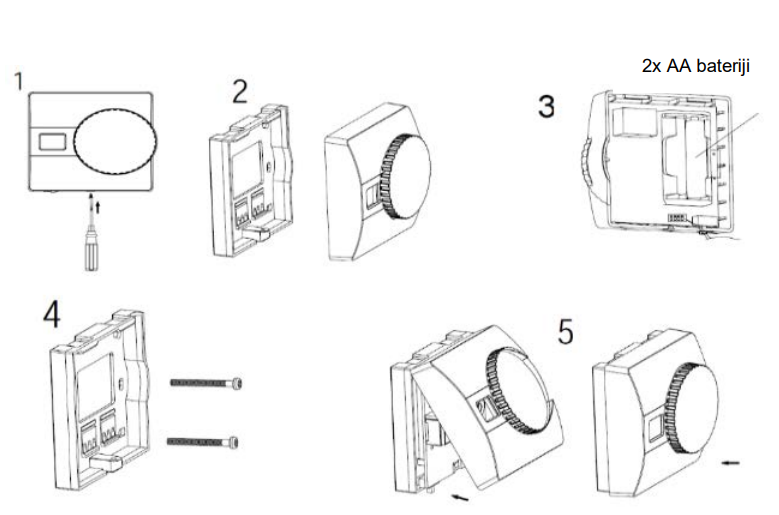
- Remove the screw, located below the thermostat. Carefully lift up the front part of the housing. Don’t try it with too much force as you may damage the housing or the thermostat itself. Also be careful not to lose the small nut from the screw, if you completely unscrew it.
- The thermostat should now be separated on two parts – front and back side.
- In the battery compartment install two new AA LR6 1.5V alkaline batteries. Make sure you place them with correct polarity.
- Then screw the back part of the thermostat on the desired place on the wall. Make sure that the housing is
rotated correctly (the “nut” should be looking downwards). - Afterwards place the front part of the housing on the back, the one you’ve installed on the wall. Fix the housing with the removed screw.
Thermostat is now installed and ready for use.
Using the thermostat Display (See the picture on the right)
The current room temperature (1) is always displayed on the screen. With that, a small house symbol is also displayed (2). When you turn the button to change the temperature, the small symbol (2) disappears and now you’re setting the temperature which is also blinking (1). The thermostat also displays which heating mode is currently selected (NSB, day or night)*, heating symbol if there is a need for heating (4), the cooling symbol if there is a need for cooling (5)* and the temperature unit (6).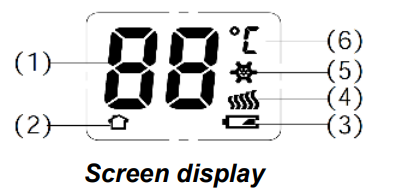
Setting the temperature
With a simple turn of the button you can easily set the desired temperature. The temperature displays on screen.
Need for heating/cooling*
When the room temperature falls below the desired heating temperature, the thermostat displays a flame symbol (4). That means the thermostat has issued a command for heating. If the thermostat is set for cooling and the temperature falls below the desired, the thermostat displays a snowflake symbol (5), and a cooling command is issued*.
Worn batteries
When the batteries are almost worn out, the thermostat displays a symbol for low battery (3).
ON/OFF switch
If the switch on the outside of the housing is set to ON, the thermostat will be turned on. If the switch is turned to OFF, the thermostat is turned off.
* Option only available in some 816 models
Possible errors on the thermostat
If there is a problem with the thermostat, an error will appear on the display. Error display: E1 – Sensor in the thermostat is in short circuit. Thermostat will stop working. Error display: E2 – Sensor in the thermostat is defective. Thermostat will stop working.
Temperature alarm
If the room temperature goes above 30°C, the thermostat displays HI on the LCD screen. If the thermostat is in heating mode, it will turn off automatically. If the room temperature falls below 5°C, the thermostat displays LO on the LCD screen. If the thermostat is in cooling mode, it will turn off automatically.
Pairing (connecting) the thermostat and the receiver
The thermostat and the receiver, if they come in a kit, are paired by default. If that is not the case, follow these instructions: 1. Read the instruction manual of the receiver for pairing (connecting). 2. Turn off the thermostat, so that the screen shows OF. Remove the big knob on the thermostat as under it is a small black button meant for pairing. Put the receiver in pairing mode, as described in its instructions and now hold the black button on the thermostat for 3 seconds to put the thermostat in pairing mode. See the picture on the right. 3. The devices should now connect and pair. “1” should appear on the LCD screen.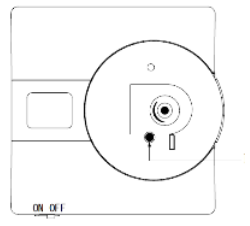
The pairing process is now complete. If the process was unsuccessful, repeat it again from the beginning or seek help from our web page. Now put the button (knob) back on its original place. Use the picture below for help. Make sure that the arrows match.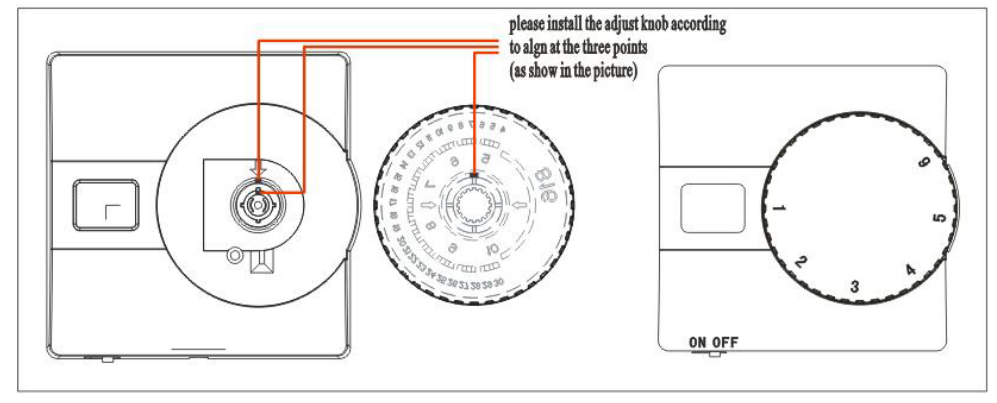
Reference
Download Manual:
Saswell SAS816WHB-0 Non-Programmable Water Heating Thermostat Instruction Manual
![]()
Saswell SAS816WHB-0 Non-Programmable Water Heating Thermostat Instruction Manual
Leave a Reply