
VIMAR 02907 Wi-Fi Touchscreen thermostat

VIMAR S.p.A., as required by Italian Legislative Decree no. 196/2003, is authorized to manage the information needed to perform the services described below, when registering the device on the Cloud servers of Vimar S.p.A. The software platform of the Cloud servers of Vimar S.p.A. collects information from the device that is needed to perform the services relating to the registered devices: the device ID, application version and the services provided by it, the device configuration, as well as the pairing between the device and the authorized applications for the remote control function, as well as signals for verifying correct access and operation of these services and devices. The above information is all necessary and functional in order to enable correctly performing the functions of remote control and maintenance of the applications and devices supported by the platform. The ID of the device and the rest of the information are automatically recorded on the Cloud servers of Vimar S.p.A. after WiFi configuration and access to the Internet. Users can disable the services that provide remote access to their devices, thereby deleting all the data relating to their devices from the Vimar S.p.A. Cloud.
Thermostat 02907
WiFi thermostat (802.11 b/g/n, 2.4GHz), wall-mounting, mains-powered (230 V~), with interface with capacitive keys and equipped with user-friendly functions to facilitate energy saving. Designed to control heating and air-conditioning via C, NC, NO relay output. Equipped with an input for an external temperature sensor (not supplied) that can be used for monitoring, control or limitation. Built-in buzzer. WiFi connectivity lets you control/consult the device remotely, directly from your smartphone or tablet.
Field of application
The appliance is designed to control room temperature by acting on the control circuit of the burner or circulation pump (heating) or on the control circuit of the air conditioner (air conditioning), ensuring an ideal temperature. The graphical user interface, thanks to special views, facilitates system management helping the user to operate while maintaining a state of energy saving.
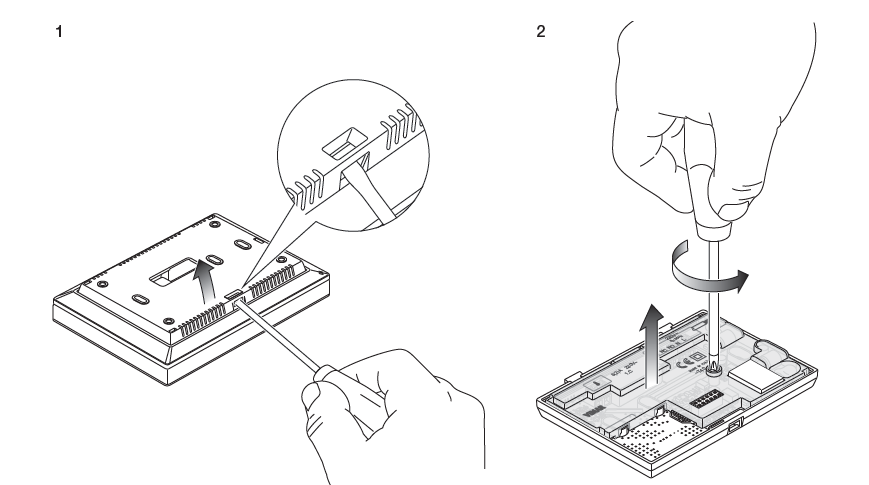
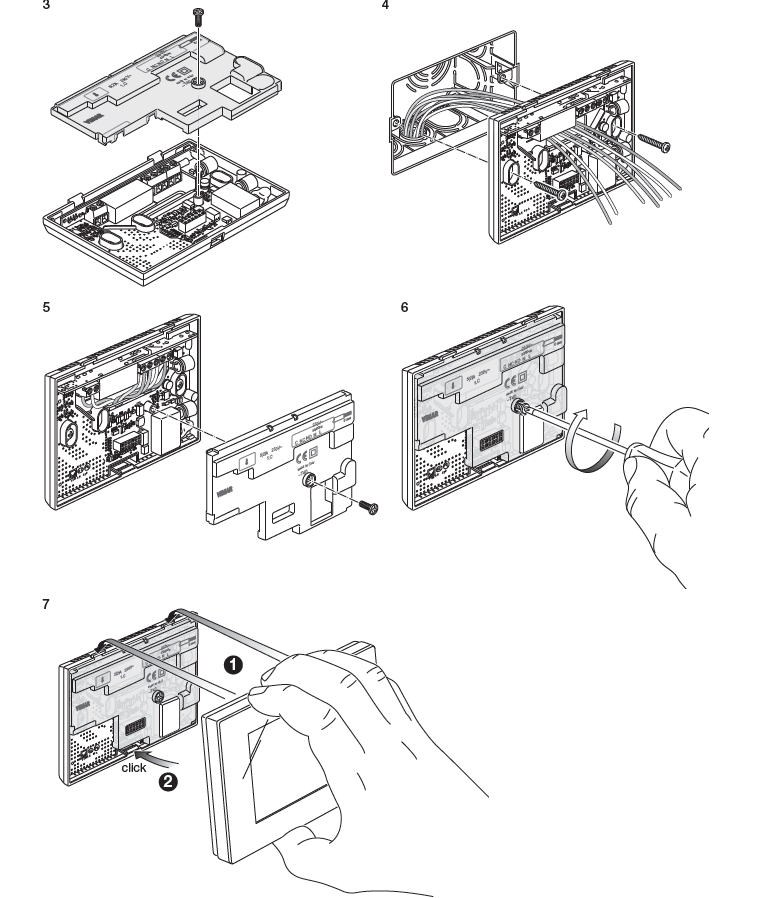
Installation
The appliance must be installed on a wall at a height of 1.5 m off the floor in a suitable position for correctly detecting the ambient temperature. It must not be installed in niches, behind doors and curtains or in areas affected by sources of heat or atmospheric factors. The thermostat is a wall-mounting device that can be installed directly on a wall or on 2 and 3-module back boxes. It should be used in dry, dust-free places at a temperature between 0°C and +40°C.
Connections
Relay connection
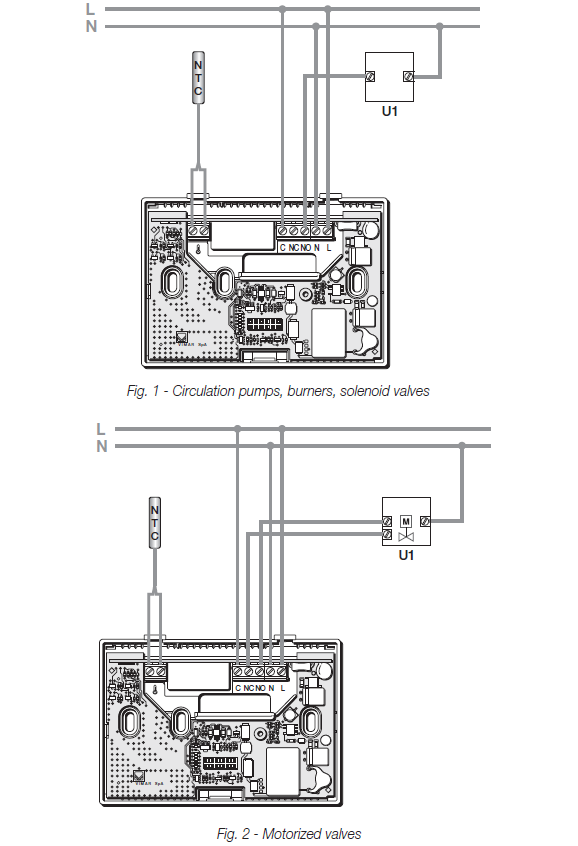
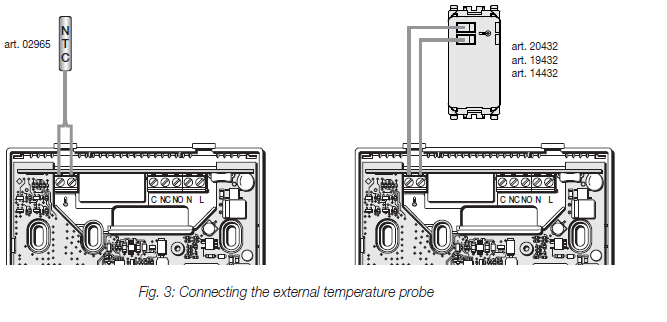
External temperature probe
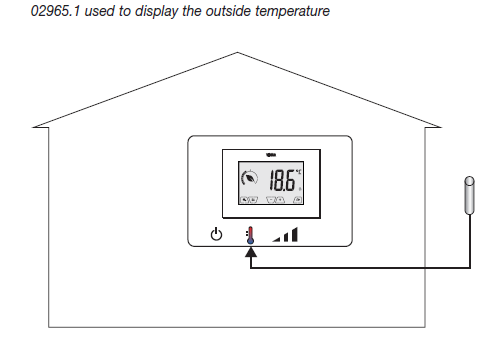
Depending on how it is configured, the external temperature probe can be used to accomplish several functions; it does NOT have polarity so you can connect the 2 wires in the 2 terminals without any particular order. It is recommended to use the NTC 10k beta 3900 probes (art. 02965.1-20432-19432-14432). The typical wiring diagram is the following:
Installation examples
02965.1 used to display the outside temperature
02965.1 used for adjustment (of a remote environment)
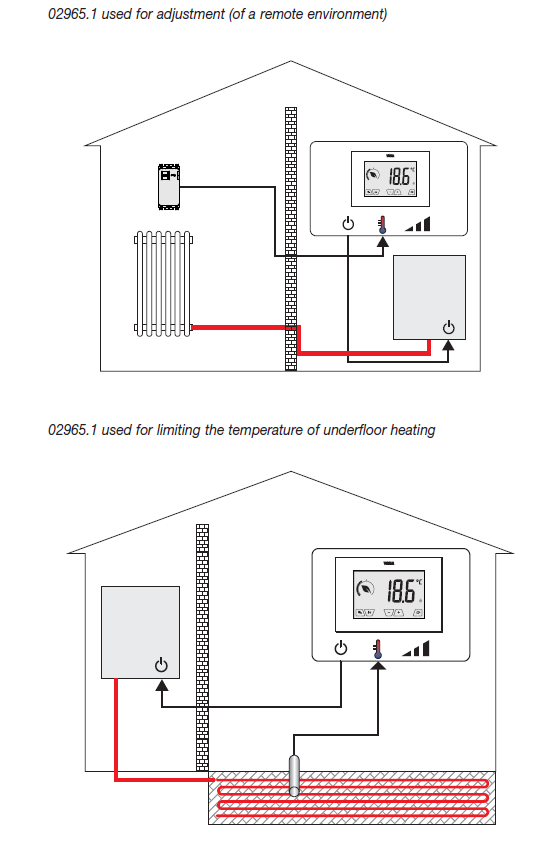
IMPORTANT: During installation, take care not to damage the insulation of the probe while laying the screed. Perform the installation in such a way that the probe is accessible for any maintenance work.
Switching on and resetting parameters
When switching on, in the first 3 seconds of power-up the thermostat displays the firmware version.

If in this phase you touch the icon![]() , a screen appears on the display where you can reset the device parameters:
, a screen appears on the display where you can reset the device parameters:
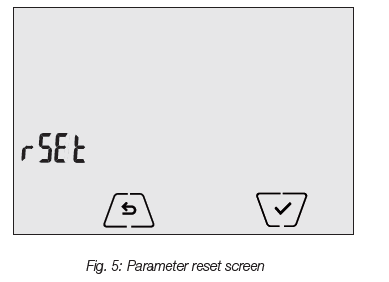
By confirming with![]() , ALL the device parameters (temperature setpoint, heating/air-conditioning mode, a unit of measurement, etc.) and ALL WiFi function settings (phone numbers, SMS, etc.) will be restored to the default values.
, ALL the device parameters (temperature setpoint, heating/air-conditioning mode, a unit of measurement, etc.) and ALL WiFi function settings (phone numbers, SMS, etc.) will be restored to the default values.
WARNING This operation is not undoable. If you wish to reset only the WiFi settings, refer to paragraph 9.3.
Configuration via WiFi interface
The thermostat 02907 features a WiFi interface that lets you configure and control your device remotely. To function correctly, the WiFi interface must be properly configured by performing the first configuration procedure described in the next paragraph (6.1).
First Configuration
- First, identify the make and model of the client Gateway/Router and keep a note of them as a reference for any official Vimar support (use the specific table in section 17).
- If there is already an Internet connection at the site of installation, make sure the Gateway/Router has been turned on for at least 2 minutes and is connected to the Internet.
- Make sure the thermostat is installed at a reasonable distance (from the router), where the signal is strong enough.
- Activate configuration mode; in this phase the thermostat acts as an access point, generating a specific temporary WiFi network for the configuration with no need for an Internet connection.
Activating configuration mode
- On the main screen, access the Settings menu by tapping the
 icon.
icon. - Using
 and
and scroll through the list of options until you see
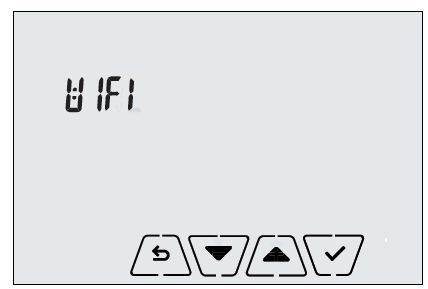
Confirm by touching![]()
Check that the “OnOF” option is set to “On”; the display must show the following screen exactly (“OnOF” flashes and “On” is on steady):
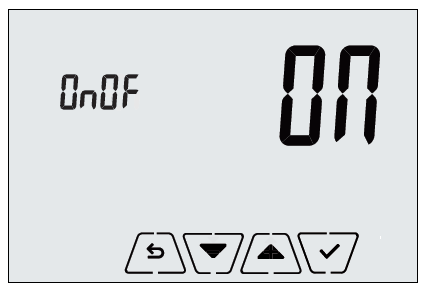
Otherwise, enter the “OnOF” menu by tapping ; “ON” or “OFF” will begin to flash.
Using and select “ON” and confirm by tapping.
Using and scroll through the list of options until you see the “Conf” screen
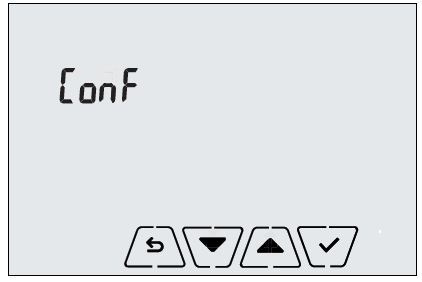
Confirm by touching
The display will show “Strt”

Confirm by touching
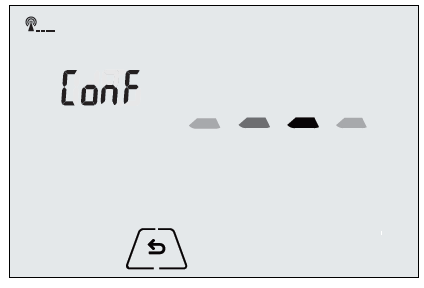
The cursor ![]() will move from left to right; the
will move from left to right; the![]() icon will blink for a few seconds and will be fixed once the access point is active. The thermostat is then ready to be configured via the Byclima App. From this point onwards, the configuration will continue directly via the mobile device (e.g. smartphone) through the Byclima App (see par. 6.1.2). If necessary, the configuration procedure can be interrupted at any time by one of the following options:
icon will blink for a few seconds and will be fixed once the access point is active. The thermostat is then ready to be configured via the Byclima App. From this point onwards, the configuration will continue directly via the mobile device (e.g. smartphone) through the Byclima App (see par. 6.1.2). If necessary, the configuration procedure can be interrupted at any time by one of the following options:
- tapping

- closing the Byclima App
- when the mobile device (e.g. smartphone) goes into standby.
Configuring the thermostat with the Byclima App
- Pick up the mobile device on which is installed the Byclima App updated to the latest version.
- Stand in front of the thermostat.
- On the device, enable the WiFi interface and scan for available networks.
- Connect the mobile device to the WiFi network generated by the thermostat 02907.
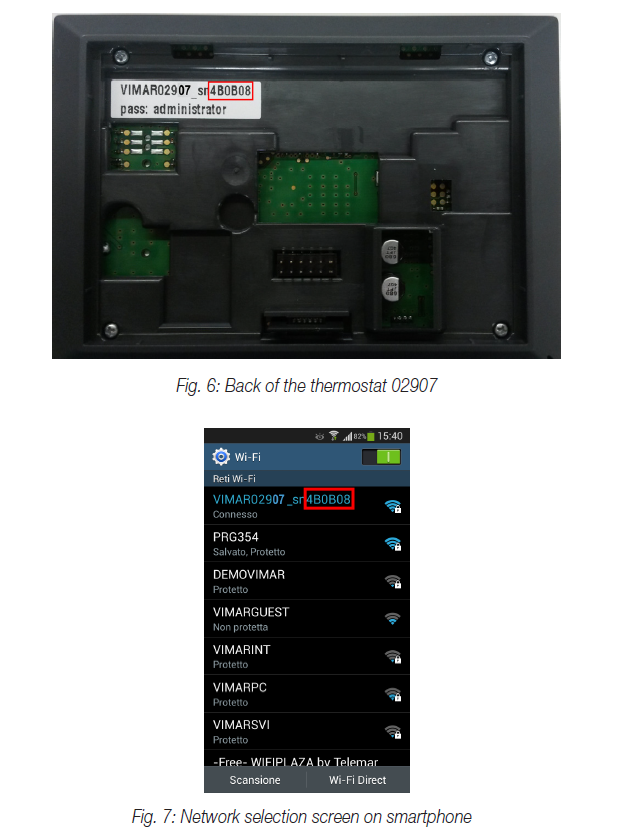
- The login credentials of the WiFi network generated by the thermostat are printed on the label visible on the device when the front panel is unhooked:
| SSID | VIMAR02907_snXXXXXX |
| Security | WPA |
| Password | administrator |
IMPORTANT: SSID is the name of the network to which you need to connect your mobile device. The name is composed of a fixed string “VIMAR02907” and a variable portion of 6 hexadecimal characters indicating the serial number of the device you want to configure (see the example in figures 6 and 7):
- Launch the Byclima App on a mobile device.
- Add a new device by tapping “ + “

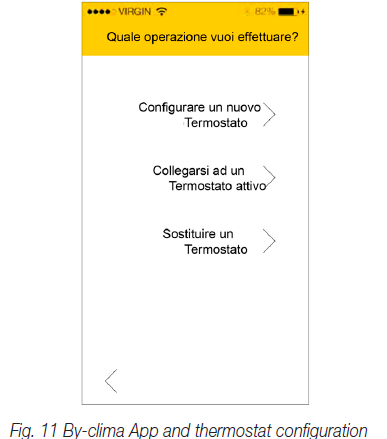
- Select the “Configure a new Thermostat” procedure
- The procedure will start searching for a new thermostat.
- After identifying the thermostat, the Byclima App will require you to enter the current PIN (which by default is 1234) and possibly a new custom PIN.
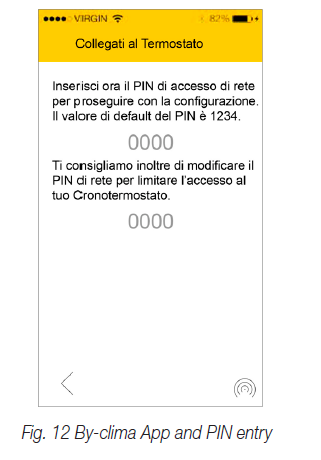
- After entering the current PIN, touch
 to proceed with the guided configuration and follow the instructions displayed directly by the App.
CAUTION: At the end of the first configuration procedure, the thermostat and the mobile device with which you performed the procedure will be paired. The thermostat 02907 can then be controlled (via WiFi) only by the mobile device with which it was configured. If you wish to control the 02907 also with other devices then you need to carry out the pairing procedure for additional devices described in paragraph 6.4.
Configuring the temperature control parameters and using the device
If your mobile device has been properly paired with the thermostat, you can set the temperature control parameters (temperature profiles, setpoint, etc.); the Byclima App clearly displays all the instructions in a user-friendly manner for making the desired settings. After these settings, send the configuration to the thermostat or proceed to configure the network parameters as shown in the next paragraph (6.3).
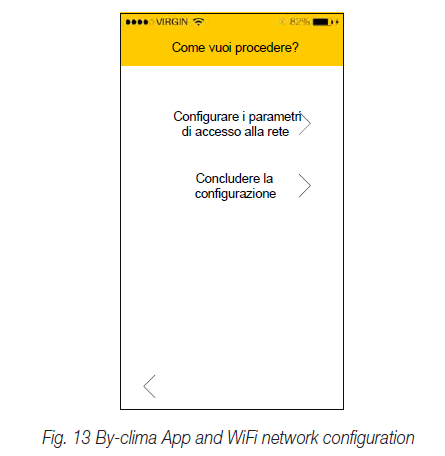
Configuring the WiFi network and cloud services
The network parameters should be configured during initial installation and/or if you change the network credentials with which the thermostat connects to your home WiFi.
Using the Byclima App, you enter the section shown in the figure on the next page and proceed by entering the parameters with which the thermostat will connect to your home WiFi network (network name, password, address assignment method, etc.).
To enter the parameters follow the guided procedure displayed by the By clima app. After making the settings, the thermostat will automatically reboot the network interface and, with a specific icon as shown below, it will show the state of its connection to the WiFi network:
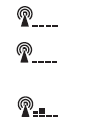 absent: WiFi antenna of the thermostat off (to turn the WiFi interface on or off, see par. 9.3.1) blinking: thermostat connecting or not connected to the local WiFi network (if prolonged it indicates a possible error in entering the password/network name or no WiFi router signal). (bars from 1 to 4): thermostat properly connected to the WiFi network and its signal strength.In addition to configuring your home network, you can also specify whether you want to take advantage of the Vimar cloud service.
Cloud Service
Vimar lets users easily access their thermostats from all over the world over the Internet thanks to its cloud service.
This service enables:
- Fully controlling your thermostat from all over the world.
- Receiving notifications from your thermostat directly on your mobile device.
- Updating the thermostat software.
- Save all the thermostat settings should you need to replace it. Registration with the Vimar cloud is automatic and is linked to the thermostat (creating a user is not required: no login). By pairing a mobile device with the thermostat, the smartphone/tablet is merged (at the logic level) with the registration of the thermostat in the cloud (see par. 6.2).
Use without the cloud
If you do not wish to register on the cloud, the thermostat can still be set to run without the cloud (for example, only via a local WiFi network without the Internet). Not activating the cloud will prevent you from doing the following:
- Operating the device over the Internet (control only within the local WiFi network)
- Receiving software updates
- Receiving notifications from your thermostat on your mobile device
- Save all the thermostat settings should you need to replace it.
NOTE: We recommend the installer keep the thermostat in this operating mode and let the customer choose whether to use the Vimar cloud.
Pairing additional mobile devices with the thermostat
The thermostat 02907 can be controlled only with mobile devices that have been paired with the first configuration or pairing procedure. A new mobile device (on which the Byclima App has previously been installed) can be paired at any time by using the Byclima App on the mobile device itself but only by also interacting with the local interface of the thermostat and within the same WiFi network (you cannot pair mobile devices remotely/ over the Internet). When pairing, you are prompted to enter a 4-digit PIN code to pair the mobile device with the thermostat, which can only be controlled if:
- the mobile device is paired with the thermostat;
- the PIN code of the mobile device and that of the thermostat coincide.
- If you change the PIN of the thermostat but not that of the tablet/smartphone, the mobile device (which is still set to the old PIN) will no longer be able to manage the thermostat; it will then be necessary to update the PIN of the tablet/smartphone device(s).
CAUTION: - The PIN for accessing the thermostat 02907 from your mobile device can only be changed with the Bclima App.
- The PIN code is very important because it protects the thermostat from previously paired mobile devices too (eg that of the installer). The end user is advised to change the default PIN code so as to disable control of the device from all smartphones/tablets (even if already paired with the device) that do not have the updated PIN code.
Display
The touchscreen display allows you to control the system using the following buttons and icons:
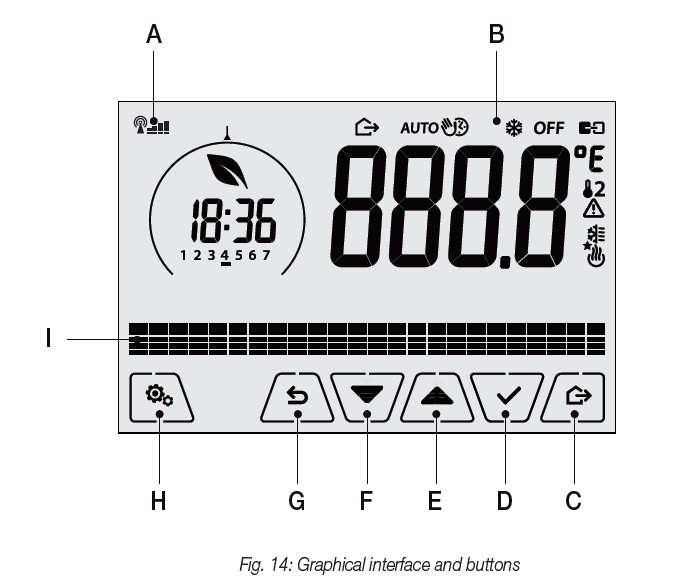
- WiFi radio signal strength indicator
- Operating mode
- Away
- Confirm
- Menu navigation and setting parameters G: Back
- Settings menu
- AUTO program temperature trends
Functions of the buttons
![]() increases the numerical values. When it “disappears” from the display it means that the value cannot be increased anymore.
increases the numerical values. When it “disappears” from the display it means that the value cannot be increased anymore.
decreases the numerical values. When it “disappears” from the display it means that the value cannot be decreased anymore.
during navigation, it scrolls the next item through the available menus. If it “disappears” then you have arrived at the last of the items that can be scrolled.
during navigation, it scrolls the previous item through the available menus. If it “disappears” then you have arrived at the last of the elements that can be scrolled.
confirms the selected option (activates the submenu if there is one or displays the next parameter/digit).
After each confirmation, the display shows the icon for approximately 1 s.
back (or cancel) exits the current screen/menu and returns to the previous one without saving any changes. In menus with changes to multiple digits, it lets you go back to change the previous digit.
N.B. The field/value being edited is highlighted by the field/value itself flashing.
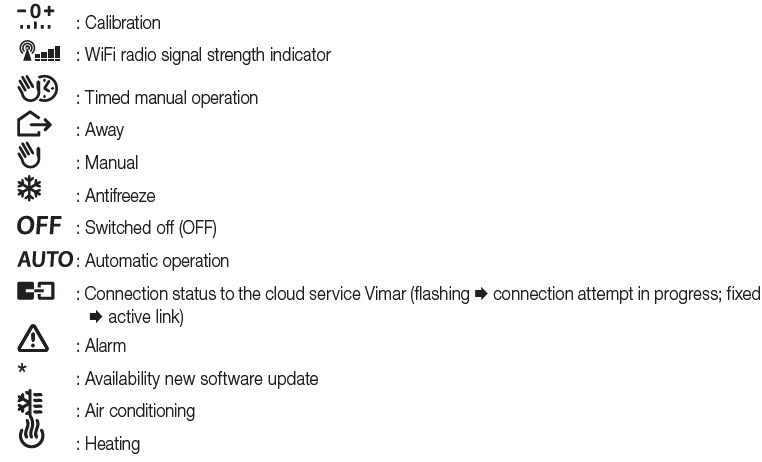
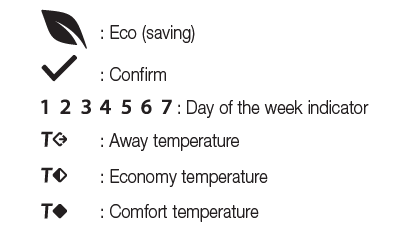
Symbols
Depending on the different operating modes, the display shows the following icons:
Standby
If no operations are carried out on the device for 30 seconds, it automatically activates standby mode which lowers the brightness level of the device.
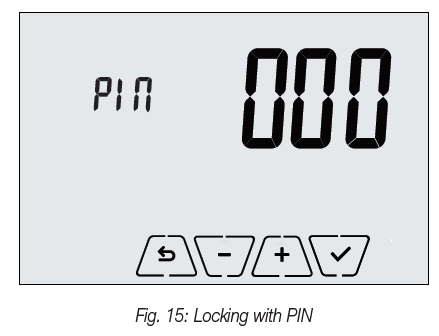
Locking the interface via PIN (set by the App)
The thermostat lets you set a password that inhibits any change to the operating mode (eg switching from Manual to OFF), limits setting the temperature values, and, more generally, blocks access to the
configuration menu. This feature is useful to prevent the thermostat from being used by unauthorized persons; the device prompts you to enter the PIN, indicating a shutdown with the PIN.
Alternative views
During normal operation, i.e. when you are not navigating the menus, you can select the information to display on the left-hand side of the display.
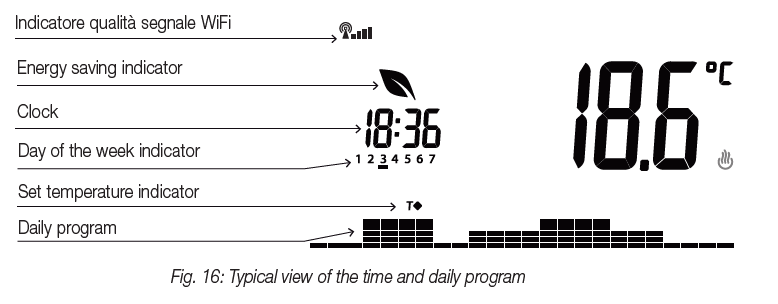
This view is the default and gives an indication of the daily temperature control program along with the data on the current moment. The program area, represented by histograms, is divided into 24 sectors each of which represents the corresponding hour of the 24 hours in a day. Each sector can be composed of 1, 2 or 3 dashes:
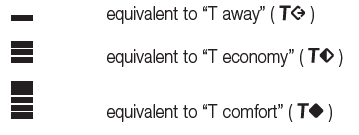
The clock shows the current time. The indicator of the day of the week highlights the current day with a dash under the number associated with it (eg, 4 = Thursday). The set temperature indicator highlights the current temperature being regulated thus replicating the information represented by the “dashes”:
The energy saving indicator indicates whether, compared to a conventional average consumption, the set temperature setpoint enables you to achieve “savings” in consumption. If the operating mode is not set on AUTO, the program area will not be active.
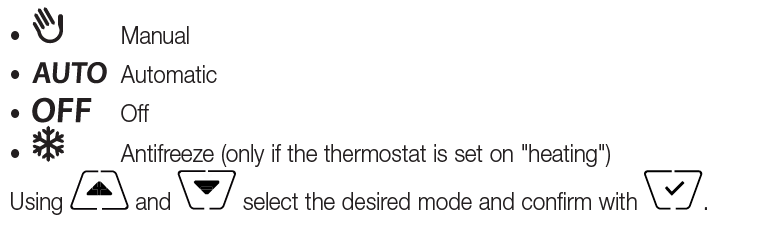
Operating mode
The thermostat 02907 is able to regulate the temperature according to the following operating modes:
- Switched off (OFF): switches the system off
- Manual (ON): lets you set the environment temperature set-point manually
- AUTO: lets you set a control program that compares the room temperature with the value set for each quarter of an hour of the current day; the user defines three levels of temperature distributed over 24 hours which can then be varied for each day of the week. Timed manual: starting from AUTO mode, this lets you activate MANUAL operation of the thermostat for
any period of time at the end of which the device will return to AUTO mode. - Away: lets you set the set-point in order to achieve significant energy savings during periods when the user is away
- Antifreeze: used to set a minimum temperature level to avoid damage to pipework or prevent the temperature from falling below a safety level.
- The operating mode is selected via the SETTINGS menu or with the shortcut keys.
Switched off (OFF)
With this mode on, the thermostat is turned off and you cannot make any adjustments; in this case, the icon is displayed above the temperature indicator. In this mode you cannot perform any operations other than activating the menus or changing the view mode.
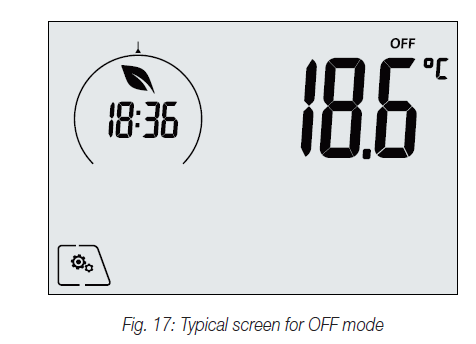
For heating-only systems this mode is typically used in the summer
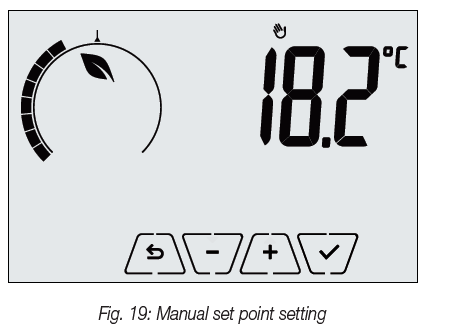
Manual
In this mode the device operates as a simple thermostat and regulates the ambient temperature, taking it to the value set by the user. When MANUAL mode is active, the ![]() icon is displayed above the temperature indicator.
icon is displayed above the temperature indicator.
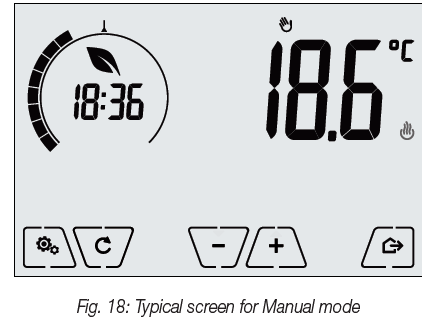
The set point can always be changed via![]() OR
OR![]()
The selection is confirmed by touching![]() .
.
The ![]() and
and![]() icons in the lower right corner indicate whether the system is operating in heating or air-conditioning mode respectively (icon illuminated = system on).
icons in the lower right corner indicate whether the system is operating in heating or air-conditioning mode respectively (icon illuminated = system on).
Auto
This is the typical mode of operation of the thermostat. The device automatically changes the ambient temperature according to the time of day and the day of the week, it minimizes user intervention thereby optimizing comfort and energy savings; three different temperatures can be set to cover the needs of normal use, user away or nighttime reduction in the environment. When AUTO mode is active, the icon is displayed above the temperature indicator.
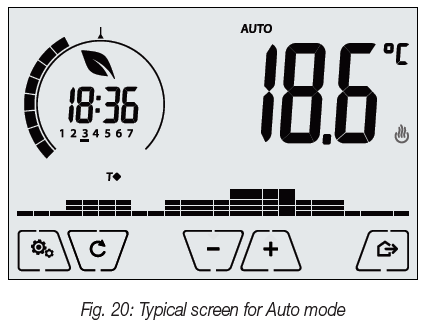 By touching and you can temporarily change the ambient temperature, setting it to a different value to the one associated with the current time slot.Confirming with it then goes into TIMED MANUAL mode. Theand icons in the lower right corner indicate whether the system is operating in heating or air-conditioning mode respectively (icon illuminated = system on).
Timed manual
This mode allows you to exit the AUTO program (you enter MANUAL mode) for a certain time after which the thermostat will return to AUTO mode. For example: take the ambient temperature to 25°C for 2 hours and then resume the Auto program. Activation is carried out starting from AUTO mode and is recognizable by the icon![]() displayed above the temperature indicator.
displayed above the temperature indicator.
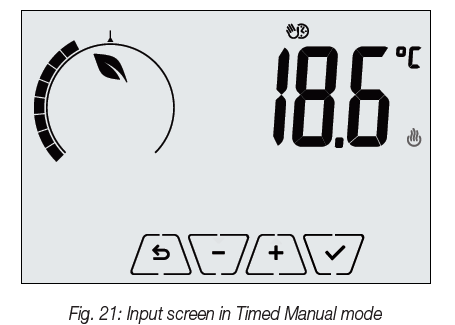
Using ![]() and
and ![]() you set the temperature and confirm with
you set the temperature and confirm with ![]() .
.
The next screen, again using  and
and , lets you set the time for which the temperature you have just set is maintained.
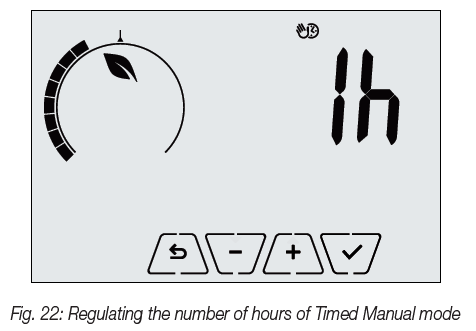
Finally confirm with .
At the end of the set time the thermostat goes back into AUTO mode, the icon switches off and reappears.
Away
This mode is useful to achieve energy savings quickly and effectively whenever the user leaves the regulated room.
In “Away” mode the system makes the adjustment according to the “away temperature” setpoint .
The Away mode can only be activated by touching![]() .
.
The display will show the “away temperature” setpoint for approximately 2 seconds:
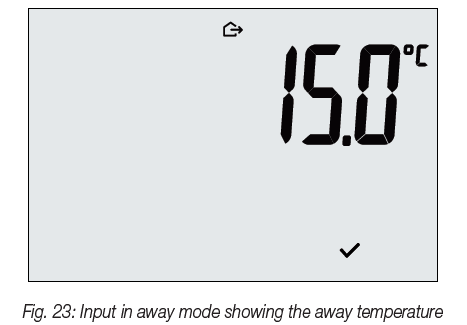
Mode activation is identified by the![]() icon
icon
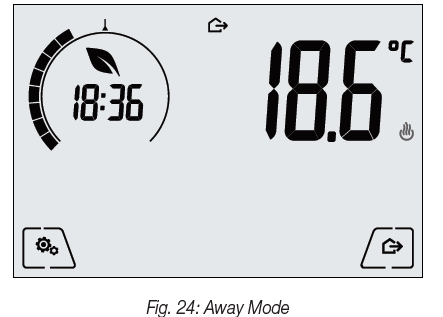
To exit and return to the initial mode touch  the button again:
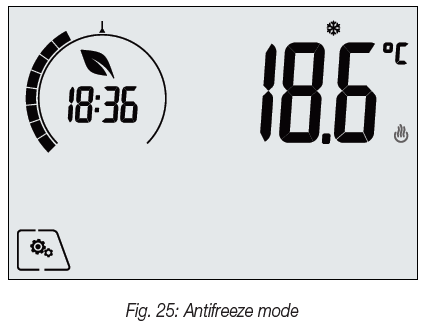
Antifreeze
This mode, which can only be activated when the system is operating in heating mode, lets you set a minimum temperature value ( setpoint) to avoid damage to the pipework or to keep it from falling below
a certain safety level when you are away for lengthy periods in the winter. The “antifreeze” mode is activated directly from the Settings menu. Once activated, antifreeze mode is identified by the icon![]() above the temperature indicator.
above the temperature indicator.
From the settings menu you can configure all the features of the thermostat.
On the main screen tap the ![]() icon.
icon.
From the main menu, using ![]() and
and![]() will display the following (flashing) symbols in succession, which provide access to the corresponding submenus:
will display the following (flashing) symbols in succession, which provide access to the corresponding submenus:
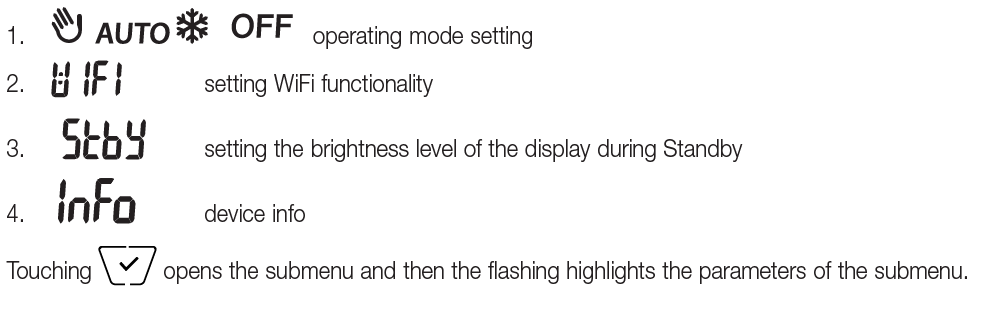
Operating mode setting
This menu is used to select the operating mode of the device
Standby brightness level setting
The menu lets you set the display brightness level when the thermostat goes onto Standby. Using and ![]() select one of the 7 available levels and confirm with
select one of the 7 available levels and confirm with ![]() (there is also the ability to turn off the display completely).
(there is also the ability to turn off the display completely).
WiFi setting
The menu lets you configure the settings for the WiFi module. Via and you can select:
On/Off
The menu lets you turn the WiFi module on or off (completely); if it is turned off, in addition to eliminating any wireless transmission/reception of the device, some of the following submenus are inhibited. Using and select “ON” or “OFF” and confirm with
Enable Cloud Service
The  menu lets you select whether or not to take advantage of the cloud service offered by Vimar. If you do not intend to use this service some of the following submenus will be inhibited. Using andselect “ON” or “OFF” to use or not use the cloud service and confirm with
Automatic time synchronization
The![]() menu enables automatic synchronization of the clock directly from the cloud. Using and select “ON” or “OFF” to enable or disable clock synchronization and confirm with
menu enables automatic synchronization of the clock directly from the cloud. Using and select “ON” or “OFF” to enable or disable clock synchronization and confirm with
First configuration
The menu enables activating the thermostat configuration procedure with the App. This procedure lets you (via a smartphone or tablet) configure the WiFi network to which the thermostat is to connect during normal operation and it lets you program all the functions of temperature control (for further details please see chap. 6). Touch and then to start the configuration procedure; then follow the instructions displayed directly on your smartphone/tablet.
Pairing with a mobile device
The ![]() menu enables activating the procedure for pairing the thermostat with a mobile device (smartphone or tablet) on which the By-clima App has been installed and that was not used during the first configuration; this procedure should be carried out on every mobile device with which you want to control/query the thermostat. (The interaction takes place on both the smartphone/tablet and on the thermostat at the same time; this ensures that the device cannot be controlled by undesired users who have not performed the pairing phase. Touch and then to start the pairing procedure; then follow the instructions displayed directly on your smartphone/tablet.
menu enables activating the procedure for pairing the thermostat with a mobile device (smartphone or tablet) on which the By-clima App has been installed and that was not used during the first configuration; this procedure should be carried out on every mobile device with which you want to control/query the thermostat. (The interaction takes place on both the smartphone/tablet and on the thermostat at the same time; this ensures that the device cannot be controlled by undesired users who have not performed the pairing phase. Touch and then to start the pairing procedure; then follow the instructions displayed directly on your smartphone/tablet.
WiFi Info
WiFi FW version
The ![]() menu lets you view the version of the firmware for the WiFi interface. It should be used, if required, when seeking support. Touch to display the FW version.
menu lets you view the version of the firmware for the WiFi interface. It should be used, if required, when seeking support. Touch to display the FW version.
Statistics
The menu lets you view the device statistics (ie its error codes). It should be used, if required, when seeking support. Touch to display the statistics.
FWuP
This is an advanced menu which lets you start updating the WiFi module.
Touch to start the update.
Reset WiFi parameters
The menu lets you reset ALL WiFi related configurations to their factory values. In particular the following values are reset:
- Access to the cloud service.
- Automatic clock synchronization.
- Alarm/notification threshold values.
- Enabling alarms/notifications.
Touch to return the parameters to their factory values; since this operation cannot be undone, you will see a confirmation notice and you will need to tap again.
Info about the device
This menu lets you view information related to the thermostat and reset the device.
Via ![]() and
and![]() you can select:
you can select:
- displays the software version of the device.
- displays the number of hours that the thermostat relay has been on (the same as the number of hours of operation of the system).
- The counter can be reset, for example at changes in season to differentiate between heating and air-conditioning, by pressing and holding the icon.
- FWuP: enables starting the procedure for updating the device software. This service requires a Vimar cloud connection.
- Tap to
 learn about the latest software version available for your device; if your device can be upgraded the icon will be blinking alongside the new SW version.
 - Tap to start the update from the Vimar cloud and wait until the next time the thermostat is restarted.
Caution: While updating the SW do not turn off the device, nor access the thermostat with the By-clima app.
Parameters table
| Function | Parameters | Value range | Reso- lution | Default value |
| Temperature control mode | Selection TempCtrl | [Heat., Air-con.] | – | Heating |
| Control algorithm | Algorithm | [ON/OFF, PID] | – | ON/OFF |
| Hysteresis (ON/OFF) | δT (Differential) | [0.1,..,1]°C | 0.1°C | 0.2°C |
| Proportional band (PID) | Band | [0.5,..,5]°C | 0.1°C | 1°C |
| Adjustment period (PID) | Period | [10,..,30] minutes | 1 min | 20 min |
|
External temperature probe |
External probe mode |
[Off, View, Temperature Con- trol, Limitation] |
– |
OFF |
| Limitation | TL (Temp. limit) | [30,..,50]°C | 0.1°C | 35°C |
| Unit of measurement (tem- perature) | Temperature unit | [°C , °F] | – | °C |
| Temperature offset | TE (Offset temp.) | [0,..,±3]°C | 0.1°C | 0°C |
|
Clock |
Hours | [00,..,23] | 1 h | 00 |
| Minutes | [00,..,59] | 1 min | 00 | |
| Day of the week | [Mon, Tue, Wed, Thu, Fri, Sat, Sun] | – | – | |
| Audible warnings | Enable audio feedback | [ON, OFF] | – | ON |
| PIN number | Pin | [000,..,999] | 1 | 000 |
|
Temperature set-point |
T0 (Away-Heat.) | [TG, 10..35]°C | 0.1°C | 16°C |
| T1 (Economy-Heat.) | [10,..,35]°C | 0.1°C | 18°C | |
| T2 (Comfort-Heat.) | [10,..,35]°C | 0.1°C | 20°C | |
| T0 (Away-Aircon.) | [10,..,35,OFF]°C | 0.1°C | 29°C | |
| T1 (Economy-Aircon.) | [10,..,35]°C | 0.1°C | 27°C | |
| T2 (Comfort-Aircon.) | [10,..,35]°C | 0.1°C | 25°C | |
| TM (Manual-Heat.) | [10,..,35]°C | 0.1°C | 18°C | |
| TM (Manual-Aircon.) | [10,..,35]°C | 0.1°C | 26°C | |
| TG (Antifreeze) | [4,..,10]°C | 0.1°C | 5°C | |
|
Programs |
Heating Prog. |
[T0,T1,T2]
(Heating) for each interval of time (24hx4x7d) |
– |
– |
|
Air Con. Prog. |
[T0,T1,T2] (Air-
con.) for each interval of time (24hx4x7d) |
– |
– |
|
| WiFi | Radio On | [ON, OFF] | – | ON |
| Cloud | Enable cloud | [ON, OFF] | – | ON |
| Clock synchronization | Enable synchroniza- tion via network | [ON, OFF] | – | ON |
|
Network access code |
Network PIN |
4-10 numeric ASCII charac- ters |
– |
1234 |
| Display access code | Lock/unlock PIN | 3 digits | 1 | 000 |
| Backlight configuration | Standby level | [OFF 1, .. , 7] | 1 | 4 |
Warnings
- The WiFi thermostat cannot connect to “Enterprise Security” WiFi networks or networks requiring dynamic exchange of authentication certificates or ones that in any case require registration/login via a Web Browser.
- The WiFi thermostat supports access to WiFi networks with WEP encryption with the following limitations: 64 or 128 bit WEP with a 10 or 26 character key in hexadecimal format (not ASCII). WEP with Open key (Open) WEP with shared key (Shared) NOT supported
- Using a WiFi/3G router (which then uses the cellular network for access to the Internet) does not guarantee an uninterrupted connection to the outside; it could therefore temporarily not be possible to control the device remotely for reasons independent of Vimar Spa, but dependent on the telecommunications provider or the current contract.
- The WiFi thermostat, if connected to the Vimar cloud service, generates periodic bidirectional network traffic; keep this in mind if you have an Internet connection with a pay-as-you-go plan.
- It is not possible to use the By-clima app with a phone acting as an access point for the WiFi thermostat
Cleaning the device
The thermostat, featuring a display with capacitive buttons, requires you to be gentle during the cleaning phase. Avoid using aggressive products. Clean the display with a special cloth for cleaning lenses.
Features
- Rated supply voltage: 230 V~, 50-60Hz
- Max power drawn from the grid: 3 VA
- Operating temperature range: 0-40°C (-T40)
- Temp. measurement accuracy (built-in probe): 0.5°C between +15°C and 30°C, 0.8°C at the ends.
- Relay output with clean change-over contacts: 5(2) A 230 V~
- Terminals: Relay C, Relay NC, Relay NO, 2 external temp. probe (art. 02965.1)
- WiFi network: complies with 802.11 b/g/n; IP address: static or DHCP
- Controlled via local interface (touchscreen) or remotely via WiFi (with Vimar By-clima App for Android, iOS, Windows Phone).
- WiFi access via cloud (for queries/updates/notifications) and via private network
- WiFi network configuration via the Vimar By-clima App
- Configurable in Heating/Air-Conditioning mode (winter/summer)
- Temperature control algorithms: ON/OFF or PID selectable via user interface.
- Operating modes: Off, Antifreeze (heating only), Away, Manual, Automatic, Timed Manual.
- 6 settable temperature set-point/offset (economy, comfort, manual, away, antifreeze, reduction).
- Action type: 1.CU. Degree of pollution: 2 (normal).
- Rated pulse voltage: 4000 V.
- ErP classification (Reg. EU 811/2013): ON/OFF: class I, contribution 1%; PID: class IV, contribution 2%.
- Frequency range: 2412-2472 MHz
- RF transmission power: < 100 mW (20dBm)
- Appliances of class II:
- Number of handling cycles for manual (3000) and automatic (100000) operation;
- Disconnection type: micro switch;
- I=175;
- Room temperature during transport: -25°C ÷ 60°C;
- Pollution level: 2;
- Software class: A;
- Nominal pulse voltage: 4000V;
- Clock error: ≤ 1s per day
Installation rules
Installation should be carried out by qualified personnel in compliance with the current regulations regarding the installation of electrical equipment in the country where the products are installed.
Regulatory compliance
RED Directive.
Standards EN 60730-2-7, EN 60730-2-9, EN 301 489-17, EN 300 328, EN 62311. Vimar SpA declares that the radio equipment complies with Directive 2014/53/EU. The full text of the EU declaration of conformity is on the product sheet available at the following Internet address: www.vimar.com.
Installation rules – Regulatory compliance – Glossary
- Glossary: names and meaning of network and WiFi parameters
- WiFi: name commonly used for wireless communication systems based on the IEEE 802.11 protocol. The following characters (eg b/g/n) describe the type of modulation and/or the main frequency at which the wireless device operates.
- SSID: WiFi network name (eg: “Home WiFi network”).
- WPA/WPA2: security systems for accessing a password-based WiFi network (recommended).
- WEP: security system for accessing an old type of WiFi network (not recommended: if you have a router withthis type of security system, you should modify it with WPA or WPA2). See paragraph 12, note 2.
- IP: communication protocol on which the entire Internet network is based.
- IP Address: the address that every device must have in order to communicate with other devices, via the IP protocol. It consists of four numbers separated by periods (e.g.: 192.168.0.123).
- Subnet mask: (useful for devices that direct IP traffic) indicates the method of determining that a device belongs to a subnet, that is its “class” (e.g.: 255.255.255.0 = class C).
- DHCP: method of automatically assigning IP addresses to devices. Typically the router in our home acts as a “DHCP server”, in other words it automatically assigns the IP address to all the devices connected to it.
WEEE – Information for users
If the crossed-out bin symbol appears on the equipment or packaging, this means the product must not be included with other general waste at the end of its working life. The user must take the worn product to a sorted waste center, or return it to the retailer when purchasing a new one. Products for disposal can be consigned free of charge (without any new purchase obligation) to retailers with a sales area of at least 400 m2, if they measure less than 25 cm. An efficient sorted waste collection for the environmentally friendly disposal of the used device, or its subsequent recycling, helps avoid the potential negative effects on the environment and people’s health, and encourages the re-use and/or recycling of the construction materials.
Glossary: names and meaning of network and WiFi parameters
- WiFi: name commonly used for wireless communication systems based on the IEEE 802.11 protocol. The following characters (eg b/g/n) describe the type of modulation and/or the main frequency at which the wireless device operates.
- SSID: WiFi network name (eg: “Home WiFi network”).
- WPA/WPA2: security systems for accessing a password-based WiFi network (recommended).
- WEP: security system for accessing an old type of WiFi network (not recommended: if you have a router with this type of security system, you should modify it with WPA or WPA2). See paragraph 12, note 2.
- IP: communication protocol on which the entire Internet network is based.
- IP Address: the address that every device must have in order to communicate with other devices, via the IP protocol. It consists of four numbers separated by periods (e.g.: 192.168.0.123). Subnet mask: (useful for devices that direct IP traffic) indicates the method of determining that a device belongs to a subnet, that is its “class” (e.g.: 255.255.255.0 = class C).
- DHCP: method of automatically assigning IP addresses to devices. Typically the router in our home acts as a “DHCP server”, in other words it automatically assigns the IP address to all the devices connected to it.
Appendix 1 – Data on the WiFi network
WiFi Thermostat
| Serial number |
WiFi Router
Main router of the installation site.
| Brand | |
| Model | |
| Notes |
Additional Access Point
If there is an additional device that extends the WiFi coverage inside the home/site.
| Brand | |
| Model | |
| Notes |
Viale Vicenza, 14 36063 Marostica VI – Italy www.vimar.com
Reference:
Download Manual:
VIMAR 02973 SMART HOME VIEW WIRELESS Thermostat
![]()
VIMAR 02907 Wi-Fi touchscreen thermostat Installational Manual
Leave a Reply