
Saswell T18UTW-7 wi-Fi thermostat
INSTALLATION
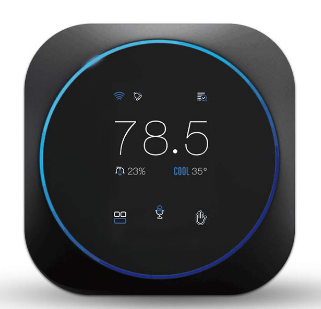
Here’s what you will see on the home screen:
- System mode
Shows your current setting:
(heat/cool/auto/off/aux) - Humidity
Shows the indoor humidity
in your home. - Indoor temperature
Shows the indoor temperature in your home. Click to slide up
or down to adjust the preferred temperature. - Menu
Allows you to control your system, schedule a vacation, and more. - Voice control
Allows you to enable/disable the microphone. - Status
Ventilator/dehumidifies/humidifies - Quick changes
Touch this button to easily Check the time, set the current mode, adjust the brightness/sound,switch between home and away. - Alerts and reminders
The alarm sign will appear if the temperature or humidity exceeds
the designed limit.
Thermostat appearance
T18UTW-7-WIFI
- Power supply: 24VAC(18-30VAC)60Hz
- Ambient temperature : 32°F~122°F(0°C~50°C)
- Temperature setting range: 41°F~95°F(5°C~35°C)
- Temperature setting accuracy: 1°F(0.1°C),1%RH
- Temperature display range: 41°F~99°F(5°C~37.5°C)
- Humidity range: 20%~90%RH
- Operating temperature range: ±1°F(0.5°C), ±1%RH
- Transport temperature range: 14°F~140°F(-10°C~60°C)
- Output: Relay Load Imax 24V/(1A)
- Wifi Communication protocol : TCP/IP, MQTT
- Wifi Frequency: 2.412GHz-2.4848GHz
- RF antenna emission frequency: 915MHz(not the standard)
- Wireless sensor control quantity: 10pcs(Not standard)
- IP rating: IP 21
- Color: black
- Thermostat size: L110mm*W110mm *H28.6mm
- Backplate size: L165mm*W129mm *H10mm
T18UTW-7-WIFI Intelligent voice control thermostat
Power supply: 24VAC (18-30VAC) power supply through RC or RH, C terminal
(no C line can be transferred through a four-wire to the five-wire module)
Support stages: 1H/0C,0H/1C,1H/1C,2H/1C,2H/2C,3H/2C,4H/2C
Terminal 1:RT+,RT-,S,G,Y1,Y2,O/B
- RT+: External sensor + terminal input
- RT-: External sensor – terminal input
- S: Control terminal input (with G and Y collinear input)
- G: Fan output
- Y1: One-stage cooling or heat pump heating output
- Y2: Two-stage cooling or heat pump heating output
- O/B: Four-way directional valve output
- Terminal2: C,RC, RH,W1,W2, AC-,AC+ (, AC-, AC+ function software and hardware design are reserved, not standard, follow-up optional)
- C: 24VAC power supply common input
- RC: 24VAC cooling or single power input
- RH: 24VAC heating power input
- W1: One-stage heating output
- W2: Two-stage heating output
- AC-: Single wire is empty, two wires are passive common output
- AC+: Humidification or dehumidification, fresh air auxiliary equipment output (only one of the three types of equipment can be selected for control, 24VAC output when single wire)
T510-45(Electric Control Module)
- Power supply: 24VAC(18-30VAC) 60Hz
- Ambient temperature : 32°F~122°F(0°C~50°C)
- Shipping temperature:14°F~140°F(-10°C~60°C)
- Output: Relay Load Imax 24V/(1A)
- IP rating: IP 21
- Color: white
- Size: 67.1*47.5*30.3mm

Five-core lead length 500mm (18#AWG) input: R,C,G,Y,G
- R: Air conditioning equipment 24VAC power input
- C: Air conditioning equipment 24VAC power supply public input G: Air conditioner fan input
- Y: Air conditioning equipment refrigeration compressor input W: Air conditioning equipment heating input
Terminal output: R,C, S,W
- R: Converter 24VAC power output
- C: Converter 24VAC power supply common output
- S: Converter control terminal (with G and Y collinear control) W: Converter heating terminal
THERMOSTAT INSTALLATION
Two ways to install a thermostat 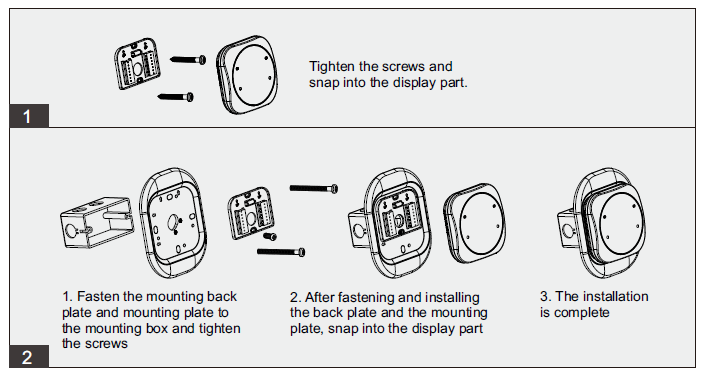
- STEP1
Power off your Heating, Ventilation, and Air Conditioning(HVAC) system by using the master switch or circuit breaker box. This is important for your safety. - STEP2
Confirm your system is off by turning on your heat(during winter)or your AC(during summer).Wait a few minutes you should not feel air coming from your vents. - STEP3
Remove your old thermostat cover from the wall.
TIPS:
- Look for your master switch or circuit breaker box in the basement, attic,utility close,or behind a wall panel near the thermostat.
- If you have a boiler, check to see that the main flame is extinguished.
- Many thermostats simply pop off or unclip from the base, while others may have screws that you will need to remove.
CHECKPOINT:COMPATIBILITY
Does your old thermostat’s backplate have any of these indicators? 
- STEP4
Take a picture of the wires connected to the terminals of your old thermostat. you may need to reference this photo later on.
CHECKPOINT:C WIRE
Do your have a C wire connected to you old thermostat? 
TIPS:
The wiring on your old thermostat may look different, just check to see if there’s a C wire.
FCC Radiation Exposure Statement:
This equipment complies with FCC radiation exposure limits set forth for an uncontrolled environment. This equipment should be installed and operated with a minimum distance 20cm between the radiator & your body.
FCC Warning
This device complies with Part 15 of the FCC Rules. Operation is subject to the following two conditions:
- This device may not cause harmful interference,and
- this device must accept any interference received, including interference that may cause undesired operation.
NOTE 1: This equipment has been tested and found to comply with the limits for a Class B digital device, pursuant to part 15 of the FCC Rules. These limits are designed to provide reasonable protection against harmful interference in a residential installation. This equipment generates uses and can radiate radio frequency energy and, if not installed and used in accordance with the instructions, may cause harmful interference to radio communications. However, there is no guarantee that interference will not occur in a particular installation. If this equipment does cause harmful interference to radio or television reception, which can be determined by turning the equipment off and on, the user is encouraged to try to correct the interference by one or more of the following measures:
- Reorient or relocate the receiving antenna.
- Increase the separation between the equipment and the receiver.
- Connect the equipment into an outlet on a circuit different from that to which the receiver is connected.
- Consult the dealer or an experienced radio/TV technician for help.
NOTE 2: Any changes or modifications to this unit not expressly approved by the party responsible for compliance could void the user’s authority to operate the equipment.
Install your thermostat with a C wire
If you have a C wire, it will power your thermostat. you won’t need the Electric Control Module included in the box.
TIPS:
TO install accessories(humidifier,dehumidifier or ventilator)please refer to the wiring diagrams at wiring.
- STEP5
Carefully disconnect and label the wires from your old thermostat one at a time, using the labels provided.
TIPS:
If you have a jumper between RC, RH, OR R, leave it alone. Only label the wires that run from your wall into a terminal block.
- STEP6
Unscrew the mounting plate of your old thermostat to remove it from the wall.
WARNING:
Be careful, as some thermostats may contain mercury.
Recycle your old thermostat safely with your local hazardous waste facility.
- STEP7
Decide if you want to use the Base plate with your thermostat.
The Base plates useful if you want to hide marks or holes left on the wall by your old thermostat.
If using the Base plate,align the mounting holes on the Base plate and backplate and press them into place together.
- STEP8
Pull the wires through the hole in the middle of the backplate and then attach the backplate to the wall using the drywall anchors and screws provided.
TIPS:
Use a 3/16” drill a hole for the drywall anchors.
CHECKPOINT: INSERT YOUR R WIRE(S)
Do your have more than one R wire?(That includes R,RC, and RH)
- STEP9
Insert your remaining wires into the side (not the front) of their corresponding terminal blocks. - STEP10
Tug on the wire gently to ensure they are securely connected.
TIPS:
- Press the terminal block levers to insert the wires more easily.
- When a wire has been connected correctly, the level on the block will be lower.
- STEP11
Gently press your thermostat into the backplate until it “clicks” into place.
TIPS:
If the thermostat “rocks”or is not flush with the wall,be sure the excess wires are pushed all the way into the wall.
STEP12
Turn the power to your HVAC system back on using the master switch or at the circuit breaker box.
Congratulations, you did it!
Say hi to your new thermostat! To complete your setup and registration, follow the instructions on your thermostat screen.
Install your thermostat without a C wire
If you don’t have a C wire, you will need to use the Electric Control Module included to reliable power your thermostat. 
CHECKPOINT: 3 OR 4 WIRES
The Electric Control Module requires your system to have either of the following:4 wires W1,Y1,G,and R(or RC or RH)
Do you have these wires?
- STEP5
Take your Electric Control Module, wire labels, tools, your smartphone, and go to your HVAC system.
- STEP6
Open your HAVC system’s cover to reveal at control board.
- STEP7
Take a picture of the wires connected to your control board.
You may need to reference this photo later on. WARNING:
HVAC systems contain high-voltage wires. Use caution when working with the control board. If you’d rather leave it up to a professional. - STEP8
Label only the R,Y,or Y1,G, and W or W1 wires with the matching labels provided.
If you have more than one wire going into these terminals, only label those going to your thermostat. STEP9
STEP9 - Disconnect the wires labeled
R,Y, G, and W from the control board.
* Important*
Attention please at this time, you need to change the wire number. As follow
- STEP10
Connect the wires you disconnected from the control board into their matching green terminal blocks on the Electric Control Module . - STEP11
Tug on the wires gently to ensure they are securely connected.
TIPS:
1. Insert the wires more easily.
2. When a wire has been connected correctly,tight screw to ensure the wiring. - STEP12
Connect the five wires coming out of your Electric Control Module to their corresponding terminals on the control board.
CHECKPOINT: Electric Control Module
Check that you have installed the Electric Control Module correctly. It should be installed between your thermostat wiring and your control board.
- STEP13
Mount the Electric Control Module inside your HAVC system, taking care not to strain the wires.
Close the HVAC cover panel securely return to your thermostat.
TIPS: Make sure your HVAC panel is fully closed.Some systems will not turn on if the cover panel has not been closed properly. - STEP14
Back at your thermostat:
Carefully disconnect and label the wires from your old thermostat one at a time, using the labels provided. If you have a jumper between RC,RH,or R leave it alone. Only label the wires that run from your wall into a terminal block.
- STEP15
Unscrew the mounting plate of your old thermostat to remove it from the wall.
WARNING:
Be careful, as some thermostats may contain mercury.
Recycle your old thermostat safely with your local hazardous waste facility. - STEP16
Decide if you want to use the Base plate with your thermostat.
The Base plate is useful if you want to hide marks or holes left on the wall by your old thermostat.
If using the Base plate, align the mounting holes on the Base plate and backplate and press them into place together.
- STEP17
Pull the wires through the hole in the middle of the backplate and then attach it to the wall using the drywall anchors and screws provided.
TIPS:
Use a 3/16” drill a hole for the drywall anchors. - STEP18
First, connect these 4 wires as shown: RC,C,S,W1. Then connect any remaining wires to their corresponding terminal.
TIPS:
Press the terminal block levers to insert the wires more easily.
CHECKPOINT: DON’T SKIP AHEAD
Did you connect the correct wires to the RC,C, S,W1 terminals, as shown below?
- STEP20
Tug on the wire gently to ensure they are securely connected.
- STEP20
Gently press your thermostat into the backplate until it “clicks” into place.
TIPS:
If the thermostat “rocks”or is not flush with the wall, be sure the excess wires are pushed all the way into the wall. - STEP21
Turn the power to your HVAC system back on using the master switch or at the circuit breaker box.
Accessory
- Optional sensor (Terminal RT+, RT-, PIR sensor)
- AC+, AC-
Wiring must comply with applicable codes, ordinances and regulations.
- Wire the NTK100 Outdoor Sensor to the RT+/RT- terminals on the thermostat.
For an example of general wiring of the NTC-100K, see Fig .2. Pigtail wiring can be used. - Mount the NTC-100K in its mounting clip.
- Plug wiring hole using nonhardening caulk or putty.

Optional sensor

SASWELL NTC 100K Room Sensor With 3 Meter Wiring
*Used for outdoor temperature detection when there is water pump protection.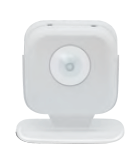
SASWELL Wireless Room Sensor
*Used for detecting human activities.(refer to PIR sensor manual)
Accessory devices
The T18 can control an accessory HVAV device like a humidifier, dehumidifier, or ventilation device from its AC terminals.
Note:You will need to configure the accessory device when you first power on your T18.
2-wire accessory (humidifier/dehumidifier/ventilator)
1-wire accesory
(humidifier/dehumidifier/ventilator)
T18 automatically connects Rc to AC- when 1-wire configuration is selected during accessory setup.
Warning: Damage may occur if accessory is connected to AC
1-wire Integrated dehumidifier
T18 automatically connects RC to AC- when a 1-wire configuration is selected during accessory setup.
Warning: Damage may occur if the accessory is connected to AC
HRV/ERV
Note: To determine which wires from your ERV/HRV need to be connected to the AC+/AC- terminal on your T18, You need follow the product prompts to choose 1-wire or 2-wire.
Congratulations, you did it!
Say hi to your new thermostat! To complete your setup and registration, follow the instructions on your thermostat screen. 
LINK APP

Items needed for Wi-Fi connection:
- The homeowners are compatible iOS or Android
- Device with the SASWELL SMART app installed and registered
- Your customer’s Wi-Fi network name (SSID) and password
How do I connect Alexa and WiFi ?
Please refer to the following steps at T18 that will help you.
T18: “MEUN” > “USER SETTINGS” > “START CONNECT WIFI” > “OK”
- Enter the app, Click the “+” in the upper right corner.
- Add Device Click “setting”

- You must have your customer’s Wi-Fi Network (SSID) and Password, to complete the wireless setup.
- Select the “SSID”code. (SSID is on the back of the product)

- Once the thermostat is connected to Wi-Fi, back the SASWELL SMART app, and select “continue Setting” from the drop-down menu.
- Select your home WiFi account and enter your password And then select “Continue”.

- Please wait patiently.
- Show“Connection succeed”And then select “Next Step” Tip (If the connection fails, please try again and enter the correct WiFi password.

- Click “login with alexa”
- Click “Get Started”
- Enter alexa In your phone’s browser, enter your account and password, and then click sign-in. The first login page is as follows.

- Log on to your amazon account, Then select “OK”,enter to
“Saswell Smart” app page. - Login alexa success, please start using.

If login alexa failed,try to click“Login With Alexa” or “skip login with Alexa”.
If click “Login With Alexa”, continue to step 11 and step 12 on page of 55.
If click “skip login with Alexa”, Please refer to the following steps.
- Enter “Device List”, Click your device.
- Slide right to enter “Main Menu”, Click”Amazon Alexa”

- Enter your Alexa account and password.Click “Sign-In”
(If you don’t have an Amazon account,click “Create a new Amazon account”) - Click”Allow” Connection succeed.

*Download the app “Amazon Alexa”
- Open the “Amazon Alexa” APP, enter amazon account & password. Then click“SIGN-IN”
- Click your amazon account.
- Click “CONTINUE” (If password is not displayed, enter amazon password)

- Click “SKIP”
- Click“ ” in the upper left corner or swipe to the right.
- Click“Skill & Games”

- Click“ ”
- Enter “ Caswell ”to search,click “Saswell SmartHome” APP
- Click“ DISABLE SKILL ”
The interface will not appear the first time you connect.
- Click“ DISABLE ” The interface will not appear the first time you connect.
- Click“ENABLE TO USE”
- Enter the account & password for the “Saswell Smart” app. Click“Sign in”

- Click
- Click“DISCOVER DEVIC”
- Discovering,please wait patiently

- 16 Click“CHOOSE DEVICE”
- 17 Choose your device, click“SET UP DEVICE”
(The SSID is on the qr code at the top right of the product. You only need to look at the last four digits) - Click“CHOOSE GROUP”

- Choose the room you want to set up,Click“ADD TO GROUP”
- Click“CONTINUE”
- Click ”Devices”, and then click “ Bedroom”(Be consistent with the room you set up)

- Click “Alpha_T18_37D0”. (Click the name of the searched device)
- Click “Edit Name”,you can change the device name.(Note: Please keep the same name on the
“Saswell SmartHome” APP device)
Voice commands:
Set the bedroom(Device name) to Cool/heat/auto/aux/off mode
You can say “change/switch/turn/make the bedroom to cool mode”
You can say such as follow:
- Alexa, change bedroom to Cool mode.”
- Alexa, switch bedroom to Heat mode.”
- Alexa set bedroom to Auto.”
- Alexa set bedroom to Aux.”
- Alexa set bedroom to Off.”
- Alexa, what is the temperature in the bedroom.”
- Alexa set the bedroom to 72 degrees.”
- Alexa, raise the bedroom by 1 degree.”
- Alexa, increase the bedroom by 1 degree .”
- Alexa, drop the bedroom by 1 degree.”
- Alexa, resume my bedroom schedule.”
Reference
Saswell T18UTW-7 wi-Fi thermostat Installation Guide