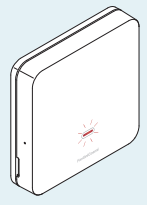
Fantini cosmi C820RQ ROOM THERMOSTAT

DUAL-POWER ROOM THERMOSTAT
Dear customer, thank you for purchasing the Fantini Cosmi digital room thermostat, model C820RQ, for the temperature management and home comfort. This manual contains all the information required for a correct installation and configuration. You can also download this manual in digital format and in several languages by framing the QR code below and entering the product code

Package contents
- Thermostat C820RQ
- Rectangular base
- Manual
Warnings
- Carefully read the installation instructions, safety warnings, operating modes and maintenance instructions in this booklet, which should be kept for further reference.
- After removing the packaging, check the integrity of the appliance; if in doubt, do not use it.
- Installation of the appliance should only be carried out by qualified technicians in compliance with current standards. • The use of any electrical appliance involves observing certain basic rules. In particular:
- DO NOT touch the device with wet hands or wet feet or bare feet.
- DO NOT expose the device to the weather (rain, sun, etc.).
- Before carrying out any maintenance or cleaning work, switch off the power supply.
- DO NOT power the appliance with the cover open
TECHNICAL DATA
- Power supply 230 V – 50 Hz 2 AA 1.5 V alkaline batteries
- Battery life > 1 year
- Adjustment ON / OFF or TPI
- Max. power consumption 1 W
- LED switch-off 5 / 10 s from last press; always ON (only at 230V power supply)
- Temperature adjustment range 2 ÷ 40 °C; increments of 0.1 °C
- Measurement range / Room T display -9 to +50 °C; resolution 0.1 °C
- Temperature display Celsius
- Relay output with changeover dry contacts5(3)A 230 Vca
- Microdisconnection 1 B.U.
- Nominal conductor wire gauge for flexible cables 0.5 to 1 mm2
- Minimum adjusting differential STD; (0.3 ÷ 5) °C
- Thermal gradient of reference 4 K/h
- Maximum room temperature 45°C
- Storage temperature -10 ÷ +60 °C
- Software Class A
- Insulation class Class II Protection rating IP32
- Degree of pollution 2
- Mounting Wall-mounting or on a Flush-mounting box type 500-502-503
- Dimensions 98 x 98 x 20 mm (square base) 125 x 98 x 20 mm (rectangular base)
- Weight 0.100 kg
- Compliant with standards: EN 60730-1 and parts two;
- Directive 2014/30/EU (EMC); Directive 2014/35/EU (LVD);
- ErP classification: ErP Class IV, 2 % (Reg. EU 811/2013 – 813/2013).
INSTALLATION
For an optimal operation of the appliance, it is recommended that the thermostat be installed at a height of approx. 1.5 mt above the floor, in a suitable position to correctly detect the room temperature (see example in the drawing To proceed with the installation, separate the front cover from the base by pressing the button on the bottom edge of the cover and releasing the body of the unit upwards, as shown in the figure.

WALL MOUNTING The tabs on the back of the base must be removed for the wall mounting. In this way the thermostat will fit tightly against the wall.

ON FLUSH MOUNTING BOXES
The thermostat is supplied with a square and rectangular base to allow the installation on a flush-mounting box type 500-502-503.
CONNECTION TO THE SYSTEM
By unscrewing the screw and lowering the plastic cover, as shown in the drawing, you will have access to the electrical connections.
Connect terminals 1 and 4 to the system.
- 4: normally open contact
- 2: normally closed contact
- 1: common

POWER SUPPLY
230V 50Hz
Connect terminals L-N to the 230V power supply
BATTERIES
To power the device with batteries, use 2 AA 1.5V alkaline batteries. Insert the batteries in the battery compartment at the rear of the device, observing the indicated polarities
Notes:
- If the device is powered at 230V, we recommend not to insert the batteries.
- When using the device powered by batteries, several advanced functions will not be selectable.

LOW BATTERY WARNING
- 1 blink per minute with display in Stand-by mode: the batteries are running low and it is still possible to operate the device, but they must be replaced.
- Fast flashing with display in Stand-by mode: the batteries are flat; the device can no longer be operated and will go into OFF mode.
- The batteries can be replaced at any time without losing the stored settings.
USE
DISPLAY ACTIVATION AND ROOM TEMPERATURE DISPLAY
When the thermostat is in Stand-by mode, the display is off. Slightly pressing the central MODE button for 1 second, the screen activates and displays the room temperature. If the system is switched off, OFF will be displayed
OPERATING MODE
- With the display switched on, press the central MODE button to select the desired operating mode:
- (COMFORT) for a setting adapted to the moments you spend at home.
- (ECONOMY) for a more energy-saving adjustment, e.g. during the night or when you are away for short periods of time.
- (OFF) to switch off the system when you are away for long periods

CHANGING THE DESIRED TEMPERATURE
By pressing the UP or DOWN arrows, the desired temperature value (Set Point) of the current operating mode can be changed. The value is increased or decreased in steps of 0.1°C.
CHANGING THE BASIC SETTINGS (USER MENU)
To change several basic settings and optimise the display use, you can access the User Menu: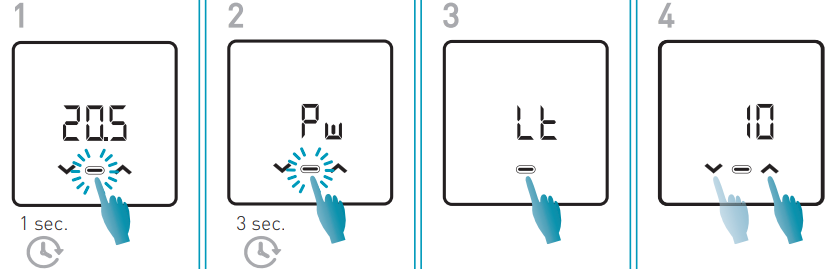
Password
In order to prevent other users from changing the thermostat settings, a password can be entered to lock the buttons. To enable this function, choose an access code with a value from 1 to 999. This code must be entered, followed by the MODE button, to access any thermostat setting from the temperature control to basic or advanced parameters.
To disable the key lock, set the value to “0”.
Stand-by
You can change the Stand-by activation time.
- Default value = 5
- 5 ÷ 10 sec
- ON = Display always on (*)
Display light intensity
To improve the visibility of the LEDs in the room or to soften their light intensity level, the default value can be changed.
- Default value = 5
- 1 ÷ 10
Temperature correction
If the thermostat is close to heat sources or cold current areas, it is possible to correct the measured temperature value.
- Default value = 0°C
- -4.0°C ÷ +4.0°C
Season
Change the season to activate the control in heating or cooling mode. When the system is switched on during the winter season, the central LED flashes red , while it flashes blue when the system is switched on during the summer season.
- Default value = WI
- WI = Winter (Heating)
- SU = Summer (Cooling)
Firmware
On this screen you can see the firmware release version
ADVANCED FUNCTIONS
To change other thermostat settings, you can access the Advanced Functions menu:

SET POINT LIMITS
The desired temperature range can be limited by the user (Set Point).
- Minimum Set Point value – Winter season
- Default value = 2.0°C
- 2.0°C – 40°C
- Maximum Set Point value – Winter season
- Default value = 40.0°C
- 2.0°C – 40°C
- Minimum Set Point value – Summer season
- Default value = 2.0°C
- 2.0°C – 40°C
- Maximum Set Point value – Summer season
- Default value = 40.0°C
- 2.0°C – 40°C
Antifreeze function
This function avoids system blockage due to possible pipe freezing during the winter period.
- Default value = 5.0°C
- OFF = off
- 2.0°C – 7.0°C
Data displayed on the Home page
- Default value = 1
- 1 = Room temperature
- 2 = Set Point active
Adjustment function
ON/OFF
During the ON/OFF adjustment the thermostat switches on (ON) when the measured room temperature is below/above the desired temperature value (Set Point), and switches off (OFF) when the desired temperature is reached. In this adjustment mode, the Optimisation function (P08) can be activated and the Static Differential value (P09) can be set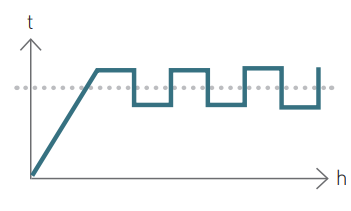
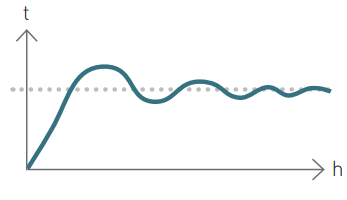
TPI
If the thermostat is powered by a 230V power supply, it is possible to take advantage of the special TPI algorithm which, by taking into account parameters such as the room temperature, the energy class of the flat (P12), the type of emission terminal (P13), the proportional band (P15) and the control period (P14), optimises the system runtimes for a more constant comfort level, ensuring optimal energy savings.
- Default value = 1
- 1 = ON/OFF adjustment
- 2 = TPI adjustment (*)
Optimisation
When the thermostat is set to the ON/OFF adjustment, this function allows to minimise the energy consumption of the heating/cooling system by adjusting its on/off times according to the installed type of system and the set differential
- Default value = OFF
- OFF = Function disabled
- ON = Function active (*)
Static differential
By selecting the ON/OFF adjustment, it is possible to set the value of the static differential to manage the temperature difference between the OFF and ON modes.
- Default value = Std
- Std = Standard
- 0.3°C ÷ 5°C (*)Pump Anti-seizure
The Pump Anti-seizure function avoids limestone deposits during the system shut- downs, resulting in short activation times of the pump after 24 consecutive hours of inactivity. The function is optional and can be enabled by configuring the activation minutes of the circulating pump. Once enabled, this function remains active even when the thermostat is in OFF mode.
- Default value = OFF
- OFF = function disabled
- 1 ÷ 10 min
Virtual relay
By enabling the virtual relay function, it is possible to display the activity status of the system even when the display is switched off (Stand-by). When the system is switched on during the winter season, the central LED flashes red , while it flashes blue when the system is switched on during the summer season.
- Default value = OFF
- OFF = Function disabled
- ON = Function enabled (*)
- (*) Regulation only available for systems powered by a 230V power supply
Energy class
When the TPI adjustment is active, it is necessary to set the energy class of the building for enabling the optimisation of the system’s runtimes.
- Default parameter = A4
- A4, A3, A2, A1, B, C, D, E, F, G
- Function only available for TPI adjustment.
Type of emission terminals
If the TPI adjustment is activated, it is necessary to also set other related parameters. The emission terminal identifies the final element of the heating/cooling system. By setting the emission terminal, the values of the Proportional Band and the Adjustment Period are automatically set (see the below table); however, they can still be changed.
- Default value = 1
- 1 = Radiators
- 2 = Fan Coil
- 3 = Floor
- Function only available for TPI adjustment.
TPI Adjustment Period
The TPI Adjustment Period indicates the duration of a systemon+off cycle. This period depends on the type of the emission terminal. The values for the Adjustment Period are set automatically by setting the emission terminal (see table P13); however, they can still be changed
- Default value = 15
- 5 ÷ 60 min
- Function only available for TPI adjustment
TPI proportional band
The Proportional Band is the temperature range around the Set Point at which TPI adjustment is active. Beyond this range, adjustment is of the ON/OFF type. The values of the proportional band are set automatically by setting the emission terminal (see table P13); however, they can still be changed.
- Default value = 0.5°C
- 0.5°C – 2.0°C
- Function only available for TPI adjustment.
Thermostat reset
After enabling the reset, the thermostat settings are restored to the default values.
- Default value = NO
- NO = Reset disabled
- YES = Reset enabled
DISPOSAL
Symbol of the crossed-out wheeled bin indicates that the product must be collected and disposed of separately from household waste. Batteries and the integrated accumulators may be disposed of together with the product. They will be separated at the recycling facilities. A black bar indicates that the product was placed on the market after August 13th, 2005. Participating in the separate collection of products and batteries contributes to the correct disposal of these materials and therefore avoids possible negative consequences for the environment and human health. For more detailed information on the collection and recycling programs available in your country, contact the local authorities or the sales point where you purchased the product.
GENERAL WARRANTY CONDITIONS
The conventional warranty lasts 24 months, starting from the date the equipment is installed. The warranty covers all parts of the equipment, except those subject to normal wear and tear resulting from use
FANTINI
- Via dell’Osio, 6 – 20049 Caleppio di Settala, Milano – ITALY
- Tel. +39 02 956821
- [email protected]
- www.fantinicosmi.it
SUPPORTO TECNICO
EXPORT DEPARTMENT
REFERENCE:
DOWNLOAD MANUALS:
Fantini cosmi C820RQ ROOM THERMOSTAT Instruction Manual
OTHER MANUALS:
Fantini cosmi C820RQ ROOM THERMOSTAT Product Data Sheet
![]()