
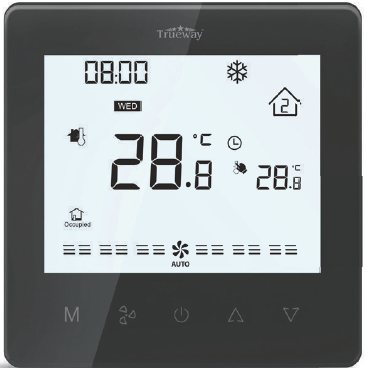
TRUEWAY TX1000 Touch Screen Thermostat
APPLICATIONS
- TX1000 Series is touchpad thermostat with many variants suitable for 2-pipe cooling & heating fan coil units and DX single-stage compressor units. Available in basic standalone and Modbus communicating variants.
- Options of back-light selection in sky blue and black VA LCD. Fitted with a built-in NTC 10K sensor and an optional humidity sensor. Several add-on functions like remote sensors, key card can be chosen as per site requirements.
SPECIFICATION
- Power Supply: 85-240VAC / 24VAC• Frequency: 50~60Hz
- Function: Cooling/Heating
- Relay Life: 220±10% VAC, 3(5)A, 100,000 times
- Wiring Max: 16AWG
- Sensing Element: 10K(@25°C) NTC
- Display Accuracy: 1°C, Set-point accuracy: 1°C/step
- Set-point range: 10-32°C(50-90°F) • Display range: 0-50°C
- Protection Glass: IP 20 • Operation Temperature: -18~49°C
- Shipping Temperature: -35~65°C • Suitable System: 2-pipe
- FCU cooling&heating, simple on-off valve or compressor
- Suitable Valve: 2-line/3-line valve • Relative Humidity: 10~90%
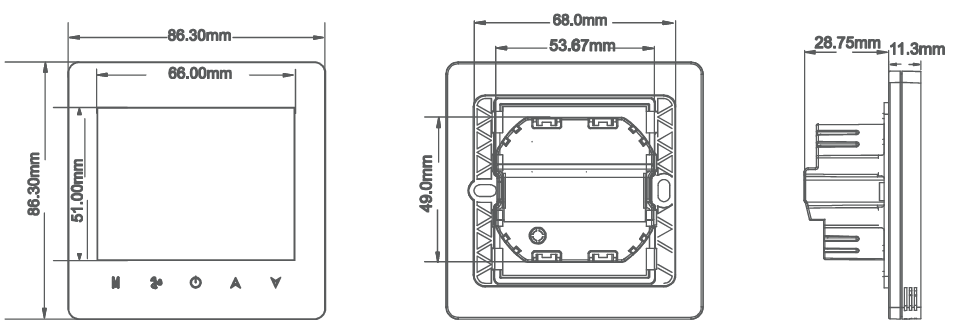
- Installed on 75mm x 75mm box
FEATURES
- Modern touchpad design suitable for offices, hotels, and residential buildings.
- Applicable for 2-pipe FCU cooling&heating, Simple on-off valve or compressor
- Black LCD and Sky-blue LCD display are selectable.
- Special color casing upon request with RAL number can be provided.
- Both room and Set-point display
- Manual & Automatic fan functions
- User settings can be kept during power off.
- Fan load 5A resistive and inductive of 3A
- Big LCD with English display
- Temperature unit C&F
- Regular color available in Black and White body
- EC motor variants available
- Fits in a 75mmx75mm electrical junction box
- Real-Time clock with infinite life battery backup
- Free iOS & Android App
- Language Selection through Mobile App – English & Arabic
- WIFI App designed & developed by Links4engg USA India
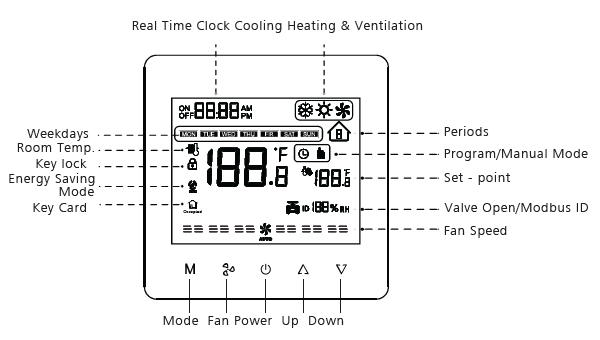
LCD DISPLAY & KEYS DESCRIPTION
FUNCTION
- 2-pipe FCU cooling&heating,
- Simple on-off output
- 3 Speed Fan + Auto Fan Control
- Energy Save Mode and
- Comfort Mode Settings
- 7 Days 6 Periods Programmable Function
- Key Pad Lock
- Both Room and Set-Point Display
ORDERING PART NUMBERS
| PART NUMBERS | OPERATING VOLTAGES | APPLICATIONS | VALVE TYPE | EXT.SENSOR | WIFI CONTROL THROUGH APP |
|
TX1000 OF220-V2 1CEW |
85-240VAC |
2-PIPE/ SINGLE STAGE |
ON-OFF VALVE / COMPRESSOR | ||
|
TX1000 OF220-V2EW |
85-240VAC |
2-PIPE |
ON-OFF VALVE |
||
|
TX1000 OF024-V21CW |
24VAC |
2-PIPE |
ON-OFF VALVE / COMPRESSOR |
ABBREVIATION
| CASING/COVER COLOR | |
|
BLACK |
B |
|
WHITE |
W |
| BACKLIGHT COLOR | |
|
Sky Blue backlight + Black letters(TN LCD) |
SB |
|
Black backlight + White letters (VA LCD) |
BW |
Operation Instruction
ON-OFF VALVE /COMPRESSOR CONTROL
The thermostat acquires the room temperature via its integrated sensor and maintains the set-point by simple on-off output
POWER ON OR OFF
Pressing the POWER button ![]() to change the power On/Off status
to change the power On/Off status
INCREASE / DECREASE
In the ON state, press ![]() UP or
UP or  DOWN to increase or decrease the setting parameters
HEAT/COOL/VENT
Pressing the MODE button![]() to select heat
to select heat cool
cool or ventilation
  mode.
mode.
FAN OPERATION
The fan can be selected as manual or automatic 3-speed operation. In manual mode, the fan will be switched to the selected speed via control output Gh, Gm, Gl (by pressing the FAN button![]() ). In automatic mode, the fan speed will be switched on the difference between the room temperature and the set point. When the room temperature reaches set-point, the valve will be closed and meanwhile, the fan turns to the low-speed fan will be turned off as well “(fan can be changed to low speed instead of turning OFF via ISU mode)”
). In automatic mode, the fan speed will be switched on the difference between the room temperature and the set point. When the room temperature reaches set-point, the valve will be closed and meanwhile, the fan turns to the low-speed fan will be turned off as well “(fan can be changed to low speed instead of turning OFF via ISU mode)”
TEMPERATURE DISPLAY
Both the room temperature and the set point are displayed
COMFORT MODE
In the comfort mode, the set point can be changed by pressing  UP or DOWN buttons. Different applications include cool only, heat only and manual heat/cool changeover
KEY LOCK
The default status of “Key lock” is all keys available and it can be changed in ISU mode. Key lock function includes the following settings: All keys are available (Default) Mode button is locked out. The fan and Mode buttons are locked out. All buttons are locked.
ENERGY SAVING MODE
By pressing the MODE button for 3 seconds can activate the energy-saving mode with an icon
![]() appearing on the screen. If energy saving is activated by the button pressed, pressing the POWER button
appearing on the screen. If energy saving is activated by the button pressed, pressing the POWER button![]() will stop energy saving mode. For heating mode, if the energy-saving function is enabled, the set-point will be changed to a remote setback heating set-point. The range of remote setback heating set-point is from 10 °C to 21 °C and the default value is 18 °C. The value can be changed in ISU mode with the step of 1 °C. For cooling mode, if the energy saving function is enabled, the set-point will be changed to a remote setback cooling set-point. The range of remote setback cooling set-point is from 22°C to 32°C and the default value is 26 °C. The value can be changed in ISU mode with the step of 1 °C.
will stop energy saving mode. For heating mode, if the energy-saving function is enabled, the set-point will be changed to a remote setback heating set-point. The range of remote setback heating set-point is from 10 °C to 21 °C and the default value is 18 °C. The value can be changed in ISU mode with the step of 1 °C. For cooling mode, if the energy saving function is enabled, the set-point will be changed to a remote setback cooling set-point. The range of remote setback cooling set-point is from 22°C to 32°C and the default value is 26 °C. The value can be changed in ISU mode with the step of 1 °C.
FREEZE PROTECTION MODE
Freeze protection can be disabled (default) or enabled via ISU mode. If freeze protection is enabled ( it is not available in the cooling only application) and the thermostat is in OFF mode while the room temperature is below 6 °C, the thermostat will open the heating device before the temperature rises to 8 °C
TIME SETTING
In ON/OFF states, press and for 5 seconds, the time area
![]() will be flashing, press to select minutes, hours or week, then press or to adjust the relevant time, press to confirm
will be flashing, press to select minutes, hours or week, then press or to adjust the relevant time, press to confirm
TO SELECT MANUAL AND PROGRAMMABLE
In the thermostat ON status, Press and hold, and for more than 5 seconds, the icon of  will be flashing, pressto select manual or programmable
![]() and press to confirm.
and press to confirm.
ADJUSTING OF WEEKLY PROGRAMMABLE
After selecting programmable mode, press for more than 5 seconds enters into the program schedule setting then press to select the setting item of periods, time, and temp. Press or to adjust the relevant value, and press to confirm. The program schedule is a weekly (7 days) cycle, it can be selected for 5+2 days, 6+1 days or 7 days. 5+2 is 5 workdays plus 2 days holiday a week, 6+1 is for 6 workdays plus 1 day holiday a week, and 7 is for 7 workdays a week. There are 6 periods for workdays and 2 periods for holidays.
Setting sequence when enter program setting
Workdays 1st period time adjusting -> temperature adjusting -> 2nd period time adjusting -> temperature adjusting……6th period time adjusting -> temperature adjusting -> holidays 1st period time adjusting -> temperature adjusting -> 2nd period time adjusting -> temperature adjusting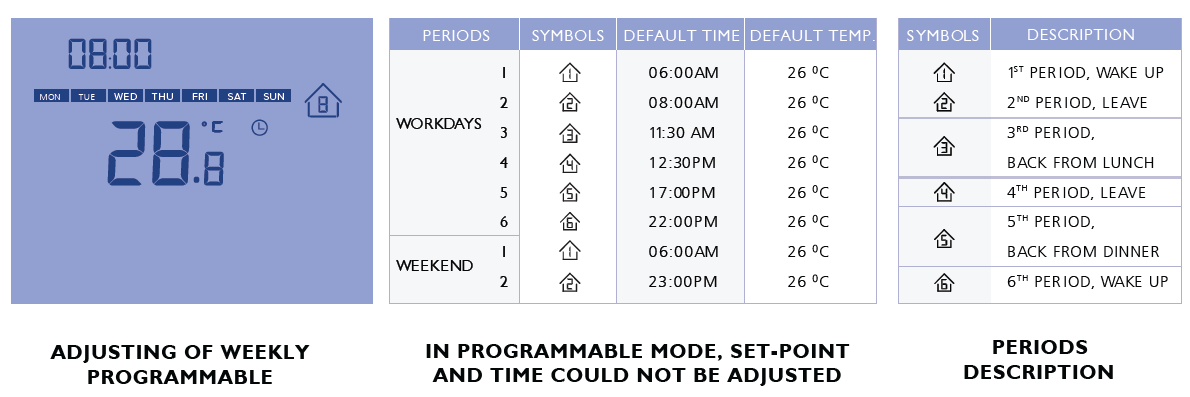
SETUP FUNCTION SETTINGS AND OPTIONS
- Press and key for 5 seconds to enter ISU setting mode, the ISU code will be flashing.
- Press orto select the setting items from 1-26.
- Press and the values of the selected item will be flashing with the icon on,
- Press
 revise the values of the setting items, and press to confirm.
| ISU CODE | DESCRIPTION | POSSIBLE OPTIONS | |
|
1 |
S YS TEM TYPE |
0 HE AT ON LY 1 COOL ON LY 2 T WO PIPES 1H1C MANUAL(DE F AULT) |
|
|
2 |
TEMPERATURE UNIT |
F :
C : |
° F
° C(DE F AULT) |
|
3 |
F AN CONTROL TYPE |
AO :
CO : BO : |
AUTO ON LY
CON S TANT ON LY B OTH(DE F AULT) |
|
4 |
KEY PAD LOCK OUT |
0 : 1 : 2 : 3 : |
ALL KE YS ARE AVAILABLE (DE F AULT) MODE BUT TON IS LOCKED OUT F AN AND MODE BUT TON ARE LOCKED OUT ALL BUT TONS ARE LOCKED |
|
5 |
REM OTE SET BA CK ENABLE METHOD |
NO :
NC : BU : |
HOTEL C ARD NO HOTEL C ARD NC
BUT TON (DE F AULT) |
|
6 |
FREEZE PROTECTION |
OF :
ON : |
DIS ABLED(DE F AULT) ENABLED |
|
7 |
DISPLAY TEMP. ADJUSTMENT |
-9˚C~+9˚C~(-9˚F~+9˚F)DEFAULT IS 0˚C/0˚F |
|
|
8 |
REMOTE SETBACK HEATING SET-POINT |
RANGE 10-21°C DEFAULT 18 ° C(RANGE 50-70°F DEFAULT 64°F) |
|
|
9 |
REMOTE SETBACK COOLING SET-POINT |
RANGE 22-32°C DEFAULT 26 ° C(RANGE 72-90°F DEFAULT 79°F) |
|
|
10 |
RESERVED FOR ADDITIONAL ISU SETTINGS |
|
|
11 |
RESERVED FOR ADDITIONAL ISU SETTINGS | |
| 12 | RESERVED FOR ADDITIONAL ISU SETTINGS | |
|
13 |
SENSOR SELECTION |
IN : INTERNAL SENSOR, OU: EXTERNAL SENSOR, IF CHOOSING EXTERNAL SENSOR, THE ROOM CARD
FUNCTION WILL NOT BE AVAILABLE, DEFAULT IS IN |
|
14 |
BEE SOUND SETTING |
ON: ON, OF: OFF, DEFAULT IS OF |
|
15 |
PROGRAM SETTING |
0: 5 WORKING DAYS AND 2 DAYS HOLIDAY A WEEK, 1: 6 WORKING DAYS AND 1 DAY HOLIDAY A WEEK, 2: 7 WORKING DAYS A WEEK, 3: CLOSE PROGRAM SCHEDULE ,DEFAULT IS 0 |
|
16 |
COMPRESSOR OFF TIME DELAY SETTING |
RANGE 0-4 MINUTES, IF SETTING VALUE IS 0, WITHOUT DELAY, THIS IS FOR SIMPLE ON-OFF VALVE CONTROL, COMPRESSOR
FUNCTION IS NOT AVAILABLE IF SETTING VALUE IS 1-4,THIS IS FOR COMPRESSOR FUNCTION, WHEN SETTING IS 1, WITH 1 MINUTE OFF DELAY FOR COMPRESSOR CONTROL. |
|
17 |
FAN STOP/RUN SETTINGS |
LO: FAN WILL BE SWITCHED TO LOW SPEED WHEN ROOM TEMP. REACHES TO SET-POINT&VALVE TURNS OFF OF: FAN WILL BE SWITCHED OFF WHEN ROOM TEMP. REACHES TO SET-POINT& VALVE TURNS OFF, DEFAULT IS OF |
|
18 |
ON / OFF BACK-LIGHT SETTING |
OF: OFF, THE BACK-LIGHT WILL BE OFF AFTER 30 SECONDS IF NONE KEY PRESS
ON: ON, THE BACK-LIGHT WILL BE ON ALWAYS EVEN NONE KEY PRESS, DEFAULT IS OF |
|
19 |
ON / OFF MEMORY SETTING |
OF: OFF USER SETTING WILL NOT BE KEPT WHEN POWER OFF (WHILE ELECTRIFIED, THE THERMOSTAT WILL BE OFF) SU: ON, USER SETTING WILL BE KEPT WHEN POWER OFF
(WHILE ELECTRIFIED, THE THERMOSTAT WILL BE ON), DEFAULT IS OF |
|
20 |
BACK-LIGHT SETTINGS |
10-60 SECONDS(DEFAULT 30 SEC.,USER CAN ADJUST BACK-LIGHT TIME ACCORDING TO ACTUAL DEMANDS) |
|
21 |
RESERVED FOR ADDITIONAL ISU SETTINGS |
|
|
22 |
RESERVED FOR ADDITIONAL ISU SETTINGS |
|
| 23 | RESERVED FOR ADDITIONAL ISU SETTINGS | |
|
24 |
RESERVED FOR ADDITIONAL ISU SETTINGS |
|
|
25 |
RESERVED FOR ADDITIONAL ISU SETTINGS |
|
|
26 |
RESET TO DEFAULTS |
THIS FUNCTION IS RESETTING ALL ISU SETTINGS TO FACTORY DEFAULTS, OPERATION: PRESS “ ” 0>1>2>3>4, THEN PRESS “ ” 4>3>2 AND PRESS “ ” TO CONFIRM DEFAULT: 0 |
ABOUT WI-FI CONNECTION
Before using your Wi-Fi thermostat for the first time you must configure the wifi signal and setting through your smartphone or tablet. This will allow communications between your connected devices
STEP 1 DOWNLOAD YOUR APP
For IOS devices, search true way controls in Apple Store and download. Alternatively, scan the relevant QR code here (fig 1-2) For Android devices, search trueway controls in Google Play and download. Alternatively, scan the relevant QR code here (fig 1-3)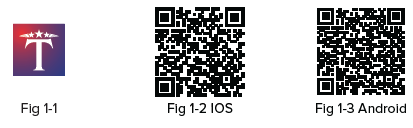
STEP 2 REGISTER YOUR ACCOUNT
Open the app Trueway controls, and you will get a piece of notification F Click “Allow” and “Continue” to go into the page of registration. For registering for the first time on the signup page input the email ID /Password and reconfirm the password then continue for getting a verification code. Already registered users can sign

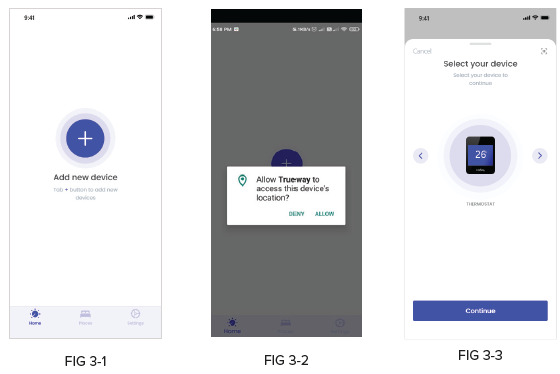
STEP 3 ADDING THE DEVICE AND CONNECT YOUR WIFI SIGNAL
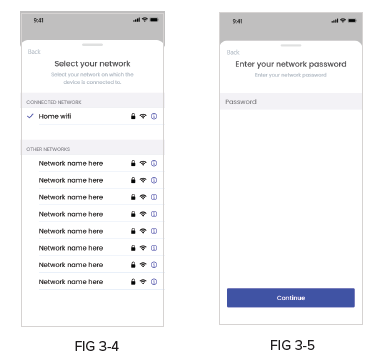
After the verification appears for adding a new device, Tap the button to add a new device. You will get a request for allow a true way to access the device location click “Allow” to continue and select the desired product. The next step is to assign the network of the current location. Access our Network and enter the password and thus the app assigns to Wifi network
STEP 4 SETTING UP AND CONNECTING THE THERMOSTAT
After the wifi network is assigned to your app proceed to reset the Thermostat which is installed in the wall. When the Thermostat is in an OFF state, please press button “M” and “ ” arrows for 3 seconds to enter the network status query. After 3 seconds selection mode appears and press “M” for selection of “AP’and “SA” mode. For easy access “SA” mode is advisable. Select “SA” mode and press the fan button for confirmation. Once the wifi module is confirmed “SA” mode stops flashing and only the wifi icon will continue flashing. “CL” mode will be displayed after wifi is connected to the cloud. Confirm the sequence by tick box and continue. refer
The app starts to scan for finding the device Fig 4-2. Once the connection is made device will be discovered and displayed on the page, the device found in and complete the setup by assigning the preferred room eg : living room, bedroom, office room, common area, etc.

STEP 5 ASSIGNING PLACE & ROOM
Once you found the device you can assign the place. Different places can create as per your choice Like Offices, homes, Gyms, and garages, or create custom names as per your requirement. On Each place, you can arrange according to the name of the room like living room, bedroom, master bedroom, or custom name of room. Any number of rooms can add and assign thermostats of the same network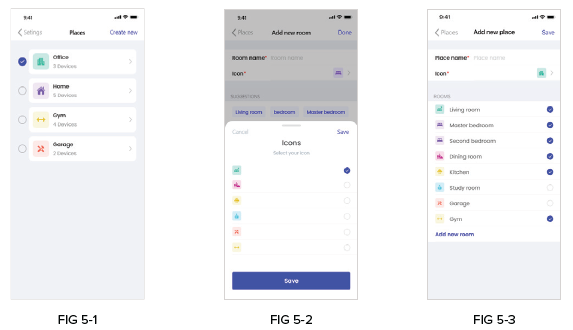
PROGRAMMING YOUR THERMOSTAT
After setting up you will launch on the home screen. Our home screen is designed with a user-friendly Interface. Start with the power button which is placed top right side of screen by clicking the Power button. The power icon will be displayed largely in the center of the screen and the thermostat turn to the ON position. Room temperature is displayed on the center of dial and set temperature is below the dial. Also provide a plus and minus button to adjust the set temperature. Fan button.lock/unlock buttons are arranged visibly.
Power ON/OFF button
Select the power button on the top right.Large display power button in red color will pop up in the center. By clicking the power button ON the button will be changed to green color.
Fan Controls
When you select fan icon on the dashboard, an interactive fan button will pop up and a realistic fan blade with motion will be displayed. All three speeds are indicated on the dial and on the center a moving fan will rotate as per your selection. User can found in anticlockwise Low, medium, High and auto Users can also view the fan status below the fan blade, Low, medium,high and auto will be written Between (+ )plus and (-)minus symbols.User can tab in the dial and in the Plus/minus button for changing the Fan position function.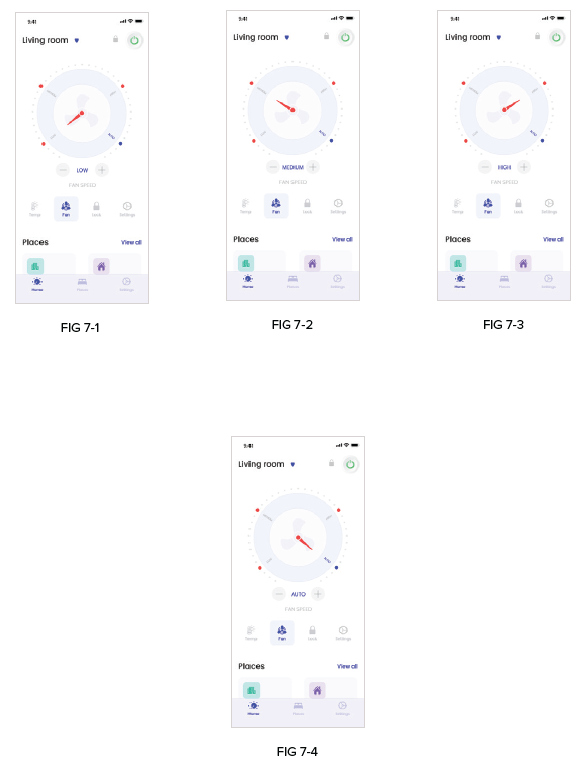
Lock/Unlock
The lock and Unlock button can access from the home screen with lock in red coloring and unlock in greening
How to set the temperature in our smart app
There is two ways of setting the desired temperature for our comfort. The first one is by taking the red indicator In the dial, moving clockwise to increase and moving anti-clockwise to decrease the temperature, alternatively
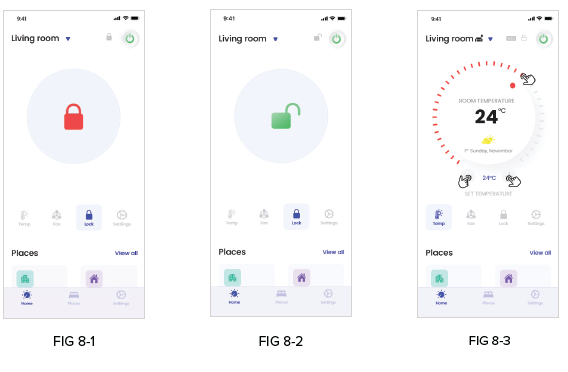
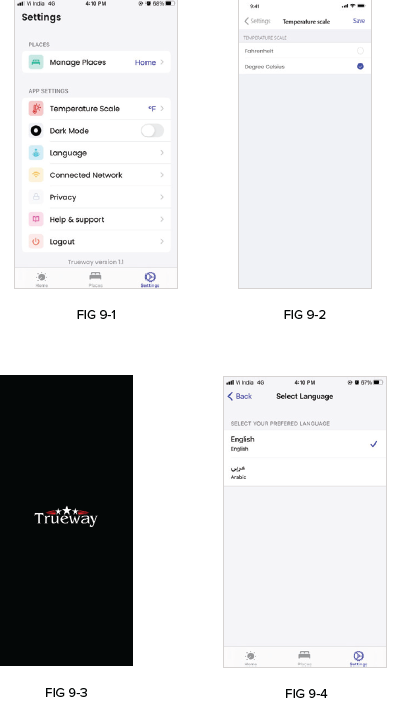
pressing the +plus or –minus button below the dial.The set temperature is displayed between +plus and –minus The large numeric in the middle of the dial is the current room temperature with degree or Fahrenheit as per choice Our smart app is designed with two types of settings one is the App setting and other one is device setting. App settings consist of Manage places, temperature scale, Ambience selection, Language selection Connected to network, Privacy policy, help & support, and finally logout
- Manage places as per step 5, you can choose different places where you use the thermostat
- Temperature scales have a choice of Degrees Celsius and Degrees Fahrenheit as you wish.
- The ambiance of the App has a choice of Dark mode and Light mode Connected network can change as per the location.
- Language Selection English & Arabic language is available.
In the device setting following operations and selections can be easily made according to user requirements
Mode selection- user can tab for three types of modes
- cooling mode
- Heating mode and
- ventilation mode.
Mode is displayed in the home screen below room temperature in home screen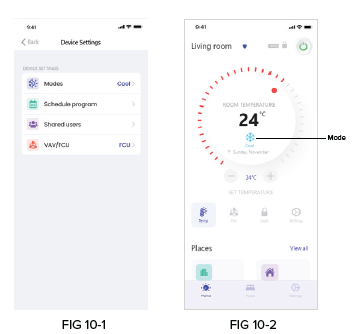
Scheduling Program 7 days 6 period
The user can schedule their program of operation throughout the week in 6-period of intervals. In Add New Taskbar user can set the temperature/Switch off by giving the task name, and selection Day, and Time by saving. Weekend device turn-off setting can be done in scheduled programming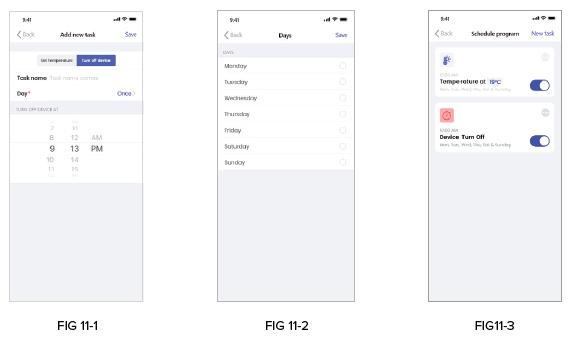
Shared users
The user can share the device with friends and family members by inputting a registered email ID and Can create a group. Select “Shared users” in the device setting. The sharing page will open Fig 12-1 Add the email ID of members who wants to share .you can share multiple users for accessing the thermostat.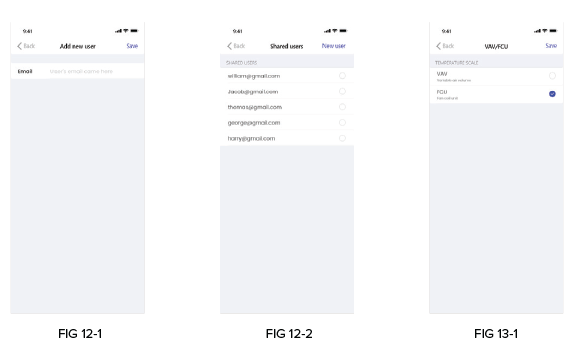
VAV/FCU
Air-conditioning types VAV(Variable Air volume) and FCU (Fan coil unit) can be selected on the device setting. If you select VAV all the fan keys in the app will be muted as VAV does not have Fan controls in the system. Whereas for FCU all key will be operational
WIRING DIAGRAM
TERMINAL POWER BOX
*wiring is subject to change without notice based on addons
NOTE:
- The thermostat is high voltage input, please do the wiring with the technician.
- If the thermostat was burned by accident, please do not wire it again by yourself, try to check it with a professional technician or contact with our manufacturer
DIMENSION
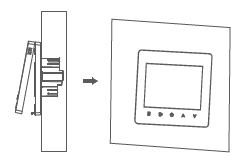
INSTALLATION AND COMMISSIONING
- To take the front panel and back plate apart by a screwdriver
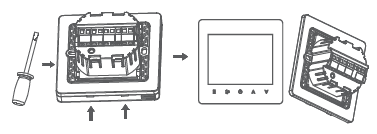
- Wiring on the terminals of the back plate according to the above wiring diagram, then fix the back plate on the junction box by screw driver

- Recombine the front panel and back plate by contract pins
Troubleshooting
| IF… | THEN… |
|
Heating system does not turn on |
Set the mode to Heat by pressing the Mode button. Wait five minutes for the heating system to respond. |
|
Cooling system does not turn on |
Set the mode to Cool by pressing the Mode button. Wait five minutes for the cooling system to respond. |
|
The fan does n’t work |
Ao : Auto Onlyconsectetuer Co : Constant Only
bo : Both(Default) adipiscing elit, |
|
The Mode button does not work |
Check whether the Fan mode is set to Auto
Check whether the heating or cooling system works well. Check whether the keypad is loc ked out (ISU mode item 4) |
|
The Fan button does not work |
Check whether the system is working in energy saving mode. Check whether the thermostat is off.
Check whether the key pad is locked out (ISU mode item 4) |
|
The Up or Down button does not work |
Check whether the system is working in energy saving mode. Check whether the thermostat is off.
Check whether the keypad is locked out (ISU mode item 4) |
REFERENCE:
DOWNLOAD MANUALS:
TRUEWAY TX1000 Touch Screen Thermostat OPERATION INSTRUCTION
![]()
TRUEWAY TX1000 Touch Screen Thermostat OPERATION INSTRUCTION
Leave a Reply